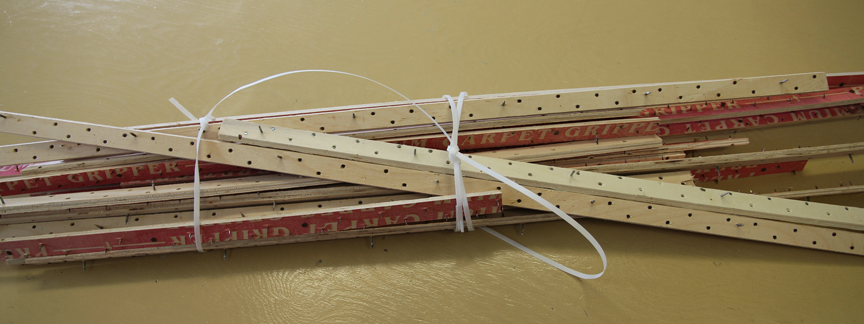
One of the most frequently asked questions is "How do I hang my rugs?". There are many different ways to proceed but the easiest way is to slap up a carpet tack strip that will hold the rug securely but still be easy to take off to shake out the dust or for a quick show and tell. Every rug in the shop is hung with the strips. They come with a series of upturned short nails on the front side that grab the rug and hold it in place and longer nails on the backside that go into the wall.
These strips are made for pulling a carpet to the outer edge of the room to hold it from shifting. The sharp little nails are quite deadly if not handled carefully but despite the odd ouch, I haven't found an easier way and easy for me means no needle and thread.
If you have old plaster walls the nails will probably not grip and will loosen quickly so take out the mounting nails by pounding them through and replace them with long screws that will reach the lathes behind the plaster and hold tight, you might even have to use wall anchors. Modern sheet rock walls are not a problem and should hold firmly with the nails, just make sure you find a strip that isn't warped so it sits flat on the wall.
If your rug is larger and therefor more heavy, you will need to attach two tack strips to support the weight and keep it flat to the wall. One along the top and the middle should be all you need to do the job. Position the rug on the strips so that it goes into the back hooked area, not the whipping or the rug binding. The nails will poke holes in the rug binding, not so attractive and will grip and hold the back of the hooked area much better. This is the easiest way I've found and when we had our 2012 gallery show I purchased a large box of these strips so if you need one drop in and see me for a freebie.
There are of course other ways to hang a rug and if you like to sew, get out a needle, thread and buy extra rug binding at your favourite rug hooking store and follow one of the methods below.
Rod Method #1 - Make loops with a coordinating colour of rug binding (probably what was used on the back to finish the rug) and sew them along the top of the rug attaching them to the back just below the area where you whipped and directly on the rug binding used to finish off the rug. Sew through the finishing binding to grab parts of the back of the rug for stability. The height of the these rod loops will be personal preference. Then buy an attractive curtain rod, slip through the loops and hang. Place the rod loops every two or three inches so there isn't any drag on the rug causing it to hang unevenly. The rod loops will show at the top of the rug from the front and add to the overall appeal of the display. Hang the rod on the brackets that came with the set.
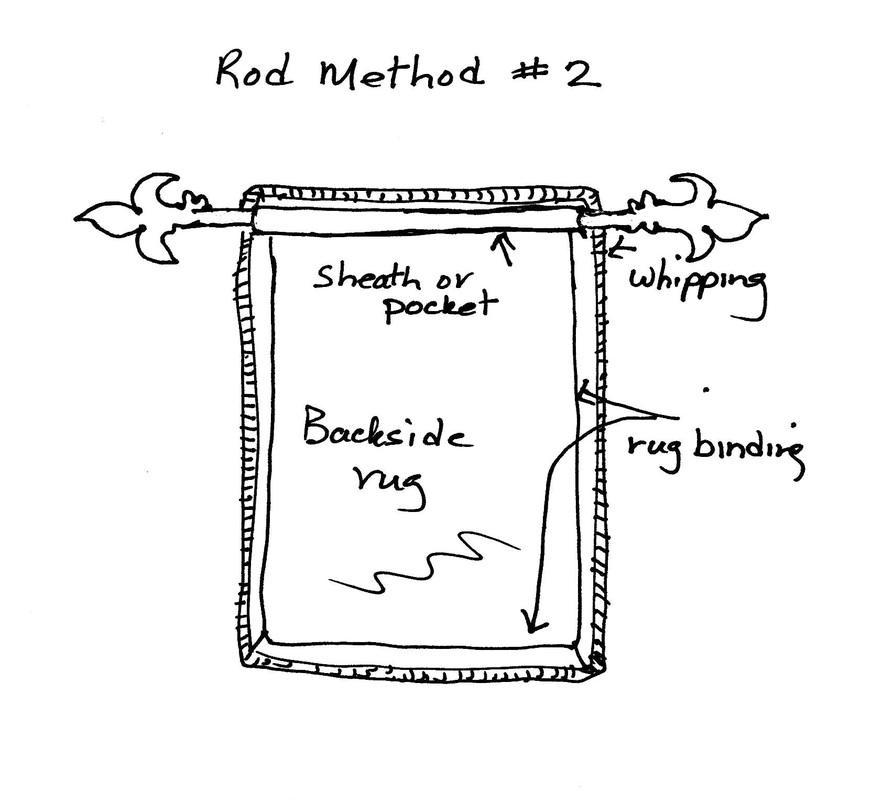
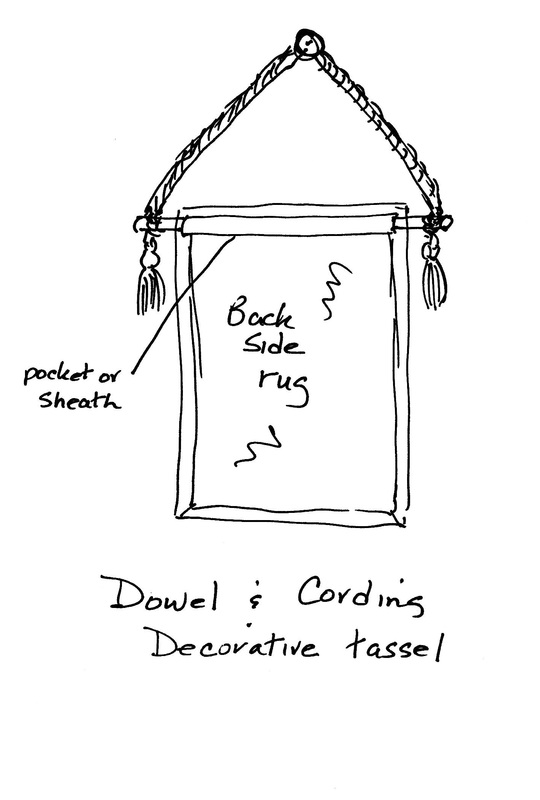
Rod Method #2 - Then of course there is the sheath or pocket way to hang a rug. Sew an extra length of rug binding along the top directly over the rug binding sewn on to cover the edge of your backing. Hand stitch across the top and bottom of the binding, leaving both ends open so you can slide a small dowel or curtain rod through the pocket. Hang the rod on the brackets that come with the set.
Dowel & Cording Method - Do the same as in Rod Method #2 and slip a dowel or rod through the sheath and tie a decorative cording on either end and hang with a fancy knob. You can tie tassels on either end for a classy look.
Note: Consider the rug's weight. You might have to reinforce the center with extra rug binding by sewing several strips along its length from the top to bottom every three or four inches.
These strips are made for pulling a carpet to the outer edge of the room to hold it from shifting. The sharp little nails are quite deadly if not handled carefully but despite the odd ouch, I haven't found an easier way and easy for me means no needle and thread.
If you have old plaster walls the nails will probably not grip and will loosen quickly so take out the mounting nails by pounding them through and replace them with long screws that will reach the lathes behind the plaster and hold tight, you might even have to use wall anchors. Modern sheet rock walls are not a problem and should hold firmly with the nails, just make sure you find a strip that isn't warped so it sits flat on the wall.
If your rug is larger and therefor more heavy, you will need to attach two tack strips to support the weight and keep it flat to the wall. One along the top and the middle should be all you need to do the job. Position the rug on the strips so that it goes into the back hooked area, not the whipping or the rug binding. The nails will poke holes in the rug binding, not so attractive and will grip and hold the back of the hooked area much better. This is the easiest way I've found and when we had our 2012 gallery show I purchased a large box of these strips so if you need one drop in and see me for a freebie.
There are of course other ways to hang a rug and if you like to sew, get out a needle, thread and buy extra rug binding at your favourite rug hooking store and follow one of the methods below.
Rod Method #1 - Make loops with a coordinating colour of rug binding (probably what was used on the back to finish the rug) and sew them along the top of the rug attaching them to the back just below the area where you whipped and directly on the rug binding used to finish off the rug. Sew through the finishing binding to grab parts of the back of the rug for stability. The height of the these rod loops will be personal preference. Then buy an attractive curtain rod, slip through the loops and hang. Place the rod loops every two or three inches so there isn't any drag on the rug causing it to hang unevenly. The rod loops will show at the top of the rug from the front and add to the overall appeal of the display. Hang the rod on the brackets that came with the set.
Rod Method #2 - Then of course there is the sheath or pocket way to hang a rug. Sew an extra length of rug binding along the top directly over the rug binding sewn on to cover the edge of your backing. Hand stitch across the top and bottom of the binding, leaving both ends open so you can slide a small dowel or curtain rod through the pocket. Hang the rod on the brackets that come with the set.
Dowel & Cording Method - Do the same as in Rod Method #2 and slip a dowel or rod through the sheath and tie a decorative cording on either end and hang with a fancy knob. You can tie tassels on either end for a classy look.
Note: Consider the rug's weight. You might have to reinforce the center with extra rug binding by sewing several strips along its length from the top to bottom every three or four inches.
 |  |
Note Round rugs: Of course round rugs need to be handled a bit differently when hanging them with carpet tack strips. You will need to use two or more more strips, the widest in the middle and shorter pieces tapered in size toward the top of the rug to ensure there won't be any flopping. For any size or shape, a bit of tape will help hold any parts of the rug that don't fit right to the wall.


 RSS Feed