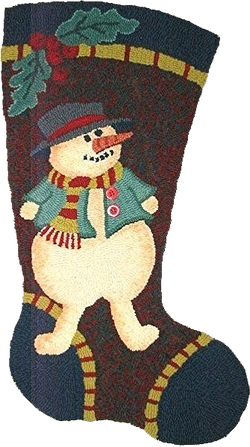
When finished hooking the stocking, steam press by placing it face down on the ironing board, cover with a wet towel and steamwith your iron. Press firmly all over the stocking, until the sizzling stops. This will flatten the piece and make it nice and pliable to work with. Hang to dry over a wide railing or lay flat as not to leave a crease.
When dry, sew a zig-zag stitch all around the outside of the piece about 1 ¼” from the finished edge. I actually sew it twice to ensure that the backing doesn’t fray when I cut out the rug. Cut outside the sewn edge.
Fold the raw edge of the backing over, pulling it snug so there isn't a lot showing along the edge of the stocking and tack it down with a loose stitch to the backside of the stocking. You will have to overlap a few folds when going around the outside curves of the pattern and snip the inside curves so it folds better (inside curves meaning where the ankle part would be in a real stocking). Once it is all sewn, steam it once again with the wet towel. (Sewing
will cause small bulges that will need to be pressed out). Let it dry once again.
Using the finished piece as a pattern, cut out material for the backing an inch or so larger than the actual size of the stocking and the top maybe two inches for tuning under. I use recycled plaid shirts or skirts in Christmas colours….a piece of velvet would be lovely too.
If you wish to line the stocking cut two pieces of material leaving the top longer for turning under. Put the right sides of the material together and use a machine to sew it the actual width of the stocking. Turn it right side out and fold under the top raw edges and then fold it again like
making a hem for curtains and hand sew or machine it in place. (You can slide in a piece of plastic from an ice cream container or box board in the fold to firm up this edge so it is more rigid.) The top of the backing side will be more reinforced this way when you sew on the hanging tab. Once the stocking is filled with goodies it won't pull as much on the material.
Now hand stitch the entire backing to the sock starting at one side and working your way around to the other side. Leave the top opened of course. Now sew the lining side to the
top side of the stocking. When sewing the backing to the stocking make sure that you are right up against the last row of hooking all along the edge so no backing will show when finished but
if it shows in places you can take a marker that blends with the colours of the stocking and just make a few swipes to hide the backing colour.
Make a tab for hanging and wait for Santa to fill! Christine Little
Note: Another simple way to attach the backing to a stocking is to cut out two backings, hand stitch it loosely to the backside of the hooked piece and then whip them together. Now sew the top lining side to the top backside of the stocking and put on a tab.


 RSS Feed


