Encompassing Designs
  • Home
  • Shop
    • Kits
    • Patterns >
      • Christine Little >
        • Signature Designs
        • New Designs
        • Seasonal Designs
      • Deborah Sweet
      • Susan Leslie
      • Patricia Perry
      • William Morris
    • Supplies >
      • Backings
      • Frames
      • Hooks
      • Books
      • Extra
    • Wool >
      • Abrashed
      • Custom Dyeing
      • Dyed Bundles
      • Dyed Curly Mohair
      • Dyed Spots
      • Dyed Values
      • Dyed Yarn
      • Jacquard Dice Dyes
      • Natural & Colours
      • Plaids & Textures
      • Dye Books & Swatches
  • Ordering
  • Blog
  • Workshops
  • Our Story
  • Contact Us

Cutting corners....literally!

8/26/2015

4 Comments

 
Picture
They say, give a job to a lazy man and he’ll find a way to do it faster.  I like to think I’m doing things smarter because I’m clever, not that I’m impatient, in a hurry and want it done yesterday.

I dislike sewing so any time I can avoid using a needle and thread I’m all for it.  When I first started rug hooking I followed the leader and pre-stitched the raw edge of the backing to the back of the rug if it was a small piece or else I whipped the more sizable pieces for the floor.  Then the dreaded rug binding had to be stitched on, not by machine but by old fashioned handwork.   If you look at the underside of the rugs I’ve hooked on display at the shop you might be surprised to see how few have rug binding on them.  Sure I can fib and say I do it on purpose to use as a teaching tool but really, how many resources do I need….maybe I’m a tool….  

Sewing should be called hand torture not hand work or hand stitching.  I really get the stitch and bitch I hear plenty about....I do plenty.  Any time there’s a needle between my fingers I’m shedding blood.  I’m clumsy and dangerous with small sharp objects....I should be wearing safety goggles and steel toed boots! 

You’d think I’d be used to bloodletting, from all my experience with diabetic test strips.  There is a little plastic covered Ginsu knife that’s spring loaded, you place the tip of the case close to the finger and press the switch.  A little blade comes out at lightning speed and tears through your flesh like a bullet through the air.  Bing, bang, boom.  Instant cut, flowing blood, sample on the strip.   I’m well versed in this; doing it once a day for the past couple of years; you’d think there would be scar tissue a mile thick on the tips on the fingers of my right hand but there isn’t. It’s amazing how the body heals and begins again.  Sometimes I hit the same spot still a bit sore from the previous day and that’s a bit of an oucher but generally the only pain is the anticipation of when that little knife will hit. When I sew, I joke I should be testing my blood from the accidental injuries to avoid making the compulsory hole later on.  So there is blood on every rug I’ve ever finished and I say that makes them more valuable, signed with my DNA, how’s that for the ultimate, personal touch?

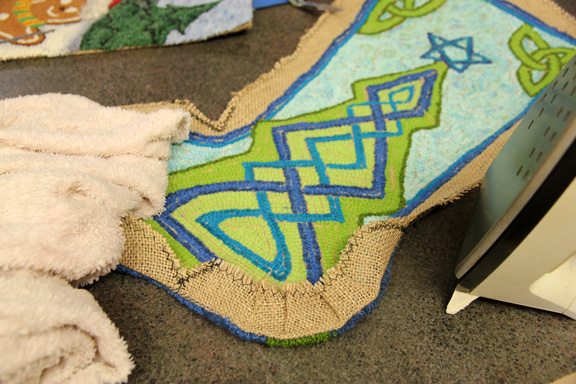
When sewing rug binding to cover the raw edge of the backing in lieu of whipping or when making something that needs a lining, such as a Christmas stocking, I’ve devised this little trick to cut out the hand sewing for step one.  There is still step two and possibly three that’s unavoidable but any shortcut is a plus with me.  Too much sewing and I'd be anemic!  This tip doesn’t require needle and thread.  All you need is a dampened towel, an iron and careful fingers so you don’t trade a prick for a burn. 

After I complete the hooking,  I machine stitch with a zig zag all around the finished sock about an inch and a quarter out.  Any time you have to cut out a round or oval project it needs to be secured or it will fray into a fringe and leave little to work with.  On a sock there are all kinds of curves and rounded areas.  The inside curved bits are more difficult to fold over so you have to cut a V in that area. 

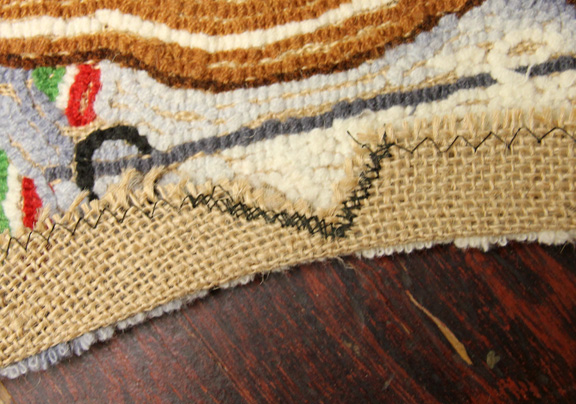
I zig zag as in the picture a wide V so I can cut down the center of it. I run it back and forth a couple of time to really secure the area and then make a snip down the center.  I get as close to the edge of the hooking as possible without compromising the last few pieces of the backing weave.  Then I pull it tightly to the back and put the damp towel over it and give it a good steaming so it is tight to the hooked edge and won’t move.  


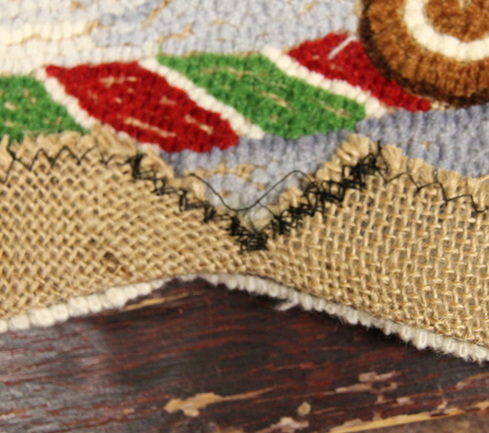
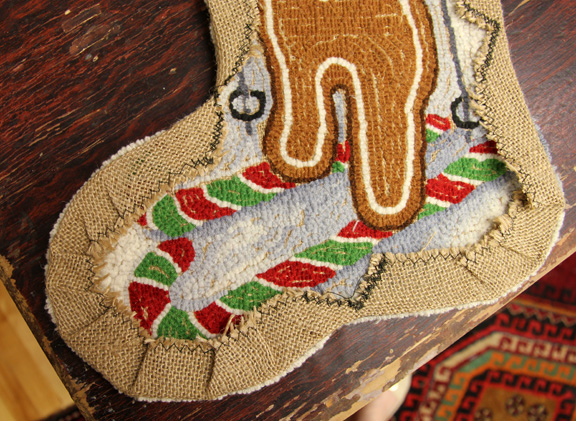
I then follow this process all around the sock, doing the V cuts when the design goes on an inside curve.  On an outside curve such as the heel and toe I overlap periodically to deal with the extra material and press it down for a smooth look edge.  Once the entire sock has been folded over and steamed it will stay in place when you sew on the backing piece of wool.   I find it rather bothersome to have to hold the backing in place while struggling with the needle that's only purpose seems to be maiming me.  And of course, I’m all for expediency and ease.   

You can make a pattern for the lining piece and the backing by positioning the finished front over a two pieces of coordinating wool fabric or velvet.  Cut them out an inch larger all around for turning under the raw edge.  You can iron the lining piece by folding the top edges over 1” to the backside and steam pressing them in place.  The fold will be inside against the raw edge of the backing (back sides together) so it doesn’t need to be finished.  Then pin in place and hand sew the lining piece to the back side of the stocking by a top or over sewing stitch close to the last row of hooking.     

When making a stocking this is one way to do the job.  I’m sure the sewers in the crowd could come up with more inventive ways to attach the backing but my uneducated sewing brain finds this the simplest way to do the job.  It looks good finished so I’m not too far off base.  After the piece of wool is sewn on this provides the lining to protect the backside of the loops from being snagged and pulled out by edges and points of toys that Santa will leave in the stocking after they’re hung with care.

Then you can prepare the backing piece and sew that to the prepared front.   This piece will need to have properly finished edges as it will show when looking into the stocking.  I would fold and press a 1/2” edge and then fold that again slightly less than 1/2” inch and sew this on the machine with a straight stitch to hold the hem.  Then it is just a matter of pinning this piece to the stocking and hand stitching all around the outside in a simple top stitch so that the very edge of the piece of material is pulled up closely to that last row of the hooking on the front piece.   You can sew a tab on while preparing the backing piece for hanging.   Also, if the material you used as a back side that isn’t great looking you can actually double it and sew it back to back, leaving a small area to turn it inside out, press and sew this to the stocking. 

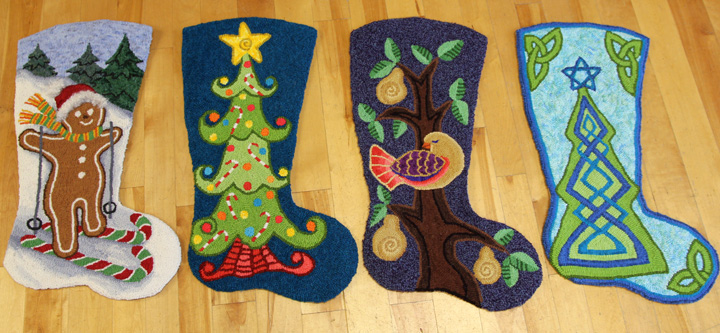
For these four pieces I plan to sew on a liner piece to hang them on the wall.  They will never be actual stockings and if sometime down the road I decide to sell them because I have too many to hang, or someone presents a good argument as to why I should let one go, whoever buys it can take it home and have the divine pleasure of doing a bit of hand-stitching. 
Picture
This is the inside curve where the stocking comes down and goes out to the toe.  This is the deepest curve and really needs to be cut and stretched to fit flat and not show on the front side.
Picture
This is a softer curve on the back edge of the stocking.  It doesn't needs such a dramatic cut to make the curve and lie flat. 
Picture
This is the curve under the foot of the stocking.  Also note how I've overlapped the outside round edges to handle the extra material and create a smooth curve.
Picture
Almost ready.  Hooked and then forgotten, dug out of storage and cut out and steam pressed with Step #1.   Feeling pretty good about the advancement.   We'll see about fitting the linings. 
Picture
Picture
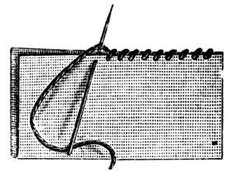
This is the top stitch I use to sew the backings to the hooked stocking.  I push my needle through as close to the outside hooked row as possible and then over the backing material ever so little just to catch and pull it to the loops.  It snugs up nice and tight so you don't see the edge of the folded over backing.  

4 Comments

How much wool do you need for a project?

8/24/2015

12 Comments

 
I’m a kid with a new toy and with all my boat talk lately I was starting to feel a bit disloyal to rug hooking!  A customer emailed to ask for help to measure one of our patterns to know how much wool was needed for the background and while replying I thought I would make a neat blog and fulfill the rug hooking quotient for a bit. 

When I’ve been in the shop all day and sometimes hooking at night, it seems the last thing I want to do is write about it.  Not that I don’t love rug hooking, it’s my number one passion but anyone with a shop will understand, all work and no play sort of thing.  So I generally like to write about my life and my experiences, sometimes they’re more interesting!   

Remember, when I write about rug hooking it’s from my perspective, my experience so this is only the way I measure wool for a project…therefore making it my way, not the highway. 

A regular occurrence is a rug hooker running out of wool before the project is complete.  This isn’t so bad if it’s a dyed piece and you’re either a home dyer or buy from a shop because there’s always more for the making, but if you’ve invested in plaid yardage and don’t hook at the speed of sound, when you go back to that shop with fingers and toes crossed for that extra piece you need to finish, it may no longer be a stock item or worse, no longer available from the manufacturer.

A lot of the plaids I purchase for resale are one-offs.  Once that lot is sold the manufacturers move on to other weaves and colours, constantly keeping us drooling for their fabulous wools.   Too many times I’ve heard grown women sniffle when they come back hoping to get that extra piece they fell short of and realize they’re foiled. Sometime, if we're lucky, I phone a friend who buys my wool, to raid her stash, enough to make the client smile, but other times I have to listen to tales of woe, of having to tear it all out and start all over with something else.

Sometimes it may seem like I’m trying to sell you more than you need but trust me, I don’t want a bad scene down the road.  For the sake of a few dollars more you should buy that extra piece of wool for peace of mind, sometimes it take years to complete a rug and wool waits for no hooker. Its experience talking when I tell you that the plaids come and go and I want you to be smiling to the very end of your project. 

And I know how you feel…..I’m no stranger to your pain! We’ve all been in that boat.  Like an addict looking for a discarded cigarette butt, I’ve actually gone through my trash looking for tails I’ve thrown out that might have a few loops left in them.  I’m also one of those people who don’t hook the torn edge piece.  I prefer the crisp cut from the machine on both sides of my strip, but in a pinch those ends are a sight for sore eyes.  Back in the day of my rug hooking beginnings, several times I’ve almost had to rethink how I’ll finish a project if not for the garbage coughing up enough strips to get me to the finish line.  I don't recommend this method.....it’s awfully stressful to finish a rug by the wiry hair of my chinny, chin, chin. 

Over time I’ve gained experience.  I’m no longer playing the guessing game or counting square inches.  For a few years hubby was helping me do it the mathematical way. He was meticulous figuring out the square inches.  He calculated all my kits for me and it was exact to the very last strip needed.  Then I would add a percentage more to cover breakage and higher loops.   That was great as long as he was available but there were times when it fell on me and I found counting the square inches tedious and boring. I’m a right brained person; using left brained ways are for the math geeks and birds. 

So I developed this neat trick where I mentally move all the motifs on the pattern to one end so I can figure out how much is needed for the background that remains.  I move one object at a time and fit it into a space between the motifs on one side and repeat this until all the bits are shifted. Then I lay material on the now pretend “empty” area to see how much is needed to cover.     I’m a visual person that would rather play this in my head than have to get out the ruler and do math. I wing it rather nicely with mental acuity and it hasn’t failed me.

If you can’t wrap your head around this trick, you’re stuck with the old fashioned, get out the ruler and measure the area you wish to cover.  Say it is 6” x 5”.  That’s 30 sq. inches.  Now multiply that x 4 for a total of 120 sq. inches.   You will need 120 square inches to cover that area.  If you have lots of little areas between motifs, you will need to measure each one and add their square inches all together for a final total. 

Generally when figuring out how much wool is needed you fold the wool into four layers, fold in half and then again.  Then you place that on the pattern in the area it's destined to determine how much area it will cover.  

There are those who prescribe to the theory that you need to pull your loops as high as they are wide.  I don’t and make jokes, whoever made this rule sold wool for a living because once you get to the #8 cut that’s almost a shag rug.  A lot will argue with me but think of this.  If you mix cuts, hook #4 for detail and #7 for background.  The loops would be different levels and the rug top would be uneven.  Also hooking the #7 higher would drain your wool and it’s a precious commodity, some would say equal to gold!  I hook every one of the strip widths the same height and maybe a bit of on the lower side.  This helps to stretch my wool to the maximum, especially that exquisite piece I might only have a smidgen off. 

The general rule for coverability is if you have one square inch of area to hook, you need 4 square inches to cover that area.  area.  Standard is four times the amount but if you hook every hole (not skip like is necessary so your rug lies flat)  or hook your loops higher than necessary,  you would need to add more.  This four times rule is for normal hooking, a reasonable sized loop height and skipping holes to keep from crushing the loops together like sardines in a can. 

A loop should be flat across the top at all times.  For healthy loops, each one should have its own space to breath.  Imagine that you are a  loops at a rock concert and there is standing room only. The producers of the show are greedy and let in way more people than the stadium holds so the area becomes overcrowded and you are being smashed up against all the loops around you.  With so much pressure from all ends, you begin to fold in a V.  So go back to being a person and imagine how you would feel in a crowd with your shoulders jammed up against people flanking you, pressing you to the point where you become round shouldered. Not a great feeling.  Well pity your poor loops! 

They need their own space and should have a bit of play to shift and move.  Once you are stepping on that beautiful rug, the loops need to move so it doesn’t put unnecessary pressure on the backing.  Rugs that are packed with wool tend to curl, one of the first indications you could skips more holes.  This happens because the loop is much larger than the piece in the back that’s pulled up tightly to the backing.  If they aren't all standing straight up, if they are pushing one another for space they start pushing against one another out to the edges of the rug for relief. Backings like burlap with a weaker fiber than linen, can be stressed under pressure when being walked on and over time it can snap the fibers.  If the loops can’t move to accept the pressure, then the backing will suffer the consequence.     

This is what I do.  For the #3, #4, #5 and #6 cuts I hook 2 holes and then skip 1 hole when hooking in a line.   Same with the rows. I’ll do 2 rows side by side and then skip 1 row.  The holes in linen and burlap are not perfectly even so sometimes it’s a judgement call on when to skip.  If you see a hole a bit larger coming up that was supposed to be a hole to skip, then hook three in a row and skip the next one.  Skipping a larger hole might create a gap on the top of your loops, and seeing backing through the loops on top of your rug is a big no no.  Whereas if when you look at the underside and not see lots of backing, that’s an indication you packed too many holes and rows with wool.  The more backing you see in the back means your beautiful rug will lay nice and flat and can take the pressure of being walked on.   

For the larger cuts, #7 and #8, I hook 1 hole and then skip 1 hole.  As for the rows, I may hook a row and skip 2 rows.  I judge the width of the loop and that is an indication on how many rows to skip.    If you hook it too close and see that the loop is bunching or turning on an angle because it doesn’t have any space to stand unhindered, pull it out and go to the next row.  There is no shame in trial and error.  Lots of times I will put a loop in to see if it will be too close or too far away and then make the proper adjustment.  

Personally I’ve never been able to figure out why the need to have more wool for wider cuts. Some say have up to 8 times the amount of wool for a #8 cut.  I’m not sure of the concept when you are covering the same area and should be adjusting your hooking to accept the width of the strip by skipping more holes and rows.  With a #8 cut I will skip several rows between them to accommodate the 1/4” width of the loop.  I never cram my loops, I let them spread out naturally. I’m covering the same surface area that I would do for a #4 cut that is half the width of a #8 strip. Theoretically they should both fill the same space equally? 

So here is my experiment.  I’ll take the same size of two pieces of wool and cut one in a #4 and the other in a #8.  Then I will hook an area to see if I get the same coverability.  The truth will be in the pudding.  Of course this is my pudding, I’m not saying what others do is wrong, I’m just a curious mind and need to know things.  Be right back!


Picture
Picture
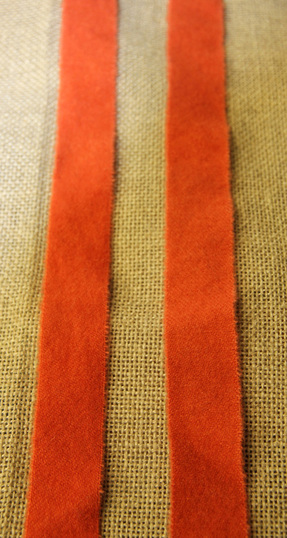
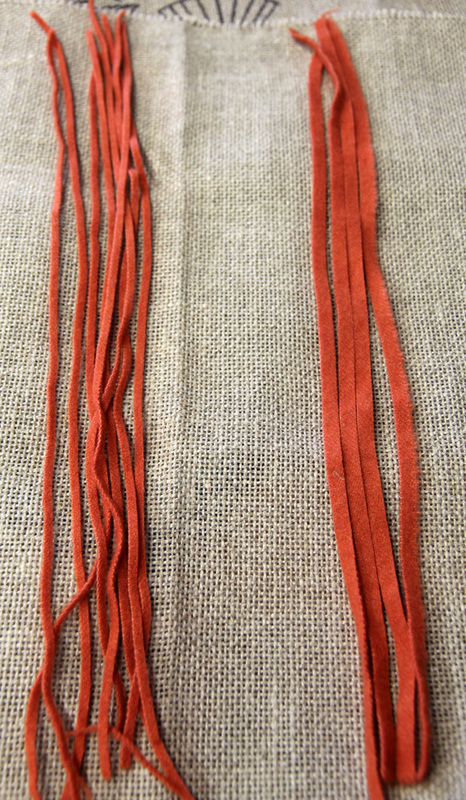
So I tore a piece of wool into two strips the same width and processed one side through the #4 blade for 1/8” wide strips that produced 8 pieces and then cut the second bit of wool with a #8 cut that produced ¼” wide strips and there were 4 of them.

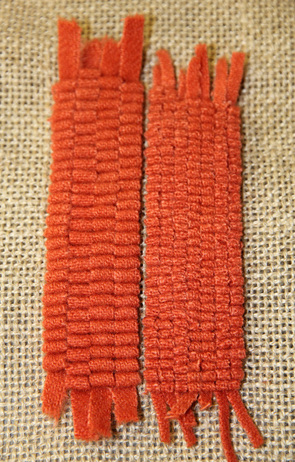
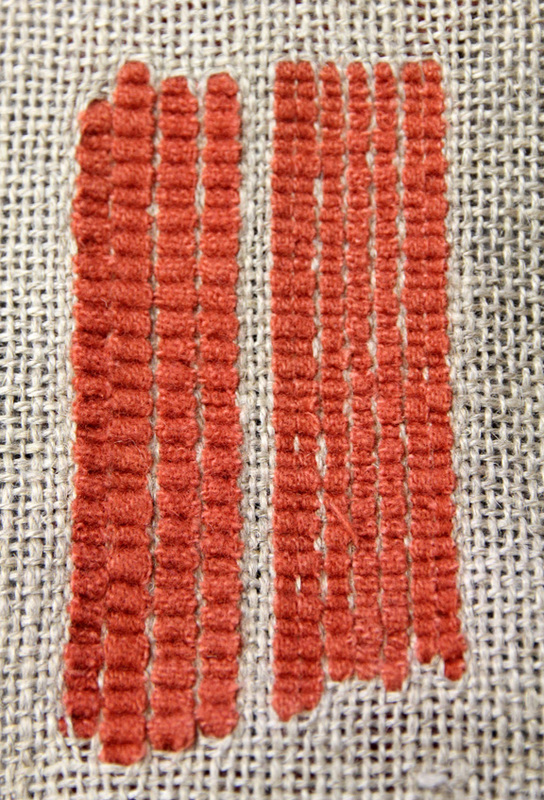
Then I hooked each set.  I’m skipping holes with the #8 cut, I hooked one hole and then skipped the next, and sometimes I even skipped two holes if the weave was tighter together.  I skipped rows between each line of loops, I calculated the amount of rows I could miss without showing a gap between them and that way my loop stayed straight across and didn’t get crunched.  You can see in the picture that my loops are of good structure, none are mashed together and they have a healthy fullness.  Packing, squeezing the loops into every hole makes them wafer thin across the top requiring way more wool to fill in the space.  

Then I hooked the #4 strips.  I hooked 2 holes and then skipped a third.  For rows I hooked two together and then skipped the next row.  Repeated that process over and over.

To me the finished comparison is very close in width and length.  There is not enough difference to warrant needing 6 - 8 times more wool to hook the area with a #8 cut.  My loops, as I mentioned earlier are hooked the same height for both cuts.  This way you can mix cuts in a rug, especially using up worms from previous projects and still keep the surface of your mat flat and even.  Anyway, that's the way I roll.....


Picture
Picture
12 Comments

The Life of I

8/20/2015

2 Comments

 
Picture
 
Today’s tale is about an infected anal gland.  No not mine.....my little furry kid Fiz.  Don’t read if you are offended by rectal inferences.    

It’s been quite the day.  It began yesterday evening, twenty minutes before our Wednesday evening hook-in when I noticed Fiz, my little red poodle dragging her little butt across the graveled driveway with a degree of urgency not seen before.  There is the occasional willnot that refuses to drop and she’s done this to extricate herself from it, although that usually works against the intent, so it’s not a rare thing to see but there wasn’t something about this action that reeked of desperation.  


I could see blood as I ran to her side.    

I scooped her up in my arms and rushed to the house with the other three racing behind me to see what all the hoopla was about. 

I got her inside and lifted her tail to find a bulbous lump, the size of a large grape below her anus and it was oozing what appeared to be a bloody, liquid liver.  I didn’t have a clue what this was and not knowing made it scarier.  Between all six dogs I’ve had, not one of them have ever had this problem.  The first thing that popped into my head was the anal gland but I thought they were inside the anus, not below it.  Their diet is such that it’s always been a natural illumination so I've not had to educate myself about the workings of this area and what I do know you could store in the eye of a needle.   

There was a large hole in the center of the orb where it ruptured.  I’ve seen abscesses, Honey had one once, and instinct told me to drain it so I applied a bit of pressure.  It didn’t take much and it oozed more of the same semi-solid and liquid gunk.  I was baffled. It didn’t have any smell and one would assume something called anal juice would have an odor.  


I did know that it was something that needed to drain so I got out the Epsom salts and warm water to make a quick poultice to draw out the infection or whatever it was and realized I had to get to the shop to open for the hook-in so I wrapped up Fiz and I left the other three pups wondering what the heck was going on and headed for the shop. 

I called for Shane’s fiancé Ashley to come down and see Fiz.   She’s a dog groomer with two pups of her own and I knew she’d know more about this than me because I was clueless.  One look and she called it; an infected anal gland.  Her little girl Sadie had this very problem a few months back. 

It was an education for me.  I thought anal glands were inside but apparently when they become inflamed they show on the outside around the anus which is good because draining externally is a whole lot better than draining inside the rectum which would lead to serious infections.  I felt a bit relieved and knew she’d be okay for the night but planned to make an appointment the next morning for a check up.     

Her bottom continued to bleed throughout the evening.  Not a gush but a slow steady leak.  I rinsed her again at the shop with warm Epsom Salts water and several times before bed.   She’s a good little patient and there wasn’t a sound out of her.  She crawled into Charlene’s hooking bag, maybe needing a place to cocoon and she left a tiny reddish stain on a piece of wool but Charlene wasn’t concerned and dropped this interesting tidbit.  Apparently Hydrogen Peroxide removes blood so I dabbed a soaked cotton ball on a stain on my shirt and sure enough the blood disappeared like magic. 

I kept a close eye on Fiz throughout the night and by morning her back end had stopped draining.  My lips on her ear told me she didn’t have a fever.  I handle them a lot and I can tell when there is a temperature change immediately.  When she was at the vet’s they put a thermometer in her back end and I assured them she didn’t have a fever and I was right.  No fever usually means the lack of infection but they gave her some pain meds and an antibiotic in case things go south.  I hate giving a dog antibiotics when there might not be any need but what do you do? 

My fur kids aren’t forgotten, floor dogs.  They are on my lap and being caressed and explored for ticks and bumps several times a day.  Each one gets a massage on their belly, legs, back, head and ears any time they jump on my lap.  They moan when I do it so I know my efforts are appreciated.  Sometimes I think it might be nice to have that done to me but none of them seem interested.  My eyes and hands are constantly on them so I’m surprised I missed this swelling ball of puss. Hopefully it was an isolated incident, a bit of fecal matter probably got in there and caused an uproar.   Obviously the week was rolling by too smoothly so something had to happen to shake it up. 

So Fiz is resting after a rather annoying day of being pricked and probed.  A shot for pain and the vets finger in her bottom told us she was only swelling on the outside and only one gland was affected so she’ll recovered nicely.   The Dr. also told me to do warm aqua cleanses with Epsom Salts so we were on the right course.  Already the swelling has subsided and the hole is scabbing over.  Her body will reabsorb whatever is left and it’ll be forgotten in a few days.  Just another day in The Life of I. 

I was going to take a picture of Fiz but she gave me a look that said, “Gee mom, do you really have to put my picture all over Facebook?  It’s embarrassing!   So this is a darling photo of her as a puppy.  Small enough to fit in a pee pot.  We can't never say "we don't a pot to Fiz in".  


Picture
2 Comments

Coming & Going

8/19/2015

4 Comments

 
Picture
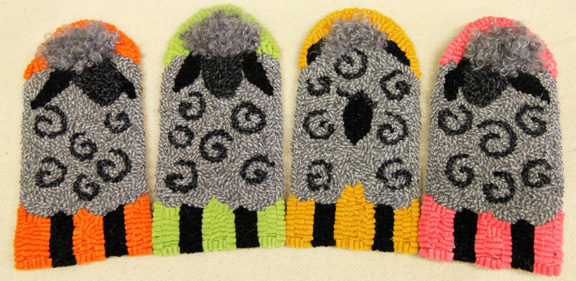
Today’s blog is short and sweet.  Although I’ve been distracted by boat stuff I managed to do a bit of hooking as well.  A client asked me to design little sheep ornaments in keeping with the Santa ones we have.  This is what I came up with and they were so cute I decided to hook them.

There is one sheep facing left, one right, one staring center on and one with its back turned, there's always one in every crowd, the black sheep of the grouping.  Called “Coming & Going”  I first hooked them with a Christmas feel using red plaid backgrounds but then pulled it all out and decided to have a bit of fun so they are more for year round enjoyment.  I think the citrus wool representing Orange, Lime, Lemon and Grapefruit is yummy and that snap of colour really pops the grey and black but they would be equally lovely with a primitive look or reds and greens for festive appeal. 

I hooked the bodies of the sheep in our light grey herringbone, the swirls and faces in the black herringbone and the legs and ears in solid black.   The swirls are cut in #5 and the rest in is a #7. 

We sell the set of four on linen for $34.95 and if you order them I’ll throw in a free bag of curly mohair for their heads.  It can either be a bag of natural or dyed grey like I used, your choice, let us know when you place the order.    


4 Comments

I hope my hubby appreciates the woMAN he married!

8/18/2015

1 Comment

 
Picture
Picture
Sunday I rowed out to our boat all by myself.  This was only my fourth time using oars, three of which were with hubby for practice.  A few short weeks ago, being on my own, bobbing up and down like a cork in a bathtub, in charge of a large rubber dingy would have scared the crap out of me.

The hardest part was getting the Zodiac to the water's edge.  That thing weighs more than I can handle so it was a drag, literally.  Once in the water of course it's weightless, too bad the tide was out making the trip down the long span of shore an arduous workout. 


I made it to the boat under my own power, albeit rather clumsily as I’m stronger in my left arm and would have kept going in circles if not for a lot of correcting.  But it was still on my own and that’s a big gold star for me! Rowing is a synchronized art that looks easier than it is and takes time to get the rhythm.  So it wasn't the most graceful attempt but I managed to reach the boat and tie off the dingy and board without mishap.   

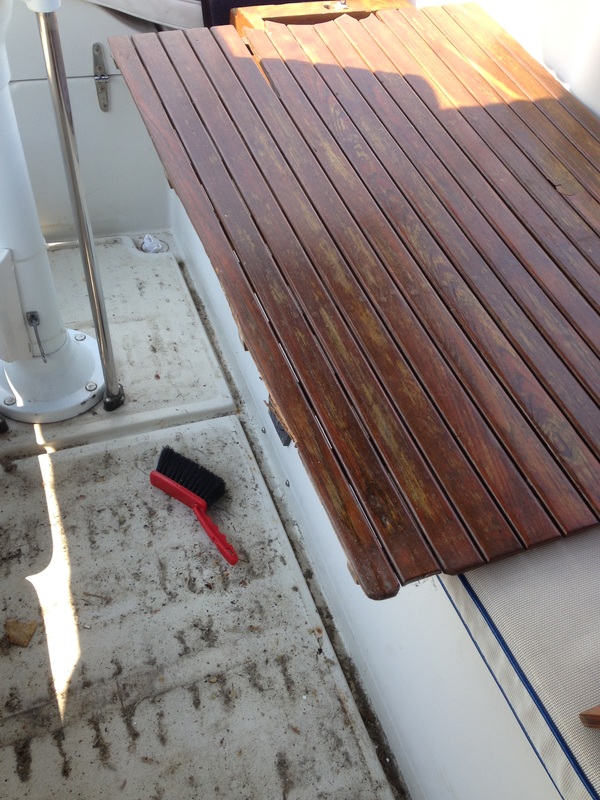
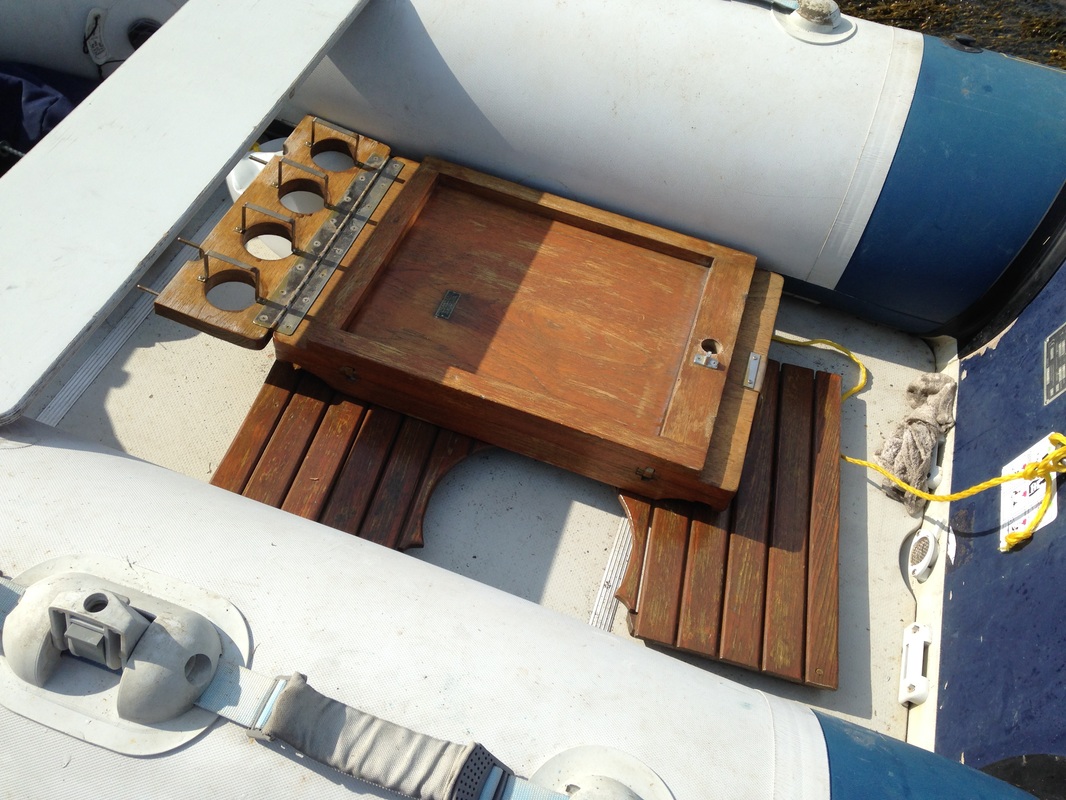
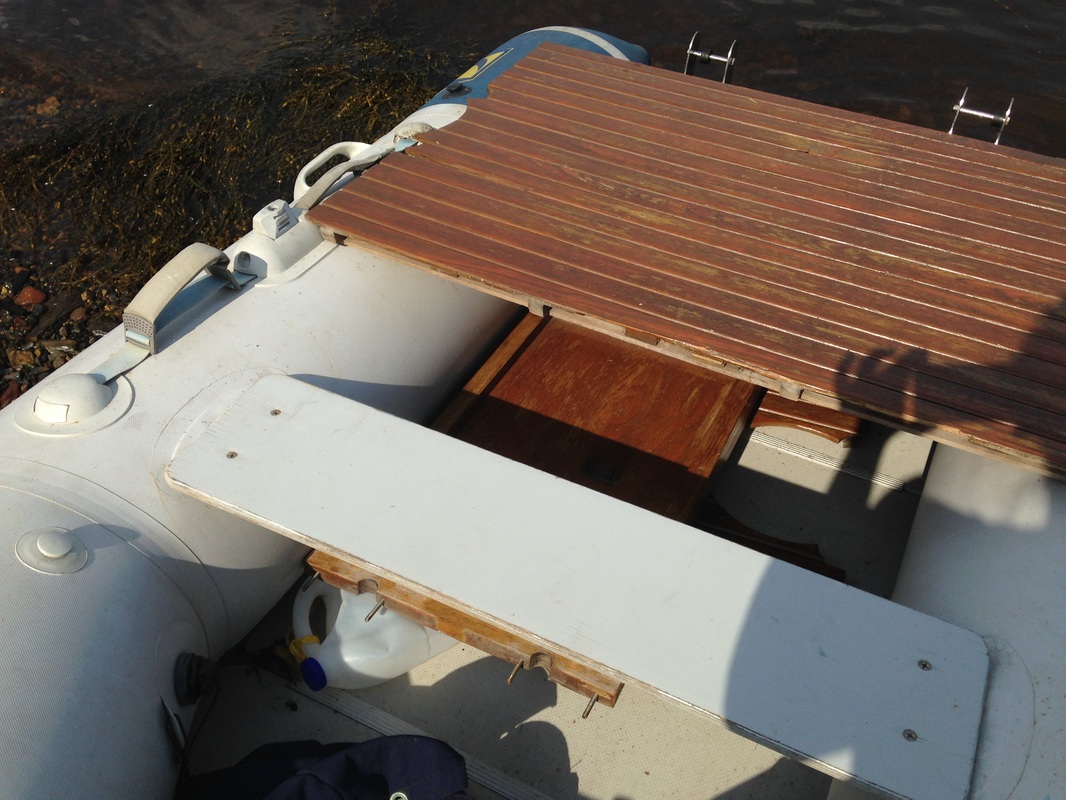
My goal was to bring home the teak cockpit floor boards and the folding table that hangs from the binnacle.  They are in desperate need of refinishing; once again the badly applied Cetol needs to go.  Thick orange goop and black mold doesn’t inspire me to put food on the table. I also wanted the swim ladder steps but that requires two people, one on the boat and one in the dingy so that will have to wait for a recruit. 

Of course as in any job, it didn’t work out as easily as planned.  The table needed a socket wrench to remove the bolts.  I’ve never used one so I had to construct the sequence needed to fit the size nut and also to downsize the part already on the tool, that square thingy on the socket end.  I had to fit two pieces together to get to the size I needed.  Then I discovered rather quickly, after several tries to loosen the bolts that were instead tightening on further, that there is a knob to turn for a clockwise or counter clockwise removal.   I figured it out and felt smugly satisfied although it would have nice to have someone witness this mastery.     

I loosened the four bolts and removed the table which was heavy as heck and awkward.  The topside needed a pick me up but the underside is absolutely terrible. The Cetol had dried on in massive drips all over the metal hinges and screws and the wood had little orange nipples where it hardened as it dripped.  I don't mean to condemn Cetol, applied properly I'm told it can be a beautiful finish, it's just not the experience I'm having.  it's like the first house hubby and I bought.  The previous owners painted latex paint over the oil paint without primer.  I spent weeks pulling off the soft water based paint like peeling a face mask as water and oil don't mix in liquids or paint applications.  

Then I looked down at the cockpit floor grates wondering what horror awaited me there.  If the dirt around the galley floor was any indication of what I might find I had to prepare myself for forensic cleaning.  I tell no lie, so much food and debris had fallen through the cracks in the teak flooring that it composted into soil.  I literally used a towel to shovel it up, rich, black dirt.    

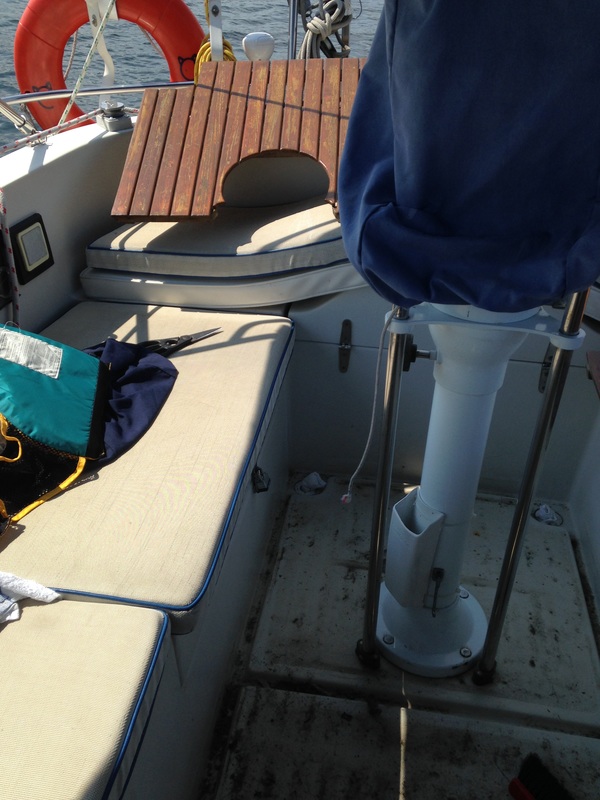
Of course the floor grate wouldn’t lift easily.  The small piece toward the stern with the circle cut out for the binnacle base came up smoothly, but the piece in front of the companionway was a tight fit and I had to remove the wench holders to get it up.   I was a struggle and I wiggled it back and forth and finally got it free.  It is apparent the fit doesn’t have to be so snug.  It needs to be trimmed about a ¼ of an inch on the length and another 1/4 on the sides for and easier installation when it’s refinished.  “Little Miss Fix It” thinks a piece of solid white plastic can be used as a spacer so it doesn’t slide back and forth when the boat heaves and it will make it easy to lift to do quick cleans every couple of weeks without having to dismantle everything around it.     

As I was lifting the grate, I was wondering what I would find.  My imagination soared. Maybe a diamond ring, some pocket change, Hoffa?   But only some broken glass and dirt looked up at me.  Actually it wasn’t as bad as I thought it would be, it was mostly loose dust, dry grime and small pebbles from the shore carried on board by our feet.  There were a few spots where something sticky had spilled, possibly beer or wine so there was a gooey clump but other than that it was manageable. 

First I plugged the scupper holes with pieces of facecloth so all the dirt wouldn’t go down the drains and plug them and then swept up all the loose debris.  Then I hit it with Spray 9, a deck brush and elbow grease.  I had expected to see more Cetol spray and I was right but it was hidden and not noticeable through the grate and could be removed another time. The day was hotter than Hades and my face was as red as a lobster, with a loud, drumming heart beat playing in my head, there was only so much down on my knees, hard labour I could do without having a heat stroke.  That job would have to wait for another day.  I drank lots of water but sweated it out so fast I felt like a garden hose with a thousand tiny holes in it.     

So I loaded all the pieces into the tender with a bit of a heave ho over the side.  Not easy due to the size, weight and awkwardness of the pieces, but I managed without incident. It’s amazing how independent and strong I can be when there isn’t a man around to bail me out.  That day I had the big girl panties hauled up to my chin!  I hope hubby isn’t reading this.....I play a rather practiced damsel in distress when he’s around...... 

The pieces sprawled over two thirds of the boat including the seat, so I had to crawl down into the dingy and re-position them so I could sit to row home. At one point I couldn’t hold onto the boat as the dingy was riding the wake of all the boats buzzing by so I held the tether in my teeth to keep from drifting away.  You’d think my chompers would’ve  ripped out but it’s amazing how little strength is needed to keep the dingy with the boat.  It’s like a gentle dance.  The dingy may float away but will come back if you wait a few seconds. She generally hangs close by, riding the same wave as the boat, like a baby whale at a mother’s side.  No need to panic at any time, just wait a bit.      

The row to the shore was a bit rough, with four two inch long bolts digging into my thighs from the cockpit table and the largest of the floor boards hindered my reach while rowing.  There was barely room to maneuver the oars and I was all over the place, going left, then right, once even back to the boat.  There were a lot of people on their boats, sitting on their moorings, if anyone was watching they probably thought “what’s that crazy woman doing, is she going to shore or heading to town?”  It was choppy from all the wakes, flipping the bow up and down, splashing me as it smacked the water.  I applauded the wet on my face, my shirt and shorts were sweat soaked and sticking to me like a second skin and greatly appreciated the cool water.  When I got to shore, I waded out up to my thighs to cool my legs hoping the rest of me would follow.  It would take an hour for my face to cool down, the heartbeat in my ears to go away and return to my normal pasty pallor.   It was a stinking hot day!

I’m pretty proud of myself.  Doing heavy labour and gittin’r dun.  Pushing my body, using muscles I don’t normal work.  I’m going to have a couple of mean biceps by the time I’m finished all this refinishing and then I’ll be primed for pulling on ropes when we sail.  I feel stronger and my blood sugar scores are fabulous.  I’m proud that I’m doing something good for my physical self instead of wearing out the sofa with my feet up on the coffee table.  I’m sleeping a heck of a lot better too!            

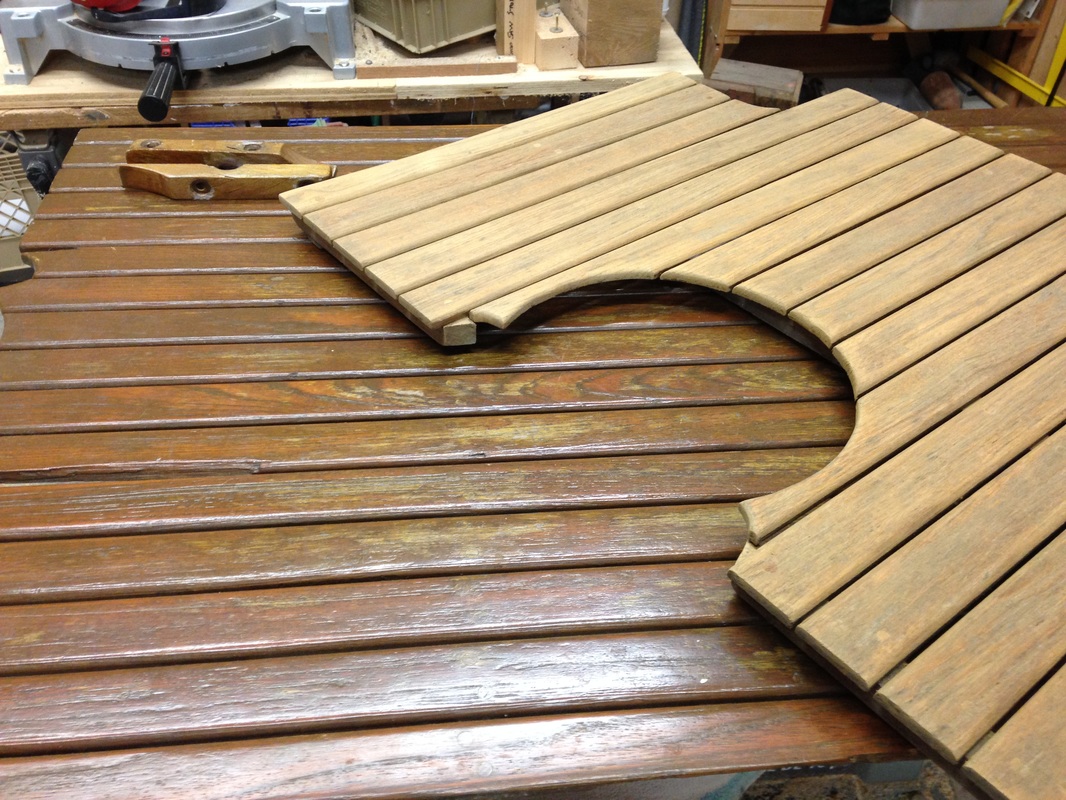
I’ve often joked that any job that breaks a fingernail is a man’s job.  I don’t have many left as they are rubbed down to nubs so there won't be much to polish for my son's wedding in a few weeks. Hubby is away at the moment and not able to help but I can’t let that stop me; I have a goal. I want all the pieces stripped and ready for him to put back on the boat when he gets home.  That’s a lot of stripping, sanding, brightening, two coats of sealer and eight coats of finish with wet sanding in between.  Is it all doable?  I’ll do my best!  
Picture
Picture
Picture
Picture
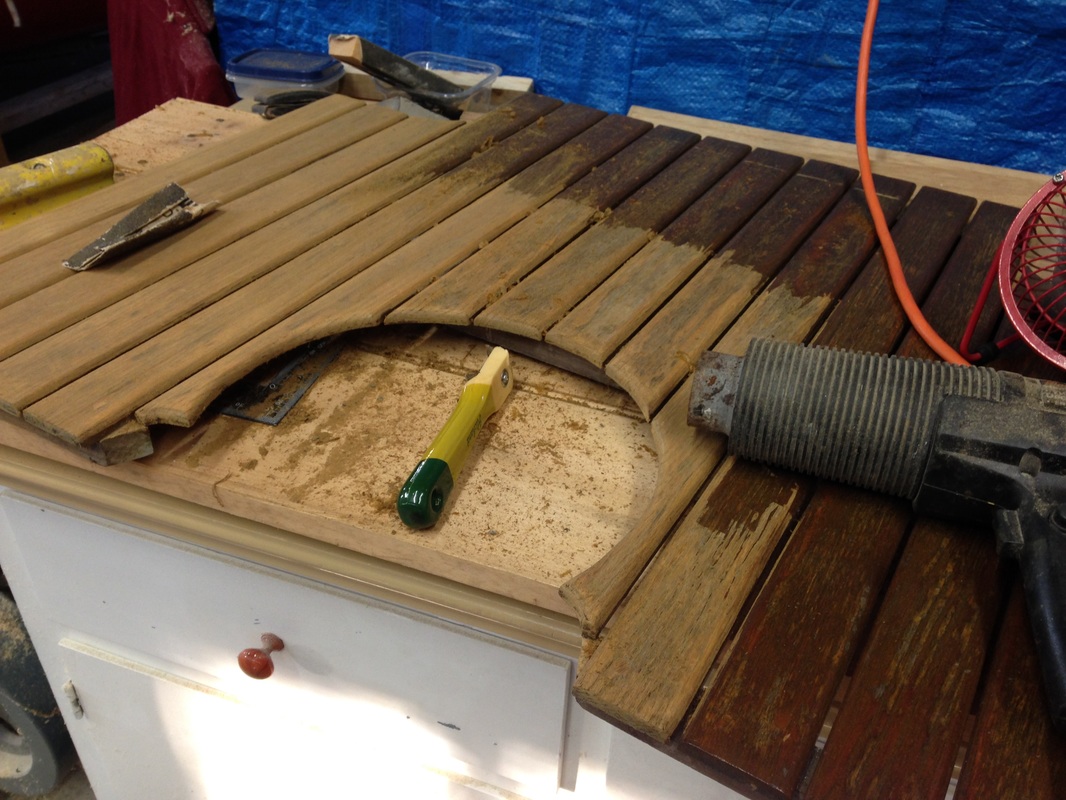
I've been reading on the internet about all the different steps. Once the teak is stripped of the old varnish there is a lot of sanding and then a chemical process that brightens the wood, taking out all the black, moldy areas.  If you skip this step, the black can continue to grow under the new varnish and all the hard work will have been in vain.   I'm going to do all the stripping and sanding first and then do the brightening all at once and all the varnishing and in-between wet sanding last.   
1 Comment

Fruit flies, small but annoyingly big!

8/17/2015

3 Comments

 
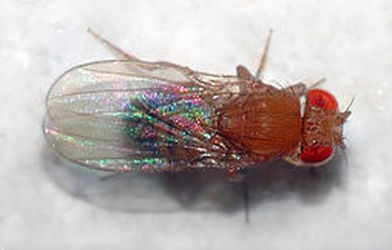
PictureMagnified, the fruit fly is beautiful!
I spent a good deal of last evening and this morning vacuuming fruit flies.  It’s an unnecessary battle, brought on by a lack of care.  If there isn’t a food source they don’t check in for an extended stay.  Leaving food out is an invitation to party.  They are like unwanted guests, they come, unpack, take over the kitchen, eat your food and horrors, each female has the potential of laying 400 eggs!     

It’s hot, their favourite condition for breeding.  Hot means rot so the fruit needs to go into the fridge, after all they aren’t called broccoli flies although, even veggie matter will start to punk up if not taken out to the composter. A couple of nights of not doing the dishes and they are sneaking in through the crack in the screen door, bringing all their friends with them. 

I’ve been busy with the boat so the dishes have been piling up since hubby left.    I’m a hard worker but I can’t do everything and by the time I roll into the house after working in the garage, the messy kitchen doesn’t even register.  My mom used to say, “He’s a smart man but he can’t chew rubber” and I’m not exactly sure what this means but think it might apply.  I smile when I think of this, I haven’t heard it since I was a child.  It might be a Springhill colloquialism, my mom’s childhood home. I tried looking it up on the internet and you know how when you start typing a phrase it recognizes it from previous searches and shows you the link, well not this time, it had no idea what I was typing.  Gotcha puter!  You don’t know everything!   


I think the saying means he can’t do it all so that’s my excuse for not doing the dishes. Hmmm....can’t chew rubber.....hmmmm....I wonder if gum would qualify, maybe I could do it all! My mom had a lot of strange little sayings that I’ve not heard before like our dye book title “SkyBluePink With A Green Smell.  I think everyone is familiar with the first part but not one person has ever told me they heard of the “With A Green Smell” ending.  As a child, when I would ask what mom was making for dinner she would say, “sky blue pink with a green smell”.

One of the little winged pests just brazenly flew by my face, as if asking to be sucked into the churning vortex.    Little beggars, I’ll be chasing them for a month of Sundays.   If you kill one, it seems twenty more come out of nowhere.   The fact that they are continually hatching from the hundreds of eggs laid by the female will keep me in business.   I’ve cleaned up the kitchen and emptied the small composter into the large one outside.  There isn’t a scrap of food to dine on, not a crumb to be found.  Be gone pests! 

A couple of interesting tidbits about this fascinating insect.   At room temperature fruit flies can develop into adults within one to two weeks.  The adult fruit fly lives for several weeks.  Twenty four hours after a female fruit fly lays her eggs, the larvae hatch.  No wonder they can go from a few to a slew so quickly.   


They are so tiny it is difficult to see how utterly beautiful the adult fly is.  Nature is amazing!  They have interesting mating rituals, if interested look it up sometime.  For such tiny creatures, they are rather amorous.  My kitchen is seeing a lot of action, just sayin!


3 Comments

I'm Teaked off!

8/14/2015

4 Comments

 
Picture
Picture
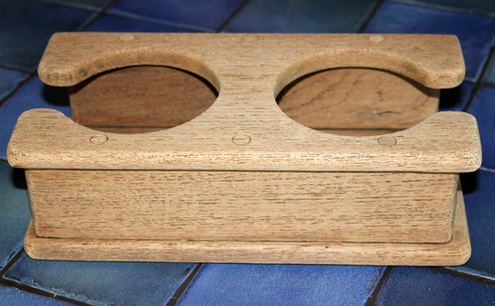
I bleached this cup holder with Javex to remove the black but I wasn't keen on it considering I have an allergy to bleach.  I have a recommended product now to use for the remaining pieces and I'll blog about my experience with it later.  
PictureThe teak is in bad shape. Lots of discoloration.
It’s 11:00 PM and I just came in from the garage to a kitchen full of dirty dishes, turned a blind eye and sat in front of the computer to write. I always do the fun thing first and if the not–so-fun thing doesn’t get done, not a worry.  I have plenty of clean dishes to last a few more days.    

I’ve discovered a new passion. Unlike beads and wool, this one doesn't cost anything except for a ton of elbow grease and a few tools already lying around.  I’m stripping and refinishing teak and it’s very gratifying!  The previous owners of our boat or maybe the ones before them, refinished the teak with a product called Cetol.  For want of a better description I’d compare it to Orange Shellac once it begins to break down. I will be removing it and using Epifane varnish.    

My philosophy is this.  If you don’t know what you’re doing, do nothing, because somewhere down the line, someone else is going to have to clean up your mess.  If Cetol is slapped on thickly it runs like cheap pantyhose which of course is what I'm dealing with on our boat,  and worse, it sprayed all over the deck, especially the non-skid gelcoat.  They didn't use drop cloths or tape off where they were applying it.  It's like a Cetol crime scene. Every couple of inches there’s an orange dot that’s a bloody witch to remove.  The only way I’ve found success is to use the tip of a knife to chip off the larger hunks, then a brass brush to rub the area which leaves a greyish metal stain and then Spray 9 to remove that.  There’s a lot of down on my knees, not my greatest position, but no other way to rid myself of these crappy specs of finish, that glaringly stand out against the gelcoat.    

So I will be stripping and refinishing every piece of teak on the deck. Quite frankly I’m embarrassed to show it in this condition; mortified that someone might think I did this horrible job.  When we row up to the boat in the tender I can see it smeared under all the teak eyebrow trim, they brushed it all over the underside on the gelcoat and then it dripped.  That’s the kind of thing that keeps me up at night.  

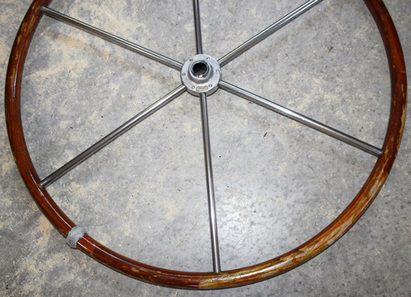
So I thought I would start with the teak cup holder and the ships wheel before tackling the floor grates and cockpit table.  The cup holder had come off and held in place with a plastic zip tie and you know that had to go!  Gregg filled the old, eaten away screw holes with epoxy and redrilled them.  The cup holder was black on the inside and not much better on the outside.  

The current state of the teak on the wheel is blotchy with light and dark bits and raw wood exposed from the finish flaking off. When the varnish separates from the wood because the bond wasn’t good, it leaves a cloudy creamish colour and when the wood is exposed, water gets in and mold occurs.  Teak is a fabulous wood, small grained and has the most beautiful patina imaginable.  Teak should shine, with at least eight applications of Epifane vanish and a light sanding in between you should be able to see your reflection.   Then every couple of years a light sanding and a few more coats, a very manageable upkeep.  Cetol on the other hand, if done properly builds up over time with refresher coats and at some point needs to be removed and begun again.  On our boat it was unfortunately done sloppily so it all has to go. Funny, a few weeks ago I’d never heard of Cetol but now it’s my nemesis.    

So I have a lot of work ahead of me.  I have a heat gun, scraper and sand paper of every grit.  I have an abundance of elbow grease and I work like a machine.  Tonight the sweat was dripping down my nose from the humidity and heat radiating off my body.  To make matters worse, using a heat gun exaggerated the temperature.   There wasn't any air movement inside the garage and my shirt was soaked and stuck to me like a wet T-shirt contest but I forged on, sailing season is too short to procrastinaate.  We have to get on the water!     

Our friends have a Nonsuch that was well protected from the weather, sailed on lakes instead of salt water and meticulously cared for.  Their boat is actually four years older than ours but is in museum quality shape.    The finish on the cabin sole is like glass, the wood is pristine as the day it was laid.  The bright work, the hand rails and wood on deck are lovely, and I can’t help feel sorry for my sad girl with all the ugly Cetol, like orange tears dripping down her sides.   My friends say all work and no play make Christine a dull gal...but I enjoy this work, I’m having fun and the big payoff is coming when i can proudly say “Welcome Aboard!”


Picture
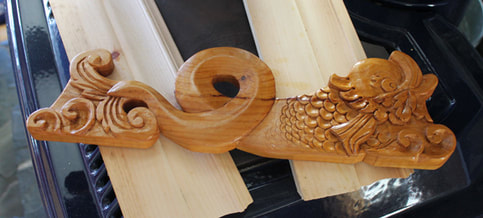
I carved this stylized sea monster about twenty years ago.  It was my very first and last carving project.  I never knew what to do with it until we bought the boat.  Although not teak, the varnish gives it that wonderful glow.  So far I've applied two coats and it's slow to cure from all the humidity. After several more coats and some sanding it will shine and blend in beautifully with the teak and mahogany in the cabin.
4 Comments

Kit Kat Bites

8/13/2015

2 Comments

 
These are squares that Deanna shared with me.  They truly taste like Kit Kat bars but better because you know what's in them!  OMG YUMMM!
Picture
Ingredients

  • 3/4 cup unsalted butter
  • 3/4 cup heavy cream
  • 1 1/2 cup granulated sugar
  • 25 regular sized marshmallows
  • 12 oz milk chocolate morsels
  • 1 oz unsweetened baking chocolate
  • 5 cup rice krispies cereal
  • 11 oz butterscotch morsels
  • 1 cup peanut butter morsels
Instructions

  1. In a large mixing bowl, add marshmallows, milk chocolate morsels and baking chocolate. Set aside.
  2. In a large pot, bring to a boil the sugar, cream and butter (over medium high heat). Once boiling, continue to boil for 4 minutes, stirring constantly. Remove from heat. Pour hot mixture over marshmallows and chocolate. Using an electric mixer, beat until chocolate has melted and mixture is smooth (about 2 minutes).
  3. Melt butterscotch and peanut butter morsels together in microwave bowl for one minute. Stir and heat at 30 second intervals until fully melted.
  4. In a large bowl, combine rice cereal, melted butterscotch and about 1/3 of the chocolate mixture. Mix completely.
  5. In a parchment paper lined 13x9 baking dish, pour 1/3 of chocolate mixture onto bottom, spreading with a knife until bottom of dish is covered. Top with cereal mixture. Press firmly. Pour remaining 1/3 of chocolate mixture over cereal, spreading with a knife. Allow to set up in refrigerator, about 1-2 hours. Remove and cut into bite sized pieces. ENJOY!
2 Comments

Life on the other side of the shoal.......

8/11/2015

3 Comments

 
Picture
Big Eagle 172 foot long yacht
Picture
Endless Summer 100 foot long yacht
Picture
Imagine having enough money that you never have to worry about writing a cheque for groceries or crunching numbers while robbing Peter to pay Paul so the  mortgage payment doesn’t bounce.  Imagine not thinking twice about purchasing that new pair of shoes or paying top dollar for lobster just because it’s Tuesday.

It’s a nice fantasy, I’m sure we’d all like to be in this position but around 95% of all the people on earth, the upper/lower middle class and the impoverished struggle to varying degrees worrying about things the upper echelon  take for granted.     I’m not sure what category I’d be classed in, the extra pounds sort of declare I’m eating well and it would be nice to think I won’t have to eat dog food in retirement, although the canine grub at our house is a step up from kibble so maybe that isn’t a bad thing....but as I looked across the harbour this morning and see about 40-50 million plus in motor yachts, both larger than the house we live in and displacing a heck of a lot of water.......it boggles the mind.   

The first boat to arrive was called Endless Summer and she’s been circling around her anchor since the weekend.  I looked her up on the internet.  She’s a 100 foot water palace, making our boat look like a tinker toy, is appointed to the max and chartered for a mere $100,000 per week plus expenses.  The fact that she is moored right across from our front door indicates that someone has paid that price, probably a mere drop in the bucket of their fortune.  Wow is all I can say.   The second yacht rolled in last evening, all 172 feet of her, bigger, more expensive at a $150,000 per week charter price and even more opulent for the lucky son-of-a-gun that can afford it.    She’s beamy, over 25 feet wide and the tender, slightly longer than her width was almost as long as our 33 foot boat!  

Imagine what any one of us could do with $100,000-$150,000 of mad money to use for guilt free self indulgence.  Spend it to buy down the mortgage or replace the old clunker in the garage with a shiny new upgrade, spend it on the kids or and the grand babies.   Imagine wool shopping sprees, spa days and fine dining.   Extra pocket change for all the fun things you’ve always wanted to do; the extra’s that normally elude us.  A once in a lifetime chance to bring dreams to fruition if only for a short while and a story to tell for the rest of our lives.....remember when we had that windfall?  Aah-h-h-h-h..... 

That 172 foot yacht uses hundreds of dollars a day for fuel just sitting at anchor.    It has to run to charge the batteries for the lights, heat, instrument panel and appliances, maybe a generator or two.  I couldn’t even afford to take her for a spin out to Strum’s Island and back.   I certainly like to think big, but my world doesn’t come in this kind of extra-large, supersized, over the top living. 

Big Eagle, the 172 footer is plastered all over the web advertising her assets to attract the wealthy.  The interior layout sleeps up to 12 quests in 6 staterooms, including a master suite, 1 VIP stateroom, 1 double cabin and 3 twin cabins.  She is also capable of carrying up to 10 crew onboard to ensure a relaxed, luxury yacht experience.  Timeless styling, beautiful furnishing and sumptuous seating are featured throughout her living areas to create an elegant atmosphere. 

The pictures of the interior are amazing with comfort built in from bow to stern.  Wouldn’t it be grand to gather a group of 100 hookers, all footing a $1500.00 price tag to have her for one week, pulling loops while having the time of our lives in the lap of luxury.   We could cram in, sharing bunks and sleeping bags to taste the rich man’s life even if it’s only a small bite.  Of course that fee only covers the rental, we’d have to bring our own food and libation if we could still afford to eat and drink, and then there’s the fuel expense, we’d all have to lug a couple of jerry cans full of diesel to get out of the bay. 

Although it would be stupendous, knowing how fast a week goes at my age, I wonder if I’d enjoy myself seeing my hard earned money disappear faster than my hair. I do know I’d play the celebrity; if I’m throwing that kind of money around I’m not bending over to pick up my wool ends, maybe have one of the ten crew members squeeze toothpaste on my brush like Prince Charles’s valet does for him.   I’d want the full indulgent experience before going back to my simple, ordinary life. 

I spied on the ships for a while through the binoculars.  I’m human with a healthy curiosity and wondered who might be chartering these water beasts.  To motor into our little bay and not make your presence known is intriguing and it brings out the detective in me.  Some high powered executive, a prince, a movie star, a bunch of rappers, obviously someone with deep pockets and the need for privacy.  I didn’t catch a glimpse of anyone that might be footing the bill for this excursion, but there were lots of young staff crawling all over them, scrubbing the decks and sides of the ship.  Killing time by cleaning what looked to me like invisible grime and polishing the stainless and brass even though the shine was already blinding.  I couldn’t see anything through the windows and portholes.  It’s obviously a lifestyle I can’t peek into, maybe it’s best I failed...... 
Pictures are taken from the internet - Big Eagle Luxury Yacht
Picture
Picture
Picture
Picture
Picture
Picture
Picture
Picture
Picture
Picture
Picture
Picture
Picture
Picture
Picture
3 Comments

Boat bites...

8/7/2015

4 Comments

 
Picture
It seems my lovely boat has forsaken me again.  I’m working  hard to clean and polish her and she’s biting the hand that feeds....although in her defense, I’ve been doing some pretty silly things. Dropping a door on my foot, really, how dumb was that?  Yes I was tired but I’m a big strong girl! I need to get a grip, literally!  I’m starting to wonder if I’ve lost a few cards from my deck.  

Like tonight for instance, I broke my own rule of always going down the companionway steps backwards.  I was heading down front ways carrying a duffel bag , slipped and fell on my backside on the galley floor. The water was calm and clear as glass, no rocking and rolling to blame it on, just me being clumsy.   My knee wasn’t in the best shape so the fall only added to that woe.  My hip and tailbone were banged pretty hard on the edge of the last step so yet another bruise to add to my collection.  My flailing body filled the entire galley floor with my head smashed up against the propane stove. 

With no way to brace myself to get my bearings, hubby had to assist me up.  I’m sputtering and complaining with fury-crying in between.  Fury crying is the dry kind, no tears just frothing madness.   I won’t post the bruising to keep it clean, I think maybe I’d be crossing the line on that body part. Take my word for it, I’m sore, I’m lucky and I better smarten up cause this cat’s been using up a few lives lately.
  To say I bruise easily would be a misnomer, I'm working darn hard to get each and every one.

I’m wondering what the people on the other boats around us think?  There's been a lot of screaming after injuries and yesterday I accidentally broke one of the sliding Plexiglas doors to a storage cupboard in the galley and let out a mournful cry.  Good luck finding a suitable replacement to that 28 year old item.   Woe is me. 

Maybe the neighboring boaters think we're doing the horizontal mambo or perhaps, that hubby is using me as a punching bag.  Luckily most of the bruising is hidden by my clothing and really, I don't know what rumor I'd rather start, that I'm frisky or accident prone.  Anyway, I have to be careful and most accidents can be avoided with a bit of thinking....the brain is there so just use it.  


After I fell, I gathered the pups and crawled between the sheets in the bow berth to lick my wounds and fell instantly asleep while hubby worked on the bilge.  He said there was a bit of soft purring, his words for my snoring, although soft wouldn’t be the best descriptor for the sounds that have been known to crawl out of my throat. 

I admit it, I snore.  Sometimes I awaken so suddenly from a loud snort the sound is still reverberating in my ears so there’s no denying it and no need to sugar coat it with words like purring.  No cat I know purrs like that.  After one of these rather abrupt awakenings, it's comical to see the pups staring at me as if to say “What the heck was that mom?” 

After I awoke from my nap the ache in my buttock was gone, the only trace that remained was the cluster of broken blood vessels.  My frame must be pretty tough; this is probably a good substitute for a bone density test to save the province a few hundred dollars in medical costs. Perhaps I'll just throw myself down the stairs once every couple of years to see if anything gives, if not I'm good to go.  If my bones were dry and chalky I’d be in a body cast by now. 

And even though the evening didn't end on a great note, I won’t let this latest incident cloud what had been a fabulous day.  From morning to  dust, the weather was pure perfection!  The town was filled to the brim with tourists and rug hookers popped into the shop to say hello from all over North America.   Several, who follow my blog asked how my foot was doing.   I was so touched!

This week Mahone Bay hosted schooner races that started at 1:00 pm, filling the harbour with their majestic  presence.  Their sails are like butterfly wings, fluttering as they tack back and forth on the water.  Cars are parked along on the side of the road and people are taking pictures to capture the true essence and power of these magnificent vessels as they harness the wind.  I’ve lived in this beautiful town my entire life and have never seen such grace on the water.   

Lloyd Westhaver, a local photographer captured the race brilliantly.  He walked up the hill behind my neighbour’s house and took this shot.  

Picture
4 Comments

A boat full of hookers......arrr me hearty's!

8/6/2015

2 Comments

 
Picture
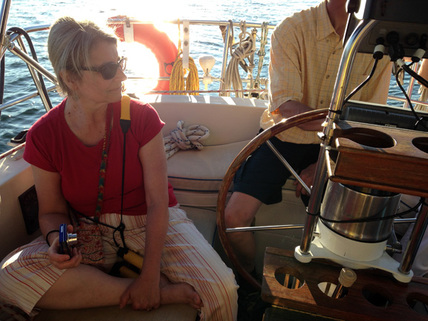
Last evening I took some of the Main Street Hookers  out sailing.   I thought it would be a nice opportunity for some fun and a get together after we’ve had to cancel the hook-ins due to the renos for the past couple of months.  For various reasons several couldn’t make it but the five that showed on the wharf seemed to enjoy themselves. 

The weather certainly cooperated although the wind could have impressed us a bit more.  It stayed calm and steady as we sailed to Indian Point at a leisurely clip, the wind in our hair and sun on our backsides.  Heather brought a bottle of Pinot Grigio, Deanna brought a delightful red pepper hummus, we contributed a salmon mousse, and with various crackers and nachos we snacked in a very civilized fashion.    

We decided not to motor after the sun began to set and almost made it to the wharf under sail power.  Along the shores of Indian Point and then Mahone Bay we were treated to a sparking show of fireworks.   It seemed as if the display was for our benefit as our big, beautiful sea cottage sailed by.  Thanks folks!

It cooled down later in the evening but polar fleece blankets kept the chill at bay for those that needed it.   Thank-you to Captain Gregg for another pleasurable sailing experience and to Deborah, Heather, Deanna, Marta and Audrey for a lovely evening on the water.


Picture
Picture
Picture
2 Comments

Companionway to an accident.....

8/5/2015

13 Comments

 
Picture
If a companionway door falls on your foot while in the middle of the harbour, does anybody hear? 

You betcha they do!  I let out a blood curdling scream when the companionway door fell, the pointy corner edge down, landing between my second and third toe.  The pain was excruciating, enough to pass out but I staggered to the settee and sat down to rip off my shoe and assess the damage. 
Momma was doing a one footed misery dance and saying fowl things and our poodles didn’t know what to do so all eight eyes, big and round, stared at me. 

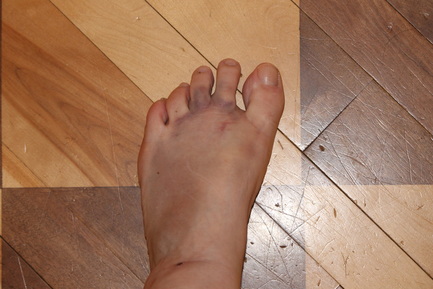
At first I was afraid to look.  The pain was so intense surely there was blood and broken bones jutting out through the skin. I was surprised to find none of it but a purple egg began to grow as if watching a flower open in high speed photography. It stretched my skin until I thought it would burst and a bruise began fanning out in all directions, artistically painting my foot with shades of black and blue. Luckily we had ice on the boat so hubby created a facecloth pack and wrapped it around the area and I elevated it. 

The scream that escaped my lips was ear piercing, not only for Gregg and the pups, but anyone sleeping on board a boat in the mooring field between Mahone Bay and Lunenburg.  It was late, around midnight, we’d been out for a fun sail and lingered to put everything away and do the dishes.  Basically I was finding things to do to stay on board.  It’s difficult to get me off the boat, I love her beamy comfort that wraps me and holds me in her wooden womb. The salt sea air acts like a sleeping powder, zapping my energy so I was really tired when I dropped the door.       

The fun now over, we locked up and prepared for home.I couldn’t get my sneaker on to get into the tender so I took out the lace and left it open to surround the bump.   The shoe tongue pressed down a bit and by the time I got home the swelling had gone down 30%, possibly also squished by the pressure when Henri’s big feet stepped on it in the cramped tender.  A few more cries echoed across the harbour, I’m sure they heard it on Tancook Island. 

And then to add salt to the wound, when we got to shore we noticed the dome light was on in the car for the last eight hours.  Now it was 1:00 am, I’m incapacitated and not able to walk the half mile to our house, every window on the street is in darkness so no help there, what is the chance the battery had enough juice to start the engine?  We held our breath while it sputtered. You could tell it was hesitant in its weakened state, but she fired up and Hubby got old gimpy home.    

I iced my foot again and elevated it while reclining on the sofa, where I found myself the following morning, covered sometime throughout the night with a blanket,  thank-you hubby.   I literally passed out, in a sleep so deep nothing stirred me until I’d filled the eight hour requirement.  As my eyes fluttered open, my first thought was my foot and I pulled back the cover to peek. It had become a black and blue, mother-of-pearl, opalescent, golden rimmed hematoma.  Almost pretty actually, like oil in a mud puddle.  The bruising spread from the impact area, as far back as my ankle and covered the entire roof of my foot.    At this point it fits in rather nicely with the rest of my boat bitten body but I can't complain, I've never had more fun!
13 Comments

Beginning workshop Saturday August 8th

8/1/2015

0 Comments

 
Picture

Introduction - Beginner

The Technique of Rug Hooking  

 One Saturday Afternoon 1-4 pm

The class concentrates on technique.  It is so important to learn proper loop formation, the foundation of all your projects to come.  Simple tips can make the difference between higgly piggly loops and straight, uniform ones.  Holding your hook properly dictates the neatness of your work as well as saving your wrist from repetitive stress. 
In this class we concentrate on loop height and position.  We practice straight and curvy lines and circles.  Once you master these simple techniques you are off to the races.


During the class you can use our equipment such as scissors, hoops, frames and hooks.  You will need a project and there is a large selection of kits to choose from or  you can select a pattern from our racks before the class and we can choose enough wool to get you started.  

After I demonstrate the techniques there will be a practice period and once you are comfortable then you will begin hooking directly on your project.  I hover over you for the next few hours to make sure you stay on track.  While you work, I talk to you about all aspects of rug hooking and recount funny, rug hooking related stories. 

Let's get you started!  Bring a sense of humour because we love to laugh!   Coffee and Tea will be served.  

You will receive a handout to take away. 

Teaching Fee $30.00

Date for upcoming Beginner Class

August 8th, 2015

Release your inner hooker!
0 Comments
    Picture
    Picture
    Picture
    Christine Little has been ranked #5​ out of the 60 top rug hooking bloggers by Rug Hooking Magazine!

    Picture
    Picture
    Max Anderson, Australia, recipient of my Nova Scotia Treasures rug.  An award of excellence for promoting Canada through his writing.  
    Picture
    Picture

    RSS Feed

    Archives

    March 2023
    February 2023
    January 2023
    July 2022
    March 2022
    February 2022
    January 2022
    November 2021
    October 2021
    July 2021
    March 2021
    February 2021
    January 2021
    December 2020
    November 2020
    September 2020
    August 2020
    June 2020
    May 2020
    April 2020
    March 2020
    February 2020
    December 2019
    November 2019
    October 2019
    September 2019
    August 2019
    July 2019
    May 2019
    April 2019
    March 2019
    February 2019
    January 2019
    December 2018
    November 2018
    October 2018
    September 2018
    August 2018
    July 2018
    June 2018
    May 2018
    April 2018
    March 2018
    February 2018
    January 2018
    December 2017
    November 2017
    October 2017
    August 2017
    July 2017
    June 2017
    May 2017
    April 2017
    March 2017
    February 2017
    January 2017
    December 2016
    November 2016
    October 2016
    September 2016
    August 2016
    July 2016
    June 2016
    May 2016
    April 2016
    March 2016
    February 2016
    January 2016
    December 2015
    November 2015
    October 2015
    September 2015
    August 2015
    July 2015
    June 2015
    May 2015
    April 2015
    March 2015
    February 2015
    January 2015
    December 2014
    November 2014
    October 2014
    September 2014
    August 2014
    July 2014
    June 2014
    May 2014
    April 2014
    March 2014
    February 2014
    January 2014
    December 2013
    November 2013
    October 2013
    September 2013
    August 2013
    July 2013
    June 2013
    May 2013
    April 2013
    March 2013
    February 2013
    January 2013
    December 2012
    November 2012
    October 2012

    Picture
    Picture
    Gift Certificates are available for that special rug hooker in your life!  Any denomination, no expiry date! 

    Picture

    Categories
    (Click on the categories for past blogs)

    All
    Announcements
    Beginner Class
    Christmas
    Colour Planning
    Contests
    Copyright
    Coupon
    Customer Rugs
    Cutter Servicing
    Dyeing
    Equipment
    Featured Hooker
    Giveaway Draw
    Guest Blogger
    Guest Blogger
    Health & Fitness
    Home & Heart
    Hooked Rugs
    Hooking Groups
    Hook In Talk
    Initially Yours
    Jibber Jabber
    Just A Bit Of Fun!
    Life's Experiences
    Life's Experiences
    New Design
    New Ideas
    Pattern Of The Week
    Patterns Hooked
    Pets
    Rants
    Recipes
    Rememberingfbe7326ff7
    Rug Schools
    Show & Tell
    Show-tell
    The Rant
    Tips Technique
    Tips Techniquef0cd117ab4
    Visitors
    Workshops

    Picture
    Picture
    Picture


    Picture
    We have a pot to "Fiz" in!

Shop Hours:
Monday - Friday 10:00 AM - 5:00 PM 
Saturdays 12:00 PM - 4:00 PM
We are closed during ice and snow storms
​so please call ahead.  If school is cancelled we probably are as well.  

Toll Free: 1-855-624-0370
Local: 1-902-624-0370​
encompassingdesigns@gmail.com

498 Main Street
P.O. Box 437
Mahone Bay, N.S.
Canada B0J 2E0

​Follow us and keep up to date
on our specials, new products
​and events!
Picture
Picture
Picture


Home
Shop
Ordering
Blog
Our Story
Workshops

Contact Us


​​​© Copyright 2023 Encompassing Designs. Website by SKYSAIL