Encompassing Designs
  • Home
  • Shop
    • Kits
    • Patterns >
      • Christine Little >
        • Signature Designs
        • New Designs
        • Seasonal Designs
      • Deborah Sweet
      • Susan Leslie
      • Patricia Perry
      • William Morris
    • Supplies >
      • Backings
      • Frames
      • Hooks
      • Books
      • Extra
    • Wool >
      • Abrashed
      • Antique JQ Colors
      • Custom Dyeing
      • Dyed Bundles
      • Dyed Curly Mohair
      • Dyed Spots
      • Dyed Values
      • Dyed Yarn
      • Natural & Colours
      • Plaids & Textures
      • Dye Books & Swatches
  • Ordering
  • Blog
  • Workshops
  • Our Story
  • Contact Us

Our new Octi-Spinner Floor Frame

5/3/2014

4 Comments

 
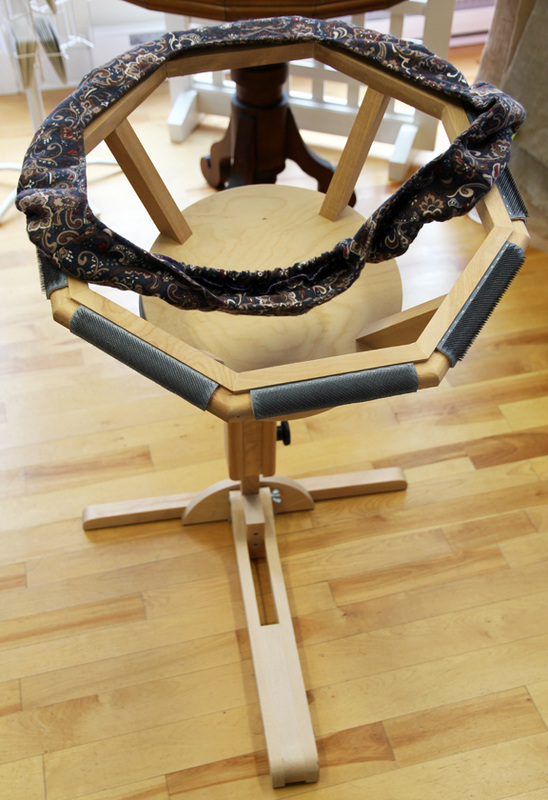
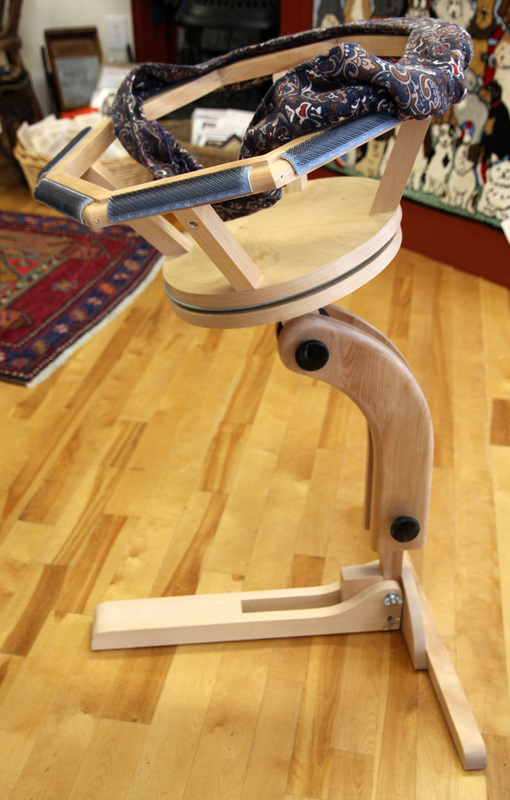
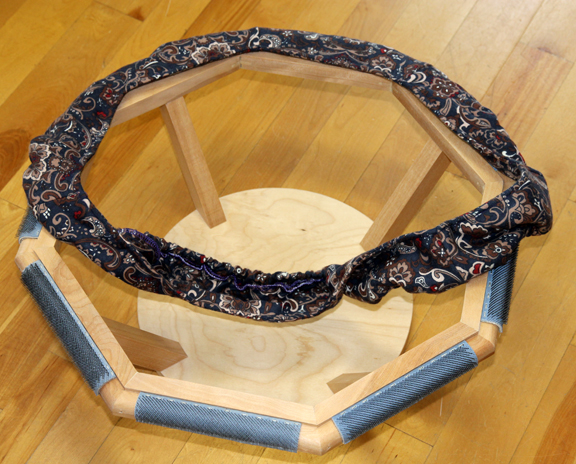
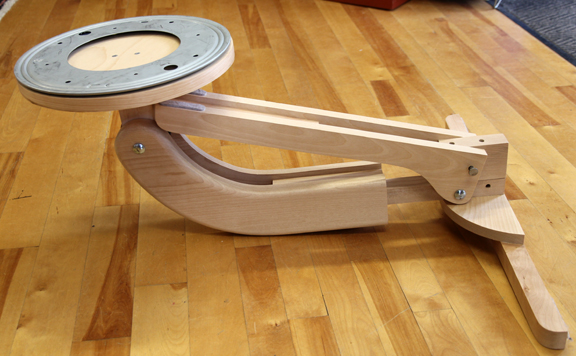
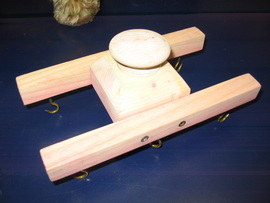
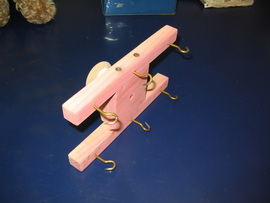
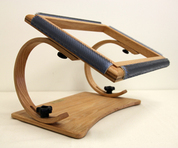
NEW!!!!!!!! - Octi-Spinner Floor Frame
Picture
Picture
Picture
Picture
Easily turns 360* on a Lazy Susan device to access any part of your rug. Large working space of 20" outside and 16 1/4" inside measurement.  All hardwood construction, sturdily made. 

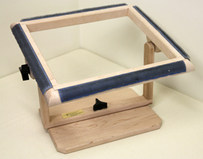
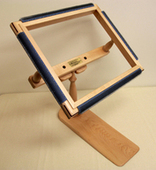
Comes with a free flannel cover (value $36.95).  Top part slides off and can be used independently as a lap frame. 

Adjustable height and tilt knobs.  Base folds up for travel.  Padded feet to protect floor.   Made in Nova Scotia.  Click for pricing:
                              http://www.encompassingdesigns.com/frames.html
4 Comments

We're just a bunch of pan handlers!

9/30/2013

2 Comments

 
PictureThis is what you call heads above the rest....I couldn't resist!
At Encompassing Designs we like to work smarter, not harder, so we’re always looking for ways to cut time from a job and minimize waste while continuing to offer quality you can rely on.   For years I’ve said I should have been an efficiency expert, if such a thing exists, but I don’t hold a candle to my son Shane.  
 
Give him a job and he will come up with a way to make it easier and faster....things I've never even considered.  I’m impressed that the apple didn’t fall too far from the tree and proud that he can beat his momma on a few things.  

Shane does the dyeing for the shop, draws patterns and does arm-long lists of  jobs that might not be seen on the surface but keeps the place running like a well-greased wheel. Everything he’s touched has been altered to work faster. I heard a saying once “Give a job to a lazy person and he'll find a way to do it faster”. Now Shane isn't lazy so that really doesn’t apply, but it could read, “Give a job to a genius and he’ll find a way to revolutionize the process.”  
 
Different dyeing techniques call for various timing for prep and execution.  Scrunching wool in a pan to spot can be labour intensive because the secret to the overall appeal is the tightness and height of the folds which of course, takes time to place.   Then the uniformity of the various colours can depend on how you place the dye over these folds.  Too high or floppy folds mean dye won’t seep to the bottom and you have to spend more time digging out between the flaps to find the white spots.  My son has the spot dye down to a science.  I'll admit his scrunching is superior to mine.…momma doesn’t have as much patience, so there’s more chance of being sloppy…the dear boy's words, not mine.  

Spot dyes require proper pans and we’ve looked for them in yard sales and hardware stores. We've tried glass, enamel and steel all with varying results.  I guess that would make Shane and I just a bunch of pan handlers.....   Most large open-faced pans  come with areas around the perimeter  that are lower than the center of the pan, a trough along the edge for drainage when cooking I guess. After my father passed away I found two large pans in his panty that have served us  very well over the years but I have never seen another pan like them so we pray they have a long life.  

These stainless steel vessels hold a half yard of wool comfortably and although they still have that channel around the outer perimeter I have found it can be useful to create a slightly darker edge that can be used for a bit of shading.  so if you have a grassy green spot and need a bit of a shadow under a bush, the darker edges are perfect!  

Most of the enameled or glass pans we found weren’t quite the right size; the glass was too elongated and the enameled one was overall too small to make the right kind of folds needed to support all the different colours in the spot.  So we toyed with the idea to have a few pans custom made and as we worked out the pros and cons the idea struck to have one fabricated large enough to hold an entire yard of wool and flat bottomed for even distribution of dye. 
 
So we contacted a local welder and requested a pan with the dimension of the inside of our oven.   As big as we could go without touching the inside walls of the stove.  It worked like a charm.  Of course everything had to be doubled, the formula and the water to sufficiently cover twice as much wool.  We don’t use it often, Shane says that it takes him more time scrunching the wool into the tiny folds in the larger pan than he is able to process in two ½ yds ones,  but I beg to differ and there might have to be a spot "dye off"  to see which one leads the race.  Even though it may take more time preparing the wool for the big pan, it does cut down on the energy spent in oven heat and that kind of efficiency saves money and, more importantly, dyes twice as much for the wool racks.   

So for all you dyers out there that sell wool, having a pan made to order can cut down on the time you are slaving over a the spot dye.   The pan cost $30.00 to have made and that was paid for with the first piece of wool dyed.  One thing we didn’t take into account was that the two older stoves we work on might not have the same dimensions inside the oven so the pan we had made only fits the one stove. Who’d of thunk?
   Even genius can learn from experience!  We had a second pan made and now we're covered. 

One thing I will caution about.  Make sure the pan's inside corners are smooth.  No areas where dye can settle in and later ooze out to stain the next piece of wool. Explain to the person making up the pan that there can't be any areas that leave gaps or where dyed water can get in.

Picture
The pan to the left is the normal size we would use to dye a 1/2 yd piece of wool.
Picture
Look at all those folds of delicious colour! Grass and foliage, here I come!
The dye formula used for this demonstration was Kermit.  See it on the site by clicking the link:
http://www.encompassingdesigns.com/dyed-spots.html
2 Comments

Wool Widget 

1/6/2013

6 Comments

 
This is a dip dyeing tool hubby made for me a few years back.   Holding the wool with just my fingers meant scalded digits and I didn't like using tongs as they were too awkward to handle and  kept slipping so the wool would fall into the dyebath, plus you need two hands and two pairs of tongs to hold the wool open and vertical, so he came to my rescue yet again. 

Tah dah!  This little Wool Widget works well.  There is a knob handle for safe holding, the wood floats if you want to lay it in the water and you don't care if it gets wet.  The brass hooks hold the wool nicely along the salvage edge and you can wrap it around once or twice, depending on the size of wool needed.  

Simple to make and easy to control when dipping the wool up and down in the water.  
 Maybe I should have these made for the shop?   
Picture
Picture
6 Comments

Hooking with gripper frames!

10/26/2012

7 Comments

 
Picture
Picture
Picture

To be fair one has to cover both sides of the coin so I'll spotlight the gripper frame inext.   She is a very lovely girl and in a perfect world we would all love to have one but there are pros and cons to this as well, although nothing to shed any tears over, unless of course you're bleeding! 

Don't we love our gripper frames!  So easy, so slick to move your backing around.   Not all gripper frames are created equal but today's designs usually tilt and turn 360* which is what you want to look for.  The older style stationery frames were high in the back and slanted lower in the front with open areas on the sides and front to get at our work.  But if you wanted to hook in a circle you have to keep adjusting the backing or learn to manipulate your wrists.  Frames that turn 360* allow access to every part of your work with a quick spin. 

There are lap frames, sit on frames and floor frames.  You can decide what suits your hooking lifestyle and some of us have more than one frame to cover all our needs.  A smaller, sit on or lap frame for scooting about to hook with groups or at a friend's house and the floor frame at home for comfort in front of the TV. 

Poor granny had to strap down her pattern to a room sized dinosaur that didn't allow any moving of the backing without a great deal of time and effort.  The stationery frame did not allow movement so she ended up hooking in straight lines back and forth.  She would have loved the flexibility of a moving frame, would have thought thought she died and went to heaven!  Today we like portability, visiting friends with hooking in tow and we also like hooking in wavy lines, circles and diagonal lines.  Thanks goodness for evolution of the rug hooking species!

Cons
1. Deadly spikes that scratch our skin and tear our shirts.  Who hasn't bled on their project please stand!  No one? Didn't think so.  Putting the backing on and taking it off is where you are likely to be scratched but leaving it sit around with out a flannel cover, you can accidently brush up against it for a little abrasive contact. 
2. More cost although that isn't a deal buster if you want one. 
3. Gee, can't think of another negative thing to say!

Pros
1. You can leave your work in a gripper frame for as long as you like.  Seeing your project out and ready you are likely too hook more often. 
2. Easy to move your pattern around to get to all areas.
3. You can make or purchase a gripper frame cover to protect you while you work to stop or minimize injury.   
4. Solid hardwood framing means long life.
5. Grippers never wear out.
6. A lot of the gripper designs have a hand rest bar that stretches across beneath the backing.
7. Usually all gripper frames come apart for travel, will fit in a bag or a suitcase.
  
8. Patterns with very little edging can still be put on a gripper frame and pulled tight to work. 
 

Picture
Picture
Picture
7 Comments
    Picture
    Picture
    Picture
    Christine Little has been ranked #5​ out of the 60 top rug hooking bloggers by Rug Hooking Magazine!

    Picture
    Picture
    Max Anderson, Australia, recipient of my Nova Scotia Treasures rug.  An award of excellence for promoting Canada through his writing.  
    Picture
    Picture

    RSS Feed

    Archives

    May 2025
    March 2025
    February 2025
    August 2024
    January 2024
    May 2023
    April 2023
    March 2023
    February 2023
    January 2023
    July 2022
    March 2022
    February 2022
    January 2022
    November 2021
    October 2021
    July 2021
    March 2021
    February 2021
    January 2021
    December 2020
    November 2020
    September 2020
    August 2020
    June 2020
    May 2020
    April 2020
    March 2020
    February 2020
    December 2019
    November 2019
    October 2019
    September 2019
    August 2019
    July 2019
    May 2019
    April 2019
    March 2019
    February 2019
    January 2019
    December 2018
    November 2018
    October 2018
    September 2018
    August 2018
    July 2018
    June 2018
    May 2018
    April 2018
    March 2018
    February 2018
    January 2018
    December 2017
    November 2017
    October 2017
    August 2017
    July 2017
    June 2017
    May 2017
    April 2017
    March 2017
    February 2017
    January 2017
    December 2016
    November 2016
    October 2016
    September 2016
    August 2016
    July 2016
    June 2016
    May 2016
    April 2016
    March 2016
    February 2016
    January 2016
    December 2015
    November 2015
    October 2015
    September 2015
    August 2015
    July 2015
    June 2015
    May 2015
    April 2015
    March 2015
    February 2015
    January 2015
    December 2014
    November 2014
    October 2014
    September 2014
    August 2014
    July 2014
    June 2014
    May 2014
    April 2014
    March 2014
    February 2014
    January 2014
    December 2013
    November 2013
    October 2013
    September 2013
    August 2013
    July 2013
    June 2013
    May 2013
    April 2013
    March 2013
    February 2013
    January 2013
    December 2012
    November 2012
    October 2012

    Picture
    Picture
    Gift Certificates are available for that special rug hooker in your life!  Any denomination, no expiry date! 

    Categories
    (Click on the categories for past blogs)

    All
    Announcements
    Beginner Class
    Christmas
    Colour Planning
    Contests
    Copyright
    Coupon
    Customer Rugs
    Cutter Servicing
    Dyeing
    Equipment
    Featured Hooker
    Giveaway Draw
    Guest Blogger
    Guest Blogger
    Health & Fitness
    Home & Heart
    Hooked Rugs
    Hooking Groups
    Hook In Talk
    Initially Yours
    Jibber Jabber
    Just A Bit Of Fun!
    Life's Experiences
    Life's Experiences
    New Design
    New Ideas
    Pattern Of The Week
    Patterns Hooked
    Pets
    Rants
    Recipes
    Rememberingfbe7326ff7
    Rug Schools
    Show & Tell
    Show-tell
    The Rant
    Tips Technique
    Tips Techniquef0cd117ab4
    Visitors
    Workshops

    Picture
    Picture
    Picture


    Picture
    We have a pot to "Fiz" in!

Shop Hours:
Monday - Friday 10:00 AM - 5:00 PM 
Saturdays 12:00 PM - 4:00 PM
We are closed during ice and snow storms
​so please call ahead.  If school is cancelled we probably are closed as well.  

Toll Free: 1-855-624-0370
Local:  902-624-0370​
[email protected]

498 Main Street
P.O. Box 437
Mahone Bay, N.S.
Canada B0J 2E0

​Follow us and keep up to date
on our specials, new products
​and events!
Picture
Picture
Picture


Home
Shop
Ordering
Blog
Our Story
Workshops

Contact Us


​​​© Copyright 2023 Encompassing Designs. Website by SKYSAIL