They say, give a job to a lazy man and he’ll find a way to do it faster. I like to think I’m doing things smarter because I’m clever, not that I’m impatient, in a hurry and want it done yesterday.
I dislike sewing so any time I can avoid using a needle and thread I’m all for it. When I first started rug hooking I followed the leader and pre-stitched the raw edge of the backing to the back of the rug if it was a small piece or else I whipped the more sizable pieces for the floor. Then the dreaded rug binding had to be stitched on, not by machine but by old fashioned handwork. If you look at the underside of the rugs I’ve hooked on display at the shop you might be surprised to see how few have rug binding on them. Sure I can fib and say I do it on purpose to use as a teaching tool but really, how many resources do I need….maybe I’m a tool….
Sewing should be called hand torture not hand work or hand stitching. I really get the stitch and bitch I hear plenty about....I do plenty. Any time there’s a needle between my fingers I’m shedding blood. I’m clumsy and dangerous with small sharp objects....I should be wearing safety goggles and steel toed boots!
You’d think I’d be used to bloodletting, from all my experience with diabetic test strips. There is a little plastic covered Ginsu knife that’s spring loaded, you place the tip of the case close to the finger and press the switch. A little blade comes out at lightning speed and tears through your flesh like a bullet through the air. Bing, bang, boom. Instant cut, flowing blood, sample on the strip. I’m well versed in this; doing it once a day for the past couple of years; you’d think there would be scar tissue a mile thick on the tips on the fingers of my right hand but there isn’t. It’s amazing how the body heals and begins again. Sometimes I hit the same spot still a bit sore from the previous day and that’s a bit of an oucher but generally the only pain is the anticipation of when that little knife will hit. When I sew, I joke I should be testing my blood from the accidental injuries to avoid making the compulsory hole later on. So there is blood on every rug I’ve ever finished and I say that makes them more valuable, signed with my DNA, how’s that for the ultimate, personal touch?
When sewing rug binding to cover the raw edge of the backing in lieu of whipping or when making something that needs a lining, such as a Christmas stocking, I’ve devised this little trick to cut out the hand sewing for step one. There is still step two and possibly three that’s unavoidable but any shortcut is a plus with me. Too much sewing and I'd be anemic! This tip doesn’t require needle and thread. All you need is a dampened towel, an iron and careful fingers so you don’t trade a prick for a burn.
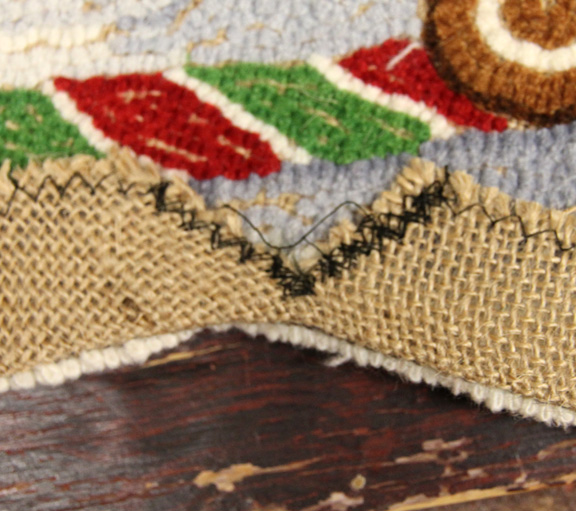
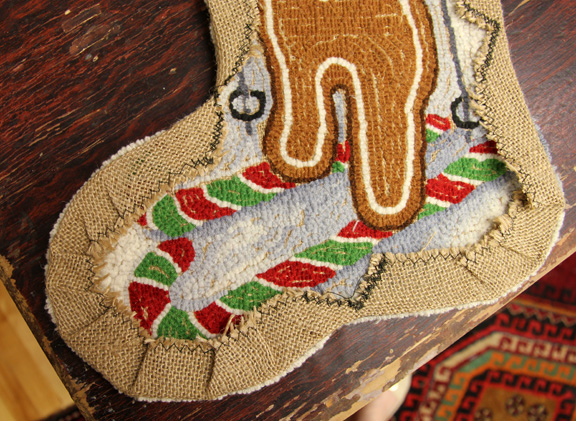
After I complete the hooking, I machine stitch with a zig zag all around the finished sock about an inch and a quarter out. Any time you have to cut out a round or oval project it needs to be secured or it will fray into a fringe and leave little to work with. On a sock there are all kinds of curves and rounded areas. The inside curved bits are more difficult to fold over so you have to cut a V in that area.
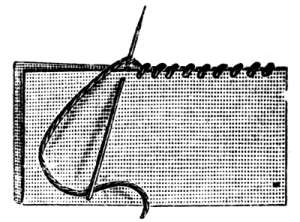
I zig zag as in the picture a wide V so I can cut down the center of it. I run it back and forth a couple of time to really secure the area and then make a snip down the center. I get as close to the edge of the hooking as possible without compromising the last few pieces of the backing weave. Then I pull it tightly to the back and put the damp towel over it and give it a good steaming so it is tight to the hooked edge and won’t move.
I then follow this process all around the sock, doing the V cuts when the design goes on an inside curve. On an outside curve such as the heel and toe I overlap periodically to deal with the extra material and press it down for a smooth look edge. Once the entire sock has been folded over and steamed it will stay in place when you sew on the backing piece of wool. I find it rather bothersome to have to hold the backing in place while struggling with the needle that's only purpose seems to be maiming me. And of course, I’m all for expediency and ease.
You can make a pattern for the lining piece and the backing by positioning the finished front over a two pieces of coordinating wool fabric or velvet. Cut them out an inch larger all around for turning under the raw edge. You can iron the lining piece by folding the top edges over 1” to the backside and steam pressing them in place. The fold will be inside against the raw edge of the backing (back sides together) so it doesn’t need to be finished. Then pin in place and hand sew the lining piece to the back side of the stocking by a top or over sewing stitch close to the last row of hooking.
When making a stocking this is one way to do the job. I’m sure the sewers in the crowd could come up with more inventive ways to attach the backing but my uneducated sewing brain finds this the simplest way to do the job. It looks good finished so I’m not too far off base. After the piece of wool is sewn on this provides the lining to protect the backside of the loops from being snagged and pulled out by edges and points of toys that Santa will leave in the stocking after they’re hung with care.
Then you can prepare the backing piece and sew that to the prepared front. This piece will need to have properly finished edges as it will show when looking into the stocking. I would fold and press a 1/2” edge and then fold that again slightly less than 1/2” inch and sew this on the machine with a straight stitch to hold the hem. Then it is just a matter of pinning this piece to the stocking and hand stitching all around the outside in a simple top stitch so that the very edge of the piece of material is pulled up closely to that last row of the hooking on the front piece. You can sew a tab on while preparing the backing piece for hanging. Also, if the material you used as a back side that isn’t great looking you can actually double it and sew it back to back, leaving a small area to turn it inside out, press and sew this to the stocking.
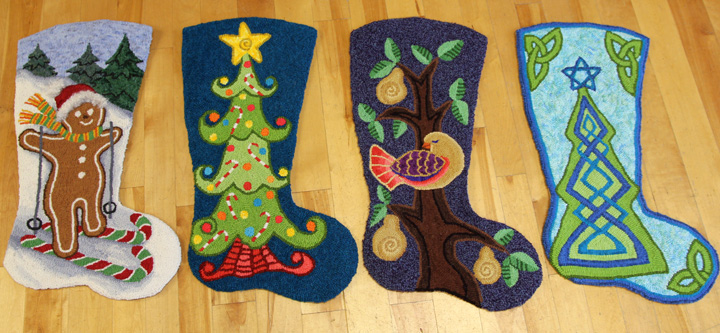
For these four pieces I plan to sew on a liner piece to hang them on the wall. They will never be actual stockings and if sometime down the road I decide to sell them because I have too many to hang, or someone presents a good argument as to why I should let one go, whoever buys it can take it home and have the divine pleasure of doing a bit of hand-stitching.
I dislike sewing so any time I can avoid using a needle and thread I’m all for it. When I first started rug hooking I followed the leader and pre-stitched the raw edge of the backing to the back of the rug if it was a small piece or else I whipped the more sizable pieces for the floor. Then the dreaded rug binding had to be stitched on, not by machine but by old fashioned handwork. If you look at the underside of the rugs I’ve hooked on display at the shop you might be surprised to see how few have rug binding on them. Sure I can fib and say I do it on purpose to use as a teaching tool but really, how many resources do I need….maybe I’m a tool….
Sewing should be called hand torture not hand work or hand stitching. I really get the stitch and bitch I hear plenty about....I do plenty. Any time there’s a needle between my fingers I’m shedding blood. I’m clumsy and dangerous with small sharp objects....I should be wearing safety goggles and steel toed boots!
You’d think I’d be used to bloodletting, from all my experience with diabetic test strips. There is a little plastic covered Ginsu knife that’s spring loaded, you place the tip of the case close to the finger and press the switch. A little blade comes out at lightning speed and tears through your flesh like a bullet through the air. Bing, bang, boom. Instant cut, flowing blood, sample on the strip. I’m well versed in this; doing it once a day for the past couple of years; you’d think there would be scar tissue a mile thick on the tips on the fingers of my right hand but there isn’t. It’s amazing how the body heals and begins again. Sometimes I hit the same spot still a bit sore from the previous day and that’s a bit of an oucher but generally the only pain is the anticipation of when that little knife will hit. When I sew, I joke I should be testing my blood from the accidental injuries to avoid making the compulsory hole later on. So there is blood on every rug I’ve ever finished and I say that makes them more valuable, signed with my DNA, how’s that for the ultimate, personal touch?
When sewing rug binding to cover the raw edge of the backing in lieu of whipping or when making something that needs a lining, such as a Christmas stocking, I’ve devised this little trick to cut out the hand sewing for step one. There is still step two and possibly three that’s unavoidable but any shortcut is a plus with me. Too much sewing and I'd be anemic! This tip doesn’t require needle and thread. All you need is a dampened towel, an iron and careful fingers so you don’t trade a prick for a burn.
After I complete the hooking, I machine stitch with a zig zag all around the finished sock about an inch and a quarter out. Any time you have to cut out a round or oval project it needs to be secured or it will fray into a fringe and leave little to work with. On a sock there are all kinds of curves and rounded areas. The inside curved bits are more difficult to fold over so you have to cut a V in that area.
I zig zag as in the picture a wide V so I can cut down the center of it. I run it back and forth a couple of time to really secure the area and then make a snip down the center. I get as close to the edge of the hooking as possible without compromising the last few pieces of the backing weave. Then I pull it tightly to the back and put the damp towel over it and give it a good steaming so it is tight to the hooked edge and won’t move.
I then follow this process all around the sock, doing the V cuts when the design goes on an inside curve. On an outside curve such as the heel and toe I overlap periodically to deal with the extra material and press it down for a smooth look edge. Once the entire sock has been folded over and steamed it will stay in place when you sew on the backing piece of wool. I find it rather bothersome to have to hold the backing in place while struggling with the needle that's only purpose seems to be maiming me. And of course, I’m all for expediency and ease.
You can make a pattern for the lining piece and the backing by positioning the finished front over a two pieces of coordinating wool fabric or velvet. Cut them out an inch larger all around for turning under the raw edge. You can iron the lining piece by folding the top edges over 1” to the backside and steam pressing them in place. The fold will be inside against the raw edge of the backing (back sides together) so it doesn’t need to be finished. Then pin in place and hand sew the lining piece to the back side of the stocking by a top or over sewing stitch close to the last row of hooking.
When making a stocking this is one way to do the job. I’m sure the sewers in the crowd could come up with more inventive ways to attach the backing but my uneducated sewing brain finds this the simplest way to do the job. It looks good finished so I’m not too far off base. After the piece of wool is sewn on this provides the lining to protect the backside of the loops from being snagged and pulled out by edges and points of toys that Santa will leave in the stocking after they’re hung with care.
Then you can prepare the backing piece and sew that to the prepared front. This piece will need to have properly finished edges as it will show when looking into the stocking. I would fold and press a 1/2” edge and then fold that again slightly less than 1/2” inch and sew this on the machine with a straight stitch to hold the hem. Then it is just a matter of pinning this piece to the stocking and hand stitching all around the outside in a simple top stitch so that the very edge of the piece of material is pulled up closely to that last row of the hooking on the front piece. You can sew a tab on while preparing the backing piece for hanging. Also, if the material you used as a back side that isn’t great looking you can actually double it and sew it back to back, leaving a small area to turn it inside out, press and sew this to the stocking.
For these four pieces I plan to sew on a liner piece to hang them on the wall. They will never be actual stockings and if sometime down the road I decide to sell them because I have too many to hang, or someone presents a good argument as to why I should let one go, whoever buys it can take it home and have the divine pleasure of doing a bit of hand-stitching.

This is the inside curve where the stocking comes down and goes out to the toe. This is the deepest curve and really needs to be cut and stretched to fit flat and not show on the front side.

This is a softer curve on the back edge of the stocking. It doesn't needs such a dramatic cut to make the curve and lie flat.
This is the curve under the foot of the stocking. Also note how I've overlapped the outside round edges to handle the extra material and create a smooth curve.
Almost ready. Hooked and then forgotten, dug out of storage and cut out and steam pressed with Step #1. Feeling pretty good about the advancement. We'll see about fitting the linings.
This is the top stitch I use to sew the backings to the hooked stocking. I push my needle through as close to the outside hooked row as possible and then over the backing material ever so little just to catch and pull it to the loops. It snugs up nice and tight so you don't see the edge of the folded over backing.


 RSS Feed