I was recently asked about fraying wool and thought I would do a blog about cutting the various strips and what to look out for.
When cutting wool into finer cuts, you have to be very careful how it goes through the cutter blades. When I say finer, I mean #3, #4, and #5. Even thought the #5 is the middle of the road, it is still pretty narrow so if you go across the Warp as you feed it through the cutter, and cut a major fiber of the Warp, you’ll experience some fraying.
First of all, unless you cut your wool with the intensity and control of a robot, there will always be a small amount of fraying. We are human and far from perfect, but as long as we pay attention and do the following, we can maximize better cuts and the fraying will be limited.
When cutting the #6, #7, and #8 strips they are generally wide enough to keep the wool intact with less fraying but even those can be compromised beyond use if the wool gets cut more on the diagonal or bias than the straight. I once had an angry client that came into the shop and told me my wool was rotten. She said it disintegrated while she was hooking with it. She’d been at a hook-in and goodness knows what people thought of our wool as she raved about its inferiority. She brought in a ball of what she had cut and quite frankly it looked like a rat’s nest minus the rat. She showed me the piece she was cutting from and it had started out as a ½ yard piece, now down to about a ¼ yard and the cut edge was a at least at a 45-degree angle, cut totally on the bias. Every time she put it through the machine it shifted as the bulk of it pulled, what I call drag, away from the cutting area. The wool was cut completely on the diagonal until all of the vertical fibers (the Warp) had been severed through and the Weft had nothing to hold it together. Our beautiful piece of wool was nothing but fluff.
Some wools are woven in a looser weave and even washing it does little to felt it tight and that has to come into account when judging what width of strip it will need.
Wool should always be hand torn to achieve a straight edge to cut along. Never use scissors to cut a straight edge to put through a machine. Unless you’ve used a magnifying glass and have the steady hands of a surgeon, I guarantee you’ve already compromised it! TORN EDGES ONLY!
1. If you use plaids or textures the weave can be different than the warp and weft of a solid wool and don’t fare as well hooked with the smaller cuts. Now after saying that I should say that I know someone who once cut a herringbone in a #3 and it was perfect to hook with, but she guided the wool through the machine as if she was doing delicate brain surgery. For cutting plaids, I would recommend nothing less that a #6 and only if the weave is tighter than some of their looser cousins. I usually cut plaids and textures in a #7, my go to for backgrounds.
2. Cutting straight on the Warp as the wool goes through your cutter is paramount. Never use too wide a piece of wool as it will create drag and want to fall off the edge of the machine; pulling it away from the blades so that you need to keep adjusting it and that action causes the wool to snake back and forth and goes through the blades like a Cape Breton highway. My rule is never put pieces of wool through the machine that are over 3 inches wide. If cutting smaller cuts like a #4 or #3 I put though an even smaller width.
.
3. If you go a bit wonky when cutting, then turn the wool over and cut the other side. If you want to check to see how your cuts are doing, take one cut strip and pull both ends and see if little fingers of wool spring up on the edges; that means you've cut it across the grain and expect some fraying. Seeing one here and there is fine.
4. The most important tip to cutting wool in a machine is having hand torn edges that are straight along the Warp. Then even more important, is paying strict attention as it goes through as straight as possible as it is fed through the blade. I press the wool to the flat surface of the machine enough that it stretches the wool a bit but still feeds out from under my fingers into the blade. My hand doesn’t move so the wool generally keeps its straight feed along the edge of the flat surface and into the blade. If I go off a bit, then the next set of cuts will be off as well, so I correct it right away either by turning the wool over to the other torn edge side or by tearing the piece down the center of the wool and cutting from these inside straight edges.
5. Hooking can also mess with the integrity of wool strips. Holding your hook like a pencil can directly impact how your wool survives coming out of the hole. If you hold it like a pencil and go down straight and pull the loop straight up through the hole both sizes of the strip rubs the backing and it will fray from both sides. To minimize fraying, you can hold your hook like you are peeling carrots and go in from the side and back out the same way. That way it only rubs the one side of the wool as it comes out of the hole, not the piece snugged into the hook. Using a primitive hook for wider cuts will also help to cut down on the fraying as that hand made fat shank will make the backing hole open and allow the wool to freely pull through. It also reduces tugging so there is less stress on the wrist.
6.. Recycled wool is sometimes thinner and will fray more. I feel the best wool on the market for rug hooking is the Dorr wool, it is the perfect weight, felts beautifully and can be cut in #2 or #3 without fraying, but then again, no wool can withstand improper cutting. One tip I used back in the day when I was greener than grass and buying recycled wools from Frenchie’s; if it looks like wool used for summer suiting, even if it says Virgin 100% Wool, is not for this craft. No matter how much you wash it in hot water or beat it up with jeans or sneakers in the machine, it will not thicken up or felt. Worsted wool is not great either and my mantra was always, Worsted is the Worst!
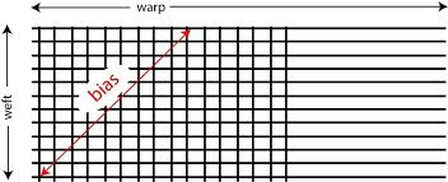
Selvage – When purchasing wool on the bolt or roll, the selvage is the finished edge of the fabric. It runs parallel to the grain or ‘Warp'. (after the selvage is removed, this is the edge that goes through your machines)
Warp – The lengthwise grain that runs along the entire length of the fabric. It is the strongest grain with the least amount of movement.
Weft – This is the grain that runs the width of the fabric and has a bit of movement or stretch to it.
Bias – The bias is at a 45* degree angle on the fabric. This grain has the most stretch.
When cutting wool into finer cuts, you have to be very careful how it goes through the cutter blades. When I say finer, I mean #3, #4, and #5. Even thought the #5 is the middle of the road, it is still pretty narrow so if you go across the Warp as you feed it through the cutter, and cut a major fiber of the Warp, you’ll experience some fraying.
First of all, unless you cut your wool with the intensity and control of a robot, there will always be a small amount of fraying. We are human and far from perfect, but as long as we pay attention and do the following, we can maximize better cuts and the fraying will be limited.
When cutting the #6, #7, and #8 strips they are generally wide enough to keep the wool intact with less fraying but even those can be compromised beyond use if the wool gets cut more on the diagonal or bias than the straight. I once had an angry client that came into the shop and told me my wool was rotten. She said it disintegrated while she was hooking with it. She’d been at a hook-in and goodness knows what people thought of our wool as she raved about its inferiority. She brought in a ball of what she had cut and quite frankly it looked like a rat’s nest minus the rat. She showed me the piece she was cutting from and it had started out as a ½ yard piece, now down to about a ¼ yard and the cut edge was a at least at a 45-degree angle, cut totally on the bias. Every time she put it through the machine it shifted as the bulk of it pulled, what I call drag, away from the cutting area. The wool was cut completely on the diagonal until all of the vertical fibers (the Warp) had been severed through and the Weft had nothing to hold it together. Our beautiful piece of wool was nothing but fluff.
Some wools are woven in a looser weave and even washing it does little to felt it tight and that has to come into account when judging what width of strip it will need.
Wool should always be hand torn to achieve a straight edge to cut along. Never use scissors to cut a straight edge to put through a machine. Unless you’ve used a magnifying glass and have the steady hands of a surgeon, I guarantee you’ve already compromised it! TORN EDGES ONLY!
1. If you use plaids or textures the weave can be different than the warp and weft of a solid wool and don’t fare as well hooked with the smaller cuts. Now after saying that I should say that I know someone who once cut a herringbone in a #3 and it was perfect to hook with, but she guided the wool through the machine as if she was doing delicate brain surgery. For cutting plaids, I would recommend nothing less that a #6 and only if the weave is tighter than some of their looser cousins. I usually cut plaids and textures in a #7, my go to for backgrounds.
2. Cutting straight on the Warp as the wool goes through your cutter is paramount. Never use too wide a piece of wool as it will create drag and want to fall off the edge of the machine; pulling it away from the blades so that you need to keep adjusting it and that action causes the wool to snake back and forth and goes through the blades like a Cape Breton highway. My rule is never put pieces of wool through the machine that are over 3 inches wide. If cutting smaller cuts like a #4 or #3 I put though an even smaller width.
.
3. If you go a bit wonky when cutting, then turn the wool over and cut the other side. If you want to check to see how your cuts are doing, take one cut strip and pull both ends and see if little fingers of wool spring up on the edges; that means you've cut it across the grain and expect some fraying. Seeing one here and there is fine.
4. The most important tip to cutting wool in a machine is having hand torn edges that are straight along the Warp. Then even more important, is paying strict attention as it goes through as straight as possible as it is fed through the blade. I press the wool to the flat surface of the machine enough that it stretches the wool a bit but still feeds out from under my fingers into the blade. My hand doesn’t move so the wool generally keeps its straight feed along the edge of the flat surface and into the blade. If I go off a bit, then the next set of cuts will be off as well, so I correct it right away either by turning the wool over to the other torn edge side or by tearing the piece down the center of the wool and cutting from these inside straight edges.
5. Hooking can also mess with the integrity of wool strips. Holding your hook like a pencil can directly impact how your wool survives coming out of the hole. If you hold it like a pencil and go down straight and pull the loop straight up through the hole both sizes of the strip rubs the backing and it will fray from both sides. To minimize fraying, you can hold your hook like you are peeling carrots and go in from the side and back out the same way. That way it only rubs the one side of the wool as it comes out of the hole, not the piece snugged into the hook. Using a primitive hook for wider cuts will also help to cut down on the fraying as that hand made fat shank will make the backing hole open and allow the wool to freely pull through. It also reduces tugging so there is less stress on the wrist.
6.. Recycled wool is sometimes thinner and will fray more. I feel the best wool on the market for rug hooking is the Dorr wool, it is the perfect weight, felts beautifully and can be cut in #2 or #3 without fraying, but then again, no wool can withstand improper cutting. One tip I used back in the day when I was greener than grass and buying recycled wools from Frenchie’s; if it looks like wool used for summer suiting, even if it says Virgin 100% Wool, is not for this craft. No matter how much you wash it in hot water or beat it up with jeans or sneakers in the machine, it will not thicken up or felt. Worsted wool is not great either and my mantra was always, Worsted is the Worst!
Selvage – When purchasing wool on the bolt or roll, the selvage is the finished edge of the fabric. It runs parallel to the grain or ‘Warp'. (after the selvage is removed, this is the edge that goes through your machines)
Warp – The lengthwise grain that runs along the entire length of the fabric. It is the strongest grain with the least amount of movement.
Weft – This is the grain that runs the width of the fabric and has a bit of movement or stretch to it.
Bias – The bias is at a 45* degree angle on the fabric. This grain has the most stretch.
Selvage Edge


 RSS Feed