When I’ve been in the shop all day and sometimes hooking at night, it seems the last thing I want to do is write about it. Not that I don’t love rug hooking, it’s my number one passion but anyone with a shop will understand, all work and no play sort of thing. So I generally like to write about my life and my experiences, sometimes they’re more interesting!
Remember, when I write about rug hooking it’s from my perspective, my experience so this is only the way I measure wool for a project…therefore making it my way, not the highway.
A regular occurrence is a rug hooker running out of wool before the project is complete. This isn’t so bad if it’s a dyed piece and you’re either a home dyer or buy from a shop because there’s always more for the making, but if you’ve invested in plaid yardage and don’t hook at the speed of sound, when you go back to that shop with fingers and toes crossed for that extra piece you need to finish, it may no longer be a stock item or worse, no longer available from the manufacturer.
A lot of the plaids I purchase for resale are one-offs. Once that lot is sold the manufacturers move on to other weaves and colours, constantly keeping us drooling for their fabulous wools. Too many times I’ve heard grown women sniffle when they come back hoping to get that extra piece they fell short of and realize they’re foiled. Sometime, if we're lucky, I phone a friend who buys my wool, to raid her stash, enough to make the client smile, but other times I have to listen to tales of woe, of having to tear it all out and start all over with something else.
Sometimes it may seem like I’m trying to sell you more than you need but trust me, I don’t want a bad scene down the road. For the sake of a few dollars more you should buy that extra piece of wool for peace of mind, sometimes it take years to complete a rug and wool waits for no hooker. Its experience talking when I tell you that the plaids come and go and I want you to be smiling to the very end of your project.
And I know how you feel…..I’m no stranger to your pain! We’ve all been in that boat. Like an addict looking for a discarded cigarette butt, I’ve actually gone through my trash looking for tails I’ve thrown out that might have a few loops left in them. I’m also one of those people who don’t hook the torn edge piece. I prefer the crisp cut from the machine on both sides of my strip, but in a pinch those ends are a sight for sore eyes. Back in the day of my rug hooking beginnings, several times I’ve almost had to rethink how I’ll finish a project if not for the garbage coughing up enough strips to get me to the finish line. I don't recommend this method.....it’s awfully stressful to finish a rug by the wiry hair of my chinny, chin, chin.
Over time I’ve gained experience. I’m no longer playing the guessing game or counting square inches. For a few years hubby was helping me do it the mathematical way. He was meticulous figuring out the square inches. He calculated all my kits for me and it was exact to the very last strip needed. Then I would add a percentage more to cover breakage and higher loops. That was great as long as he was available but there were times when it fell on me and I found counting the square inches tedious and boring. I’m a right brained person; using left brained ways are for the math geeks and birds.
So I developed this neat trick where I mentally move all the motifs on the pattern to one end so I can figure out how much is needed for the background that remains. I move one object at a time and fit it into a space between the motifs on one side and repeat this until all the bits are shifted. Then I lay material on the now pretend “empty” area to see how much is needed to cover. I’m a visual person that would rather play this in my head than have to get out the ruler and do math. I wing it rather nicely with mental acuity and it hasn’t failed me.
If you can’t wrap your head around this trick, you’re stuck with the old fashioned, get out the ruler and measure the area you wish to cover. Say it is 6” x 5”. That’s 30 sq. inches. Now multiply that x 4 for a total of 120 sq. inches. You will need 120 square inches to cover that area. If you have lots of little areas between motifs, you will need to measure each one and add their square inches all together for a final total.
Generally when figuring out how much wool is needed you fold the wool into four layers, fold in half and then again. Then you place that on the pattern in the area it's destined to determine how much area it will cover.
There are those who prescribe to the theory that you need to pull your loops as high as they are wide. I don’t and make jokes, whoever made this rule sold wool for a living because once you get to the #8 cut that’s almost a shag rug. A lot will argue with me but think of this. If you mix cuts, hook #4 for detail and #7 for background. The loops would be different levels and the rug top would be uneven. Also hooking the #7 higher would drain your wool and it’s a precious commodity, some would say equal to gold! I hook every one of the strip widths the same height and maybe a bit of on the lower side. This helps to stretch my wool to the maximum, especially that exquisite piece I might only have a smidgen off.
The general rule for coverability is if you have one square inch of area to hook, you need 4 square inches to cover that area. area. Standard is four times the amount but if you hook every hole (not skip like is necessary so your rug lies flat) or hook your loops higher than necessary, you would need to add more. This four times rule is for normal hooking, a reasonable sized loop height and skipping holes to keep from crushing the loops together like sardines in a can.
A loop should be flat across the top at all times. For healthy loops, each one should have its own space to breath. Imagine that you are a loops at a rock concert and there is standing room only. The producers of the show are greedy and let in way more people than the stadium holds so the area becomes overcrowded and you are being smashed up against all the loops around you. With so much pressure from all ends, you begin to fold in a V. So go back to being a person and imagine how you would feel in a crowd with your shoulders jammed up against people flanking you, pressing you to the point where you become round shouldered. Not a great feeling. Well pity your poor loops!
They need their own space and should have a bit of play to shift and move. Once you are stepping on that beautiful rug, the loops need to move so it doesn’t put unnecessary pressure on the backing. Rugs that are packed with wool tend to curl, one of the first indications you could skips more holes. This happens because the loop is much larger than the piece in the back that’s pulled up tightly to the backing. If they aren't all standing straight up, if they are pushing one another for space they start pushing against one another out to the edges of the rug for relief. Backings like burlap with a weaker fiber than linen, can be stressed under pressure when being walked on and over time it can snap the fibers. If the loops can’t move to accept the pressure, then the backing will suffer the consequence.
This is what I do. For the #3, #4, #5 and #6 cuts I hook 2 holes and then skip 1 hole when hooking in a line. Same with the rows. I’ll do 2 rows side by side and then skip 1 row. The holes in linen and burlap are not perfectly even so sometimes it’s a judgement call on when to skip. If you see a hole a bit larger coming up that was supposed to be a hole to skip, then hook three in a row and skip the next one. Skipping a larger hole might create a gap on the top of your loops, and seeing backing through the loops on top of your rug is a big no no. Whereas if when you look at the underside and not see lots of backing, that’s an indication you packed too many holes and rows with wool. The more backing you see in the back means your beautiful rug will lay nice and flat and can take the pressure of being walked on.
For the larger cuts, #7 and #8, I hook 1 hole and then skip 1 hole. As for the rows, I may hook a row and skip 2 rows. I judge the width of the loop and that is an indication on how many rows to skip. If you hook it too close and see that the loop is bunching or turning on an angle because it doesn’t have any space to stand unhindered, pull it out and go to the next row. There is no shame in trial and error. Lots of times I will put a loop in to see if it will be too close or too far away and then make the proper adjustment.
Personally I’ve never been able to figure out why the need to have more wool for wider cuts. Some say have up to 8 times the amount of wool for a #8 cut. I’m not sure of the concept when you are covering the same area and should be adjusting your hooking to accept the width of the strip by skipping more holes and rows. With a #8 cut I will skip several rows between them to accommodate the 1/4” width of the loop. I never cram my loops, I let them spread out naturally. I’m covering the same surface area that I would do for a #4 cut that is half the width of a #8 strip. Theoretically they should both fill the same space equally?
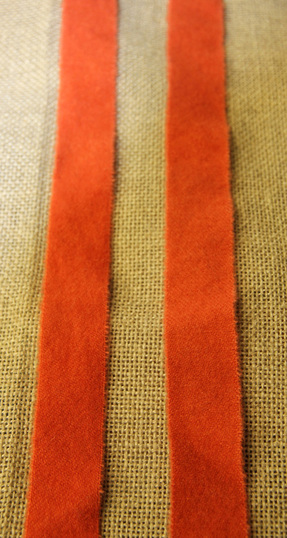
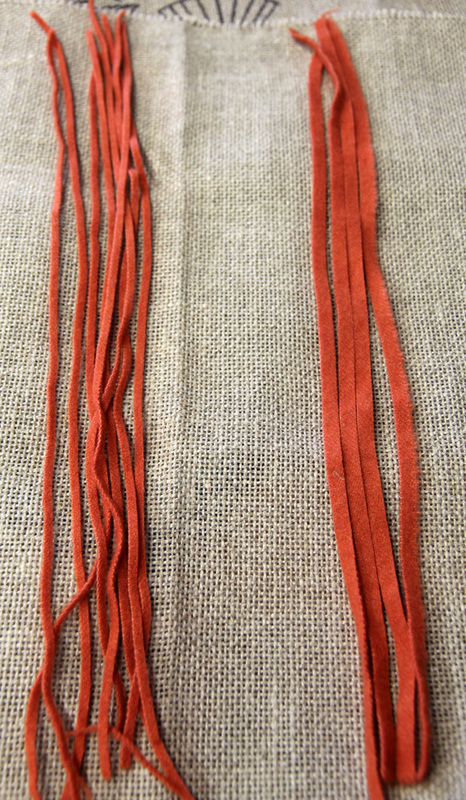
So here is my experiment. I’ll take the same size of two pieces of wool and cut one in a #4 and the other in a #8. Then I will hook an area to see if I get the same coverability. The truth will be in the pudding. Of course this is my pudding, I’m not saying what others do is wrong, I’m just a curious mind and need to know things. Be right back!
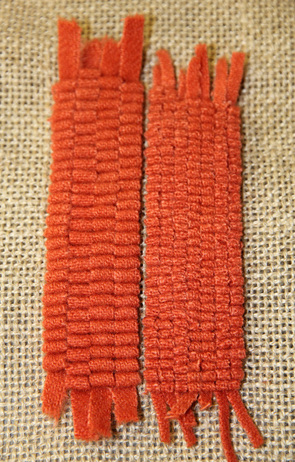
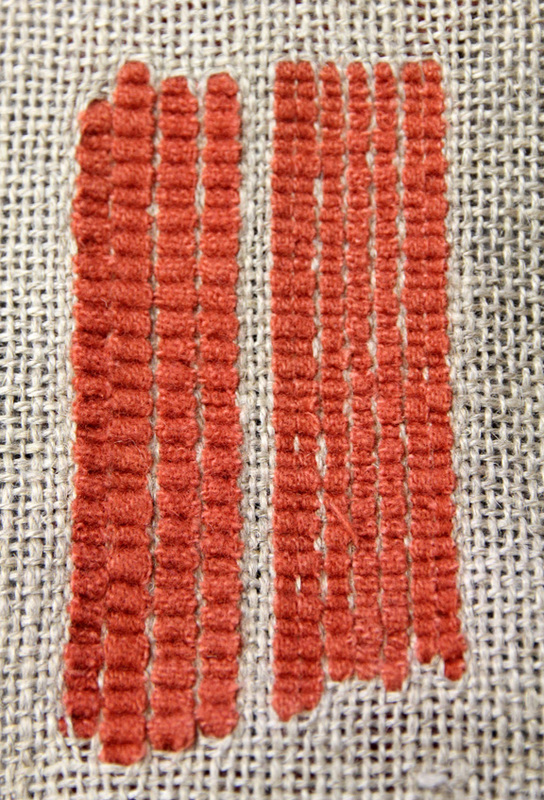
Then I hooked each set. I’m skipping holes with the #8 cut, I hooked one hole and then skipped the next, and sometimes I even skipped two holes if the weave was tighter together. I skipped rows between each line of loops, I calculated the amount of rows I could miss without showing a gap between them and that way my loop stayed straight across and didn’t get crunched. You can see in the picture that my loops are of good structure, none are mashed together and they have a healthy fullness. Packing, squeezing the loops into every hole makes them wafer thin across the top requiring way more wool to fill in the space.
Then I hooked the #4 strips. I hooked 2 holes and then skipped a third. For rows I hooked two together and then skipped the next row. Repeated that process over and over.
To me the finished comparison is very close in width and length. There is not enough difference to warrant needing 6 - 8 times more wool to hook the area with a #8 cut. My loops, as I mentioned earlier are hooked the same height for both cuts. This way you can mix cuts in a rug, especially using up worms from previous projects and still keep the surface of your mat flat and even. Anyway, that's the way I roll.....




 RSS Feed


