My apologies for the delay posting these assembly instructions. The day after we mailed out the first load of patterns, I had the most excruciating sciatica flareup and I wasn’t able to sit at the computer to write the post. After a very long month of discomfort, I am finally back to work.
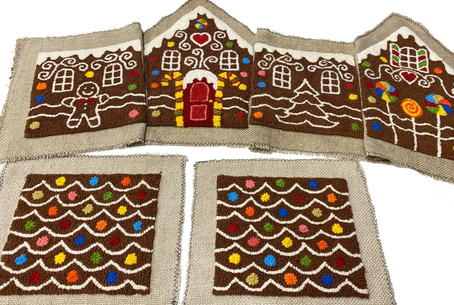
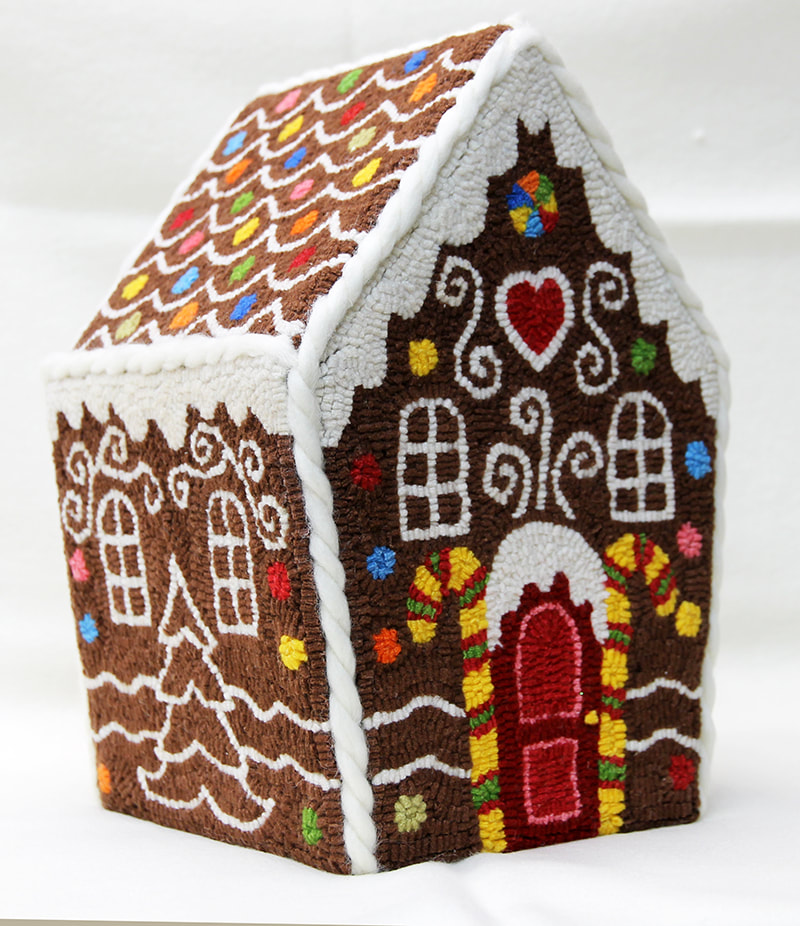
I hope you enjoyed hooking this little gingerbread house as much as I did. this is the first one of a trilogy I plan to design and hook to make a sweet little gingerbread house village. I am already half way through hooking the next house. Stay tuned!
I used our beautiful Walnut wool dyed by Shane. It was the perfect Gingerbread colour and contrasted perfectly with the White for the icing and all of the splashes of colour for the candies.
First hook all of your sides and roof. Steam press to flatten. Zig-zag around each piece or you can forego this step because of gluing the edge to the core board backing so fraying won't occur. I left an excess of linen about 1 ¼” around each piece.
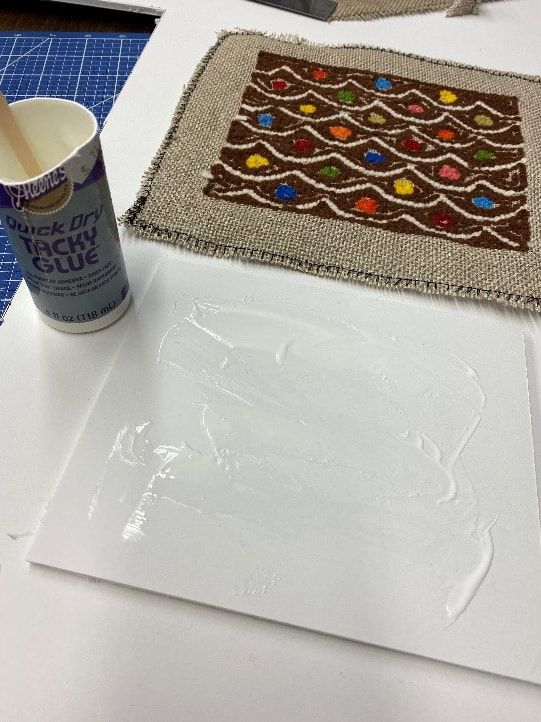
The supplies you will need to construct the house are a ruler, fast drying tacky glue, coffee stir sticks or a piece of plastic cut from an ice cream container to spread the glue, stapler, carpet knife, foam core board or other thin backing and some sort of continuous roving to hide to seams.

Next cut out a rigid backing for each panel. I used a foam core board that was about 1/8” thick. You could use a thinner backing but I wouldn’t go any thicker than the 1/8” or your side seams will be wider apart and need more twisted roving to fill them.
Use the hooked pieces as a template and cut out each backing shape with carpet knife or other type of blade. Once you have the backing piece cut to fit, put glue all over one side and attached the backside of the rug to it. Make sure that it is firmly adhered to the board so it won’t begin to sag over time. I used a fast-drying tacky glue that I bought from a fabric store. It dried fast and clear.
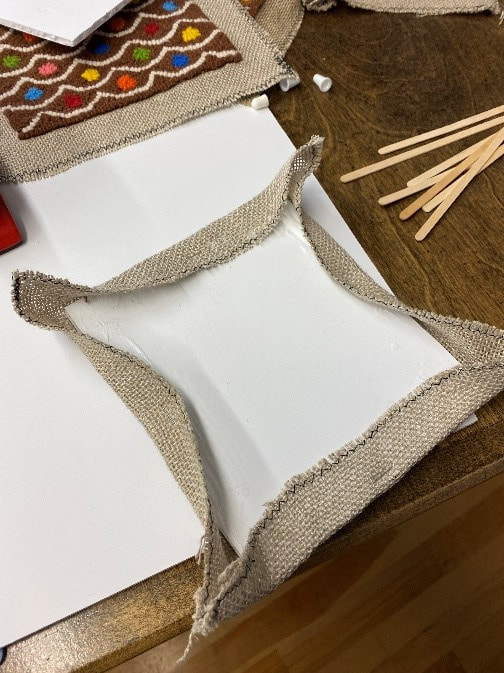
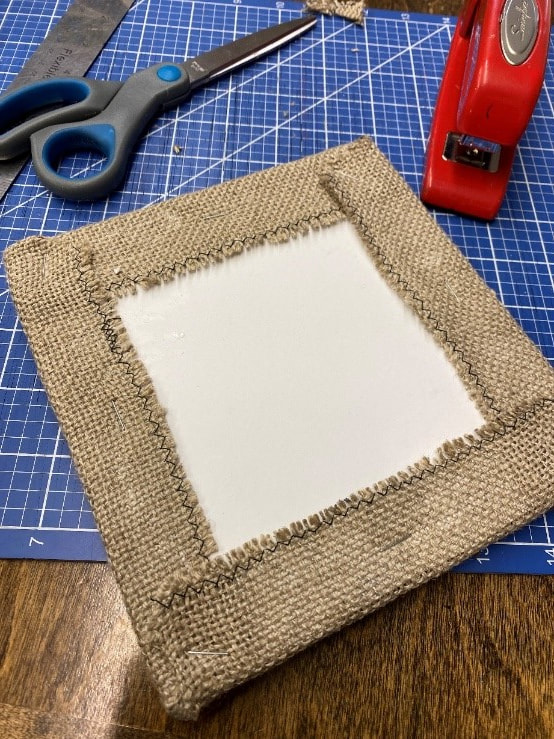
Once the core board is glued to the rug front, apply glue to the backside of the cord board where the excess linen will be stuck on. I did one side at a time and put a staple in the middle of each side to hold it from moving until the glue was dry. (Don’t use the full stapler (you don’t want the staple to go through the rug), just hold the top part of the stapler over the area you wish to affix and then press down.)
Then miter or fold over the corners, add glue keeping them as flat as possible. I also popped a staple into each corner to hold it down.
After all sides are glued, pressed down with your hands to make sure it was well stuck to the foam core board and as flat as possible.
Use the hooked pieces as a template and cut out each backing shape with carpet knife or other type of blade. Once you have the backing piece cut to fit, put glue all over one side and attached the backside of the rug to it. Make sure that it is firmly adhered to the board so it won’t begin to sag over time. I used a fast-drying tacky glue that I bought from a fabric store. It dried fast and clear.
Once the core board is glued to the rug front, apply glue to the backside of the cord board where the excess linen will be stuck on. I did one side at a time and put a staple in the middle of each side to hold it from moving until the glue was dry. (Don’t use the full stapler (you don’t want the staple to go through the rug), just hold the top part of the stapler over the area you wish to affix and then press down.)
Then miter or fold over the corners, add glue keeping them as flat as possible. I also popped a staple into each corner to hold it down.
After all sides are glued, pressed down with your hands to make sure it was well stuck to the foam core board and as flat as possible.
 |  |
After all the pieces were glued to a solid backing, I placed the sides of the building together in order (short side, then high side, short side, then high side) all together with the finished rug side down. With all backsides together I used a needle and thread to sew them all together. My first intention was to hot glue gun them together and without an assistant or means to hold them together it was awkward. So, I sewed them together, all but the last join that had to be sewn from the outside edge. I liked how rigid it felt so I then hand sewed the outside corners, placed the roof pieces and then sewed them as well from the outside. This held it very rigid so I didn’t need the hot glue gun or the burnt fingers that would have ensued.
I squeezed glue along the outside edges of each seam and used the thin coffee sticks to smear it into the linen and cover the crack well. Work on the peak of the roof and the two sides of the roof that come down over the shorter two sides of the house first. I used two strands of the merino roving and twisted it gently as I went, running it along those glued seams and patting it down into the groove for a good hold.
I squeezed glue along the outside edges of each seam and used the thin coffee sticks to smear it into the linen and cover the crack well. Work on the peak of the roof and the two sides of the roof that come down over the shorter two sides of the house first. I used two strands of the merino roving and twisted it gently as I went, running it along those glued seams and patting it down into the groove for a good hold.
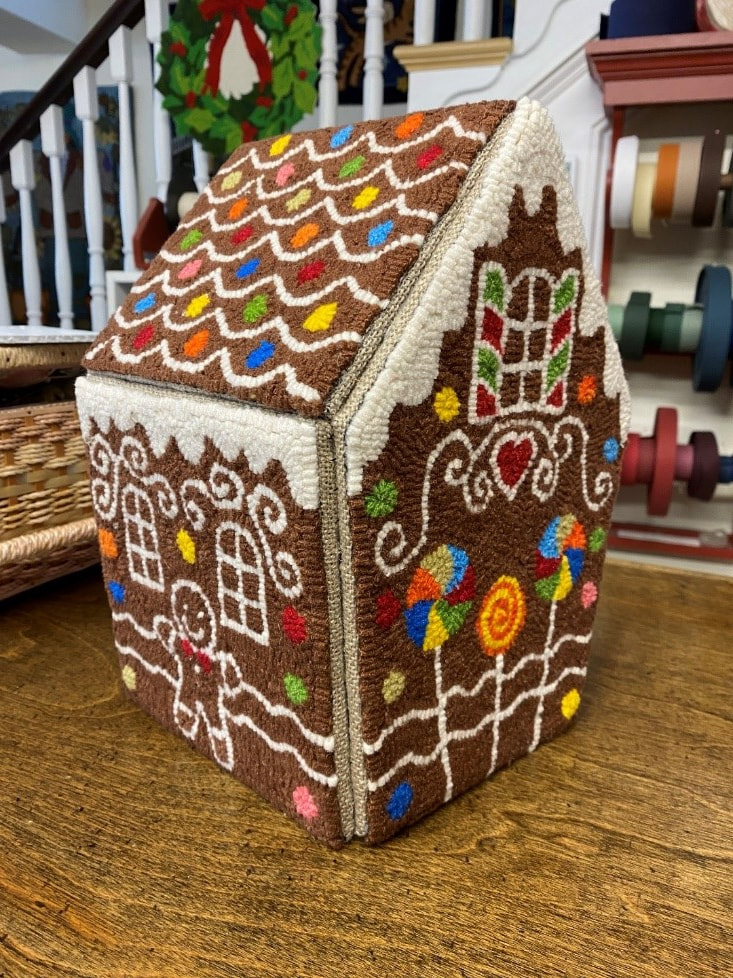
Then I did the front and back, adding the glue first, smearing it in and then starting at the bottom, tucking the end of the roving inside, (I put a bit of glue in there to hold it), then ran it up the one side, over the roof peak, twisting the roving as I went until I reached the other side bottom, putting some glue inside that corner as well to hold the end of the roving. Sorry I was so intent and excited doing this part I forgot to take a photo.
 |  |


 RSS Feed