Order the fabulous Wool Widget today! The first twenty customers will receive a fat quarter of Dorr Natural to get started!
The Wool Widget comes with instructions.
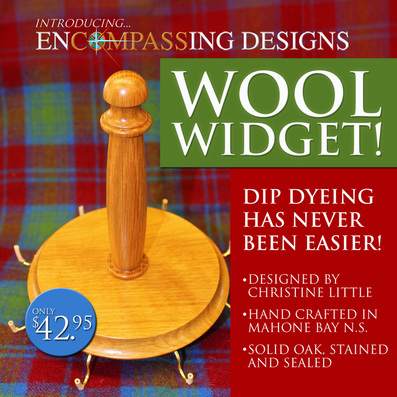
Encompassing Designs is proud to introduce the Wool Widget!
The best little gadget since the wool cutter! It holds the wool to reduce accidents; we’ve all dropped our wool into the dye bath using pins and tongs! No more burning fingers in scalding water!!
Made in Mahone Bay!
Sits in the water while you answer the phone or mix the next solution.
The round shape fits nicely in the pot
Beautifully turned oak with sturdy spool handle for gripping
Finished with varnish
No fuss, pointed brass hooks hold the wool secure
Instructions on how to use your Wool Widget
If your wool is the same size as the circumference of the base you can attach it snuggly. Hook the wool with slightly less than ½ inch edge to have a firm grip on the fabric. If the wool is wider you can let it hang loosely by draping it from hook to hook until it fits around the entire base. The holes will not impact your hooking and will be in the end of the cut strip that will end up a tail that will be cut off. The holes will hardly be seen once the wool is removed and dried. You can also snag the selvage edge which will be removed. The wool can also be hung slightly overlapped or double thickness.
Use a hotplate on a low table if available or on the floor so you don’t have to stand on a ladder or step stool to be able to dip longer pieces of wool on the stove burner. It is safer to work closer to the floor to avoid unfortunate accidents with hot water and splashing on the face. Big tip – don’t wear open toed shoes or sandals!!! If you have a range hood that is low and reaches out over the burners you may have to roll the stove out from the wall to clear the hood when dipping up and down. Most stoves are on rollers for ease of cleaning behind them so they slide in and out easily.
Have your formulas ready to go so you don’t have to stop between adding each colour. A practice formula is below and to lessen or intensify the colour you can add or subtract dye powder. This would dye a ½ piece of natural with a medium colouring. Don’t worry about the colours being too bright on their own. Once they are overlapped it will tone them down a bit. I use Majic Carpet dyes but any basic yellow, orange and red would work.
Equipment Needed to dip-dye Fire Formula
3 measuring cups (one cup per formula)
Dye - Stir sticks - Vinegar - Tablespoon
Pot - 12 Quart is a nice size with high walls (less splashing)
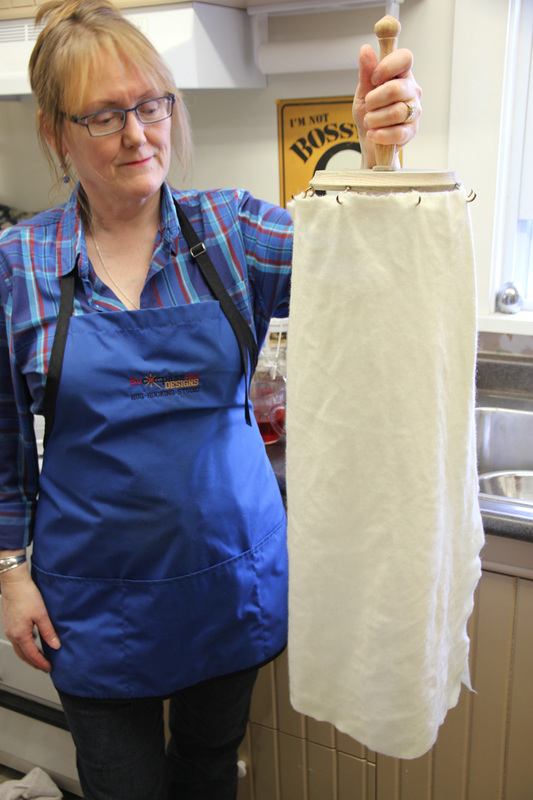
Wool widget - Wool
Heat source (stove burner or hotplate)
Paper towel - Aluminum Foil
Pan - Oven
Fire
1st Formula 1/16 tsp. Yellow
2nd Formula 1/16 tsp. Orange
3rd Formula 1/16 tsp. Red
Mix each formula in 1 cup boiling water with 2 Tbsp. vinegar
Add your first colour (Yellow) to the hot water. Not boiling, just simmering. At no time do you allow the water to boil, if it gets too hot turn down the burner or add a bit of cold water.
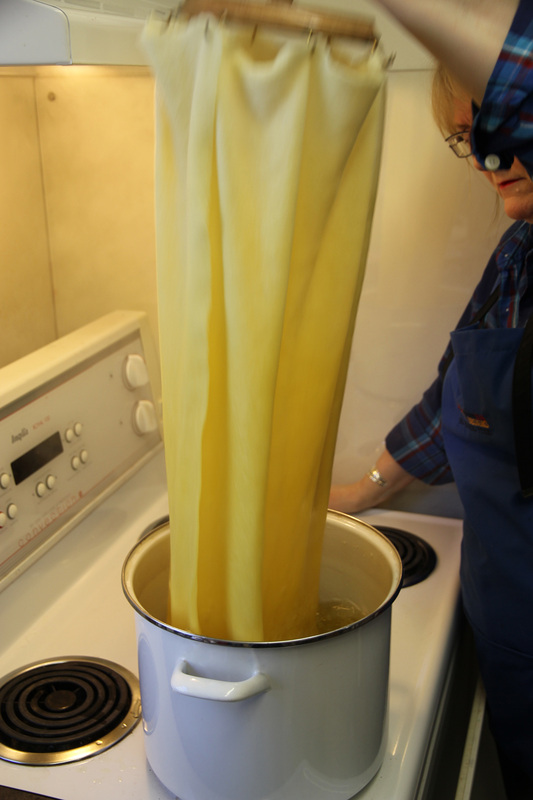
Put the wool into the pot and pump it up and down in an even rhythmic movement getting the bottom third saturated with the dye. Slowly dip it farther into the pot, continuing the pump action until you reach the upper area of the wool. You can dip it right over the top of the wool by lowering the entire widget just below the water.
Never stop in the middle of dipping the wool when there is still a lot of dye in the pot or it will create a visible line. (This of course won’t impact your hooking, it just creates less of a smooth transition.) If your arm gets tired lift the wool right out of the dye bath to rest for a moment and then continue. If you are distracted by company or the phone, get a hand basin and hold it under the wool to collect the drips on the way to the counter and lay the Widget and the wool in the sink, draped over the center divider with the Widget in one sink and the wool in the other. Resting the wool will be fine until you can get back to the process.
Pump up and down until most of the dye is absorbed, this will lay down the first colour on the entire piece of wool and it should look graduated, darker on the bottom and lighter on the top. If you want the wool to be darker on top with the first colour by all means pump it up and down right to the top, the first colour won’t impact the end result as much as the other two because it is usually the lightest of the three.
This is the fastest form of dyeing wool; the pumping, up and down action will force the dye into the center of the wool so there won’t be any white core even though you are starting with hot water. Steady movement is what makes the dye grab and sink its teeth into the fabric. Also the faster the movement, the quicker the dye will adhere to the wool.
Do this until the first colour is mostly absorbed and then pour in the second colour. For this example we are creating a fiery look with yellow as the base and orange as the medium level and then red as the last infusion.
Hold the wool over the pot while you pour in all of the Orange dye. You don’t really have to stir, just start pumping the wool up and down and it will quickly blend and start the absorption of the second colour. Keep the bottom third of the wool in constant motion and slowly graduate up to the middle. For this particular dip dyed effect you want the end result colours to show yellow to light orange in the first third or top, medium orange to orangey red in the middle and then a deep version of all three colours in the bottom third. When most of the dye is absorbed you can actually dip it right up to the top to tone down the yellow with a bit of the residual orange. This is personal choice.
Once the orange is mostly or completely absorbed add the red dye and repeat. Remember the colour of the wool is always darker when it is wet.
Measuring wool for dip dyeing:
You will need to calculate the length of the wool to match the item you are dyeing it for. If you are planning to hook for an item such as a leaf that is about three inches long you would make sure the wool length is four times that, 12 inches long. If doing larger items measure the wool accordingly keeping in mind there are limitations. Putting the pot on the floor will allow fairly long pieces to be dip dyed after that you will be up and down a ladder!
Dip dyeing can be done just as effectively with a single colour to use in place of a 6, 8 or 12 value graduated swatch. It is a much smoother transition from light to dark then you get from the half cup replacement way of dyeing. For the more dramatic look you would use two, three or more colours.
After you have achieved the look you want, remove the wool from the Widget and lay it in a pan lined with paper towel. If the wool is longer than the pan, fold the wool over and put paper towel between the layers so there won’t be any transference of colour. Cover with foil and bake in a 250* oven for ½ hour to firmly set. You can layer several different dip dyes as long as you use paper towel in-between them to keep the colours from mixing.
Tips: Clean and dry the Wool Widget after use, especially the hooks as the vinegar is acidic and will rust them. If in time the they discolour and stain the wool, use fingernail polish to coat them and just reapply every now and then.
As long as the most of the dye is absorbed by the wool you can sit your Widget on top of the water and it will not sink. Too much dye remaining will darken the top part of the wool that was meant to be lighter.
Over time the acidity of the vinegar and the submerging in hot water might wear away the finish of your Widget but that will not impact its use. Hardwood does not absorb colour easily and what does show generally won’t stain your wool. You can reapply a coat of varnish if you wish.
*You don’t have to use these little plastic pieces as the wool should stay on. If you get a bit too rambunctious with your dipping the wool might pop off one of the hooks but just slip it back on. Hold the wool level at all times as tipping it is what will push the wool up and off one of the hooks!
The best little gadget since the wool cutter! It holds the wool to reduce accidents; we’ve all dropped our wool into the dye bath using pins and tongs! No more burning fingers in scalding water!!
Made in Mahone Bay!
Sits in the water while you answer the phone or mix the next solution.
The round shape fits nicely in the pot
Beautifully turned oak with sturdy spool handle for gripping
Finished with varnish
No fuss, pointed brass hooks hold the wool secure
Instructions on how to use your Wool Widget
If your wool is the same size as the circumference of the base you can attach it snuggly. Hook the wool with slightly less than ½ inch edge to have a firm grip on the fabric. If the wool is wider you can let it hang loosely by draping it from hook to hook until it fits around the entire base. The holes will not impact your hooking and will be in the end of the cut strip that will end up a tail that will be cut off. The holes will hardly be seen once the wool is removed and dried. You can also snag the selvage edge which will be removed. The wool can also be hung slightly overlapped or double thickness.
Use a hotplate on a low table if available or on the floor so you don’t have to stand on a ladder or step stool to be able to dip longer pieces of wool on the stove burner. It is safer to work closer to the floor to avoid unfortunate accidents with hot water and splashing on the face. Big tip – don’t wear open toed shoes or sandals!!! If you have a range hood that is low and reaches out over the burners you may have to roll the stove out from the wall to clear the hood when dipping up and down. Most stoves are on rollers for ease of cleaning behind them so they slide in and out easily.
Have your formulas ready to go so you don’t have to stop between adding each colour. A practice formula is below and to lessen or intensify the colour you can add or subtract dye powder. This would dye a ½ piece of natural with a medium colouring. Don’t worry about the colours being too bright on their own. Once they are overlapped it will tone them down a bit. I use Majic Carpet dyes but any basic yellow, orange and red would work.
Equipment Needed to dip-dye Fire Formula
3 measuring cups (one cup per formula)
Dye - Stir sticks - Vinegar - Tablespoon
Pot - 12 Quart is a nice size with high walls (less splashing)
Wool widget - Wool
Heat source (stove burner or hotplate)
Paper towel - Aluminum Foil
Pan - Oven
Fire
1st Formula 1/16 tsp. Yellow
2nd Formula 1/16 tsp. Orange
3rd Formula 1/16 tsp. Red
Mix each formula in 1 cup boiling water with 2 Tbsp. vinegar
Add your first colour (Yellow) to the hot water. Not boiling, just simmering. At no time do you allow the water to boil, if it gets too hot turn down the burner or add a bit of cold water.
Put the wool into the pot and pump it up and down in an even rhythmic movement getting the bottom third saturated with the dye. Slowly dip it farther into the pot, continuing the pump action until you reach the upper area of the wool. You can dip it right over the top of the wool by lowering the entire widget just below the water.
Never stop in the middle of dipping the wool when there is still a lot of dye in the pot or it will create a visible line. (This of course won’t impact your hooking, it just creates less of a smooth transition.) If your arm gets tired lift the wool right out of the dye bath to rest for a moment and then continue. If you are distracted by company or the phone, get a hand basin and hold it under the wool to collect the drips on the way to the counter and lay the Widget and the wool in the sink, draped over the center divider with the Widget in one sink and the wool in the other. Resting the wool will be fine until you can get back to the process.
Pump up and down until most of the dye is absorbed, this will lay down the first colour on the entire piece of wool and it should look graduated, darker on the bottom and lighter on the top. If you want the wool to be darker on top with the first colour by all means pump it up and down right to the top, the first colour won’t impact the end result as much as the other two because it is usually the lightest of the three.
This is the fastest form of dyeing wool; the pumping, up and down action will force the dye into the center of the wool so there won’t be any white core even though you are starting with hot water. Steady movement is what makes the dye grab and sink its teeth into the fabric. Also the faster the movement, the quicker the dye will adhere to the wool.
Do this until the first colour is mostly absorbed and then pour in the second colour. For this example we are creating a fiery look with yellow as the base and orange as the medium level and then red as the last infusion.
Hold the wool over the pot while you pour in all of the Orange dye. You don’t really have to stir, just start pumping the wool up and down and it will quickly blend and start the absorption of the second colour. Keep the bottom third of the wool in constant motion and slowly graduate up to the middle. For this particular dip dyed effect you want the end result colours to show yellow to light orange in the first third or top, medium orange to orangey red in the middle and then a deep version of all three colours in the bottom third. When most of the dye is absorbed you can actually dip it right up to the top to tone down the yellow with a bit of the residual orange. This is personal choice.
Once the orange is mostly or completely absorbed add the red dye and repeat. Remember the colour of the wool is always darker when it is wet.
Measuring wool for dip dyeing:
You will need to calculate the length of the wool to match the item you are dyeing it for. If you are planning to hook for an item such as a leaf that is about three inches long you would make sure the wool length is four times that, 12 inches long. If doing larger items measure the wool accordingly keeping in mind there are limitations. Putting the pot on the floor will allow fairly long pieces to be dip dyed after that you will be up and down a ladder!
Dip dyeing can be done just as effectively with a single colour to use in place of a 6, 8 or 12 value graduated swatch. It is a much smoother transition from light to dark then you get from the half cup replacement way of dyeing. For the more dramatic look you would use two, three or more colours.
After you have achieved the look you want, remove the wool from the Widget and lay it in a pan lined with paper towel. If the wool is longer than the pan, fold the wool over and put paper towel between the layers so there won’t be any transference of colour. Cover with foil and bake in a 250* oven for ½ hour to firmly set. You can layer several different dip dyes as long as you use paper towel in-between them to keep the colours from mixing.
Tips: Clean and dry the Wool Widget after use, especially the hooks as the vinegar is acidic and will rust them. If in time the they discolour and stain the wool, use fingernail polish to coat them and just reapply every now and then.
As long as the most of the dye is absorbed by the wool you can sit your Widget on top of the water and it will not sink. Too much dye remaining will darken the top part of the wool that was meant to be lighter.
Over time the acidity of the vinegar and the submerging in hot water might wear away the finish of your Widget but that will not impact its use. Hardwood does not absorb colour easily and what does show generally won’t stain your wool. You can reapply a coat of varnish if you wish.
*You don’t have to use these little plastic pieces as the wool should stay on. If you get a bit too rambunctious with your dipping the wool might pop off one of the hooks but just slip it back on. Hold the wool level at all times as tipping it is what will push the wool up and off one of the hooks!
 Majic Yellow, Orange & Red | 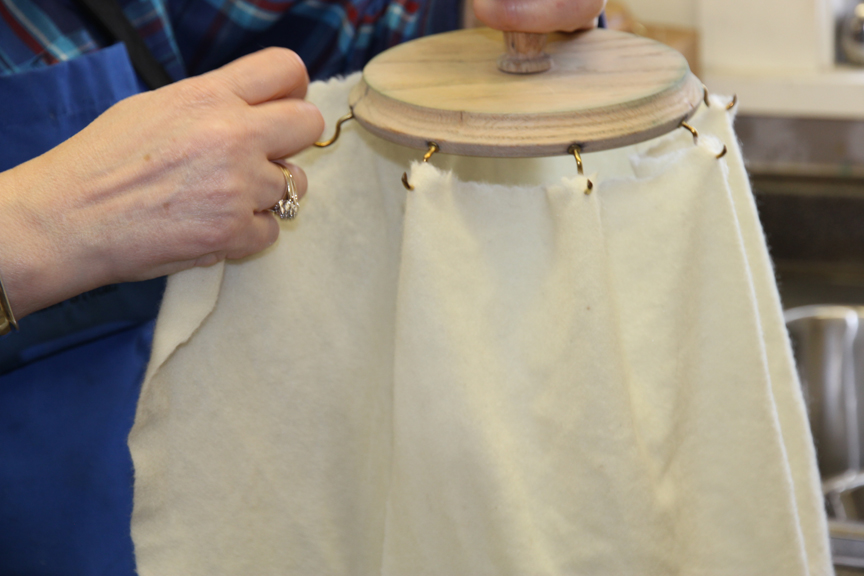 Pushing the wool down over the hooks. |
 Ready to roll! |  The pumping action has begun. | 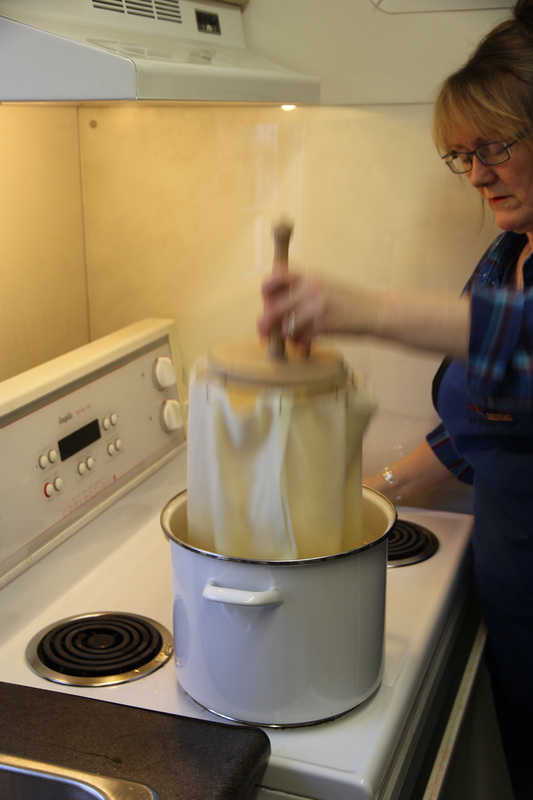 Starting to lower to dye top third. |
 The dye bath is almost clear. | 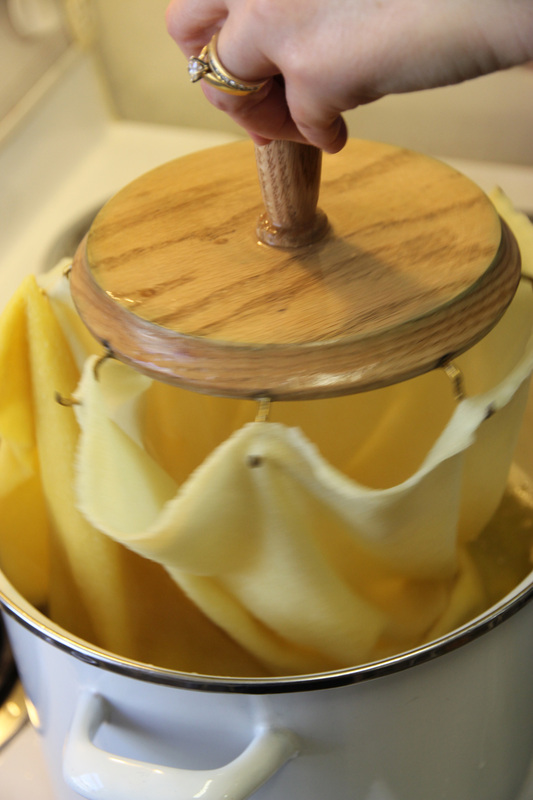 Lowering to darken the top a bit. | 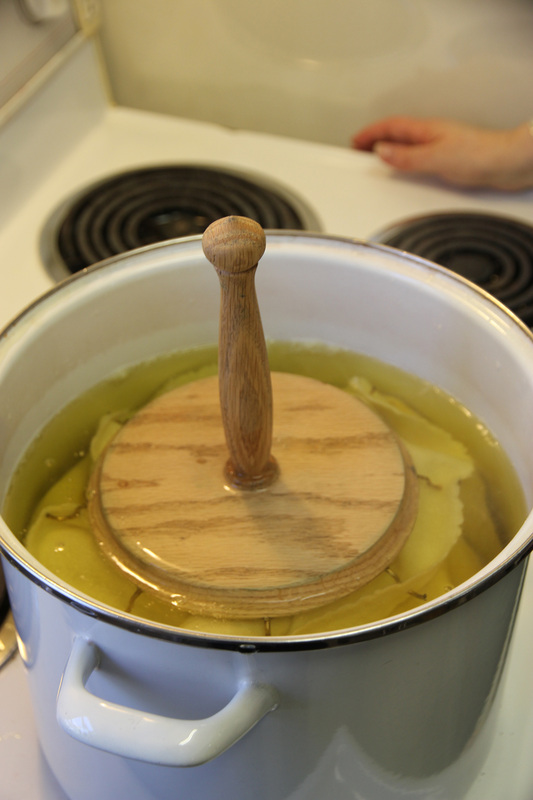 Letting it rest for a moment. |
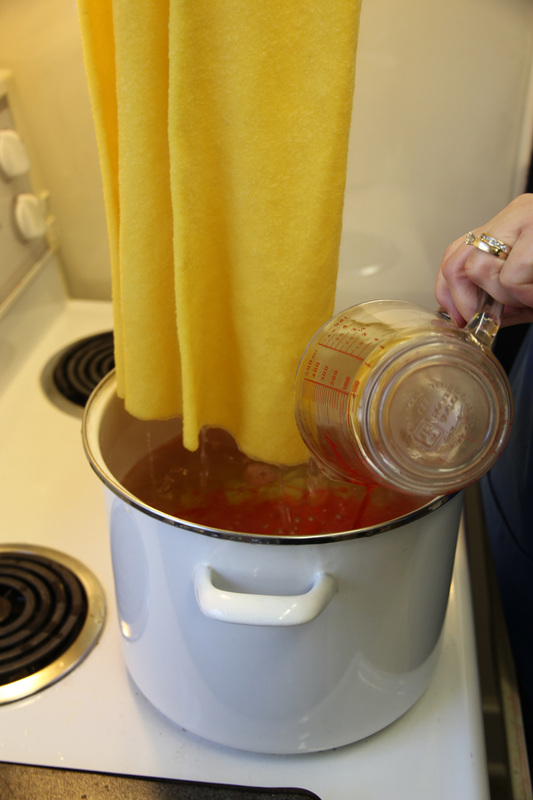 Adding the orange. | 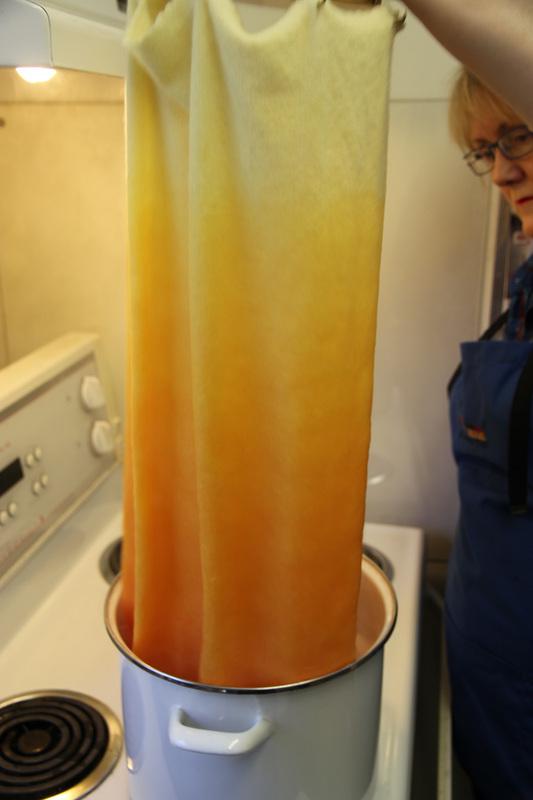 Pumping up and down with orange. | 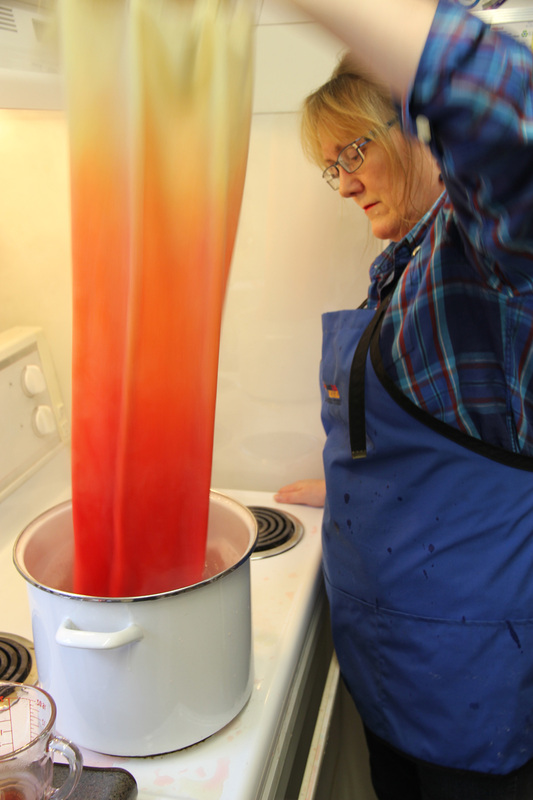 Pumping up and down with red. |
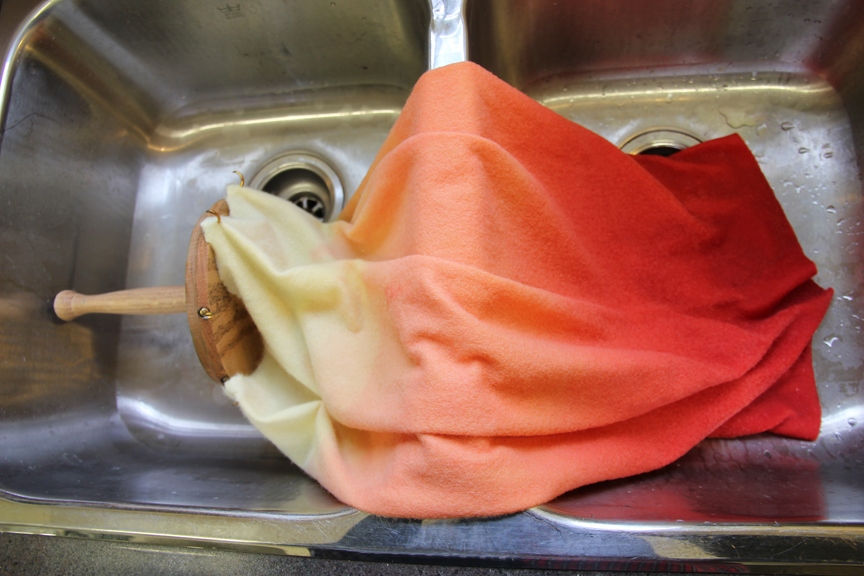 Finished wool in the sink.  Add more paper towel and fold over top half.  Cover with tin foil and put in 250* for 1/2 hour. 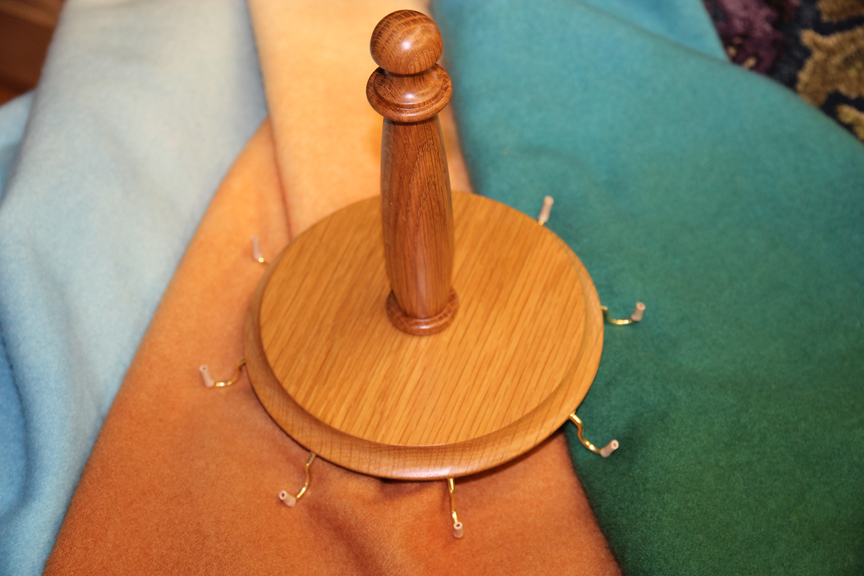 The Wool Widget. | 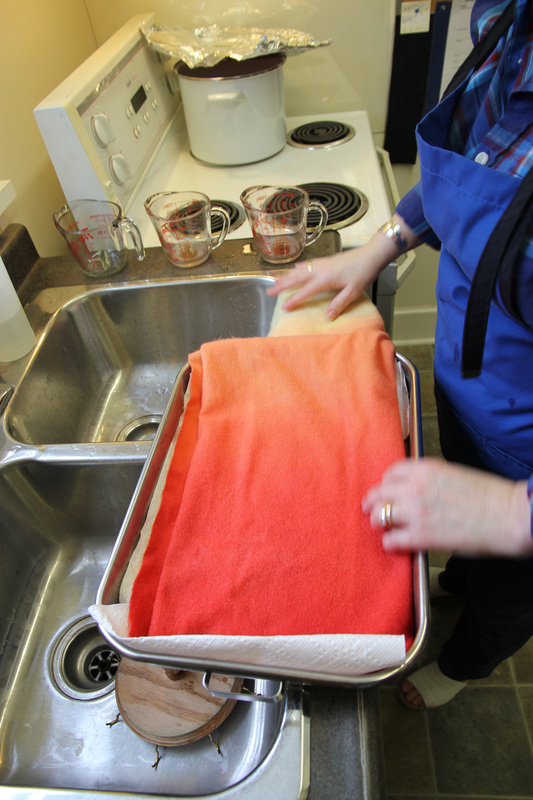 Lay bottom part flat on paper towel. 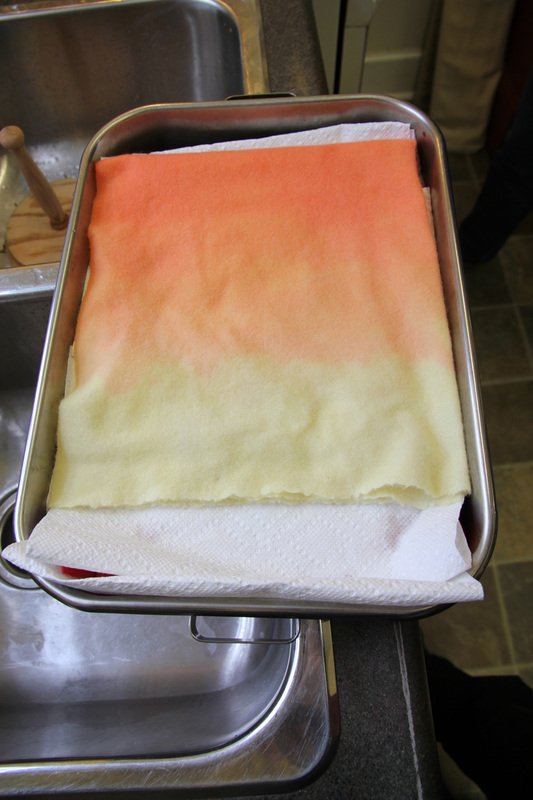 Top half folded.  Wool spun dry and twisted to show the variance of colour from yellow to orangey red. Gorgeous for flowers, sunsets and fire. |


 RSS Feed