 |  |
You can do so much with a pillow sized rug. Make a chair pad, hang it on the wall, rest it on a trunk, coffee table mat or use it as a cushion for your home. It's rewarding to treat yourself to a smaller project after completing a larger rug, and if you are into selling your hooked items, small seems to trump large items more than not. A tourist, with limited room in their suitcase, will happily pay for a smaller piece, not only for the lessor cost but also for its packing ability. A set of coasters, a trivet, chair pad or pillow will fit nicely among folded clothing without creating a lot of extra weight. Larger items are often bypassed for the smaller keepsake as only a few of your customers will opt to have the item shipped home, so unfortunately, 95% of them will just walk away.
Besides, who doesn’t love a good pillow? It’s an international accessory for the home, beautiful to look at and comfort for the head. Smaller projects also hook quickly, so there’s instant gratification for your toil. And as for gift giving, it’s much easier to give a project away when it worked up quickly as I recently learned over Christmas, than a rug project that spanned over a year or more.
Finishing the pillow can be as easy as hooking it, although I hear it all the time, how the hooking is fun but sewing on the back is a chore. A lot of rug hookers I’ve talked to farm that job out to local seamstresses, (I’m not sure if that name is politically correct anymore but I’m referring to the wonderful thread wizards that sew out of their homes for a living).
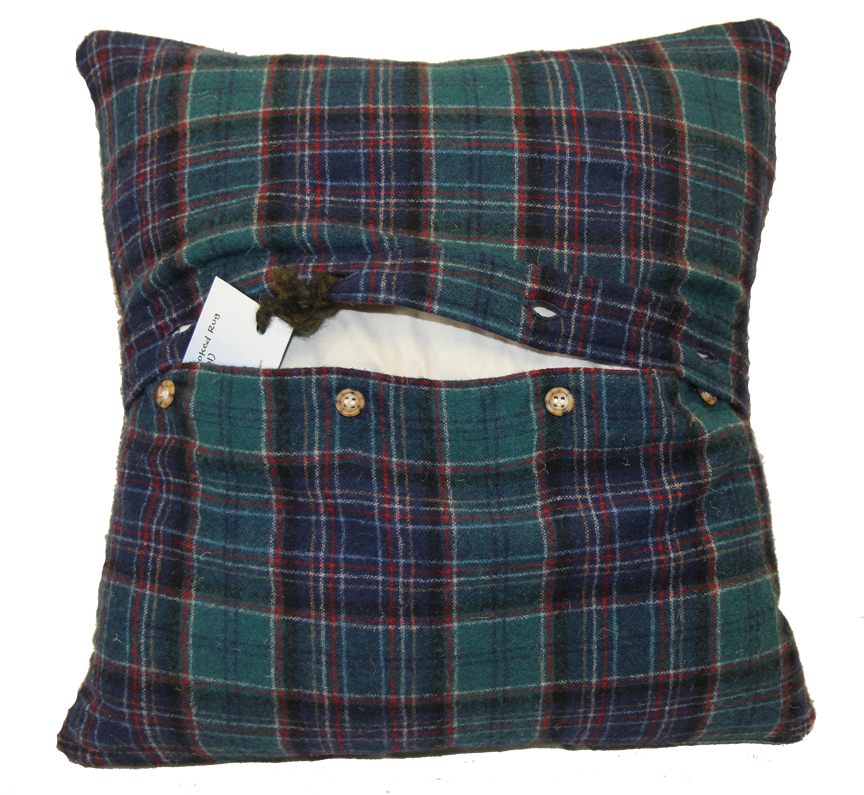
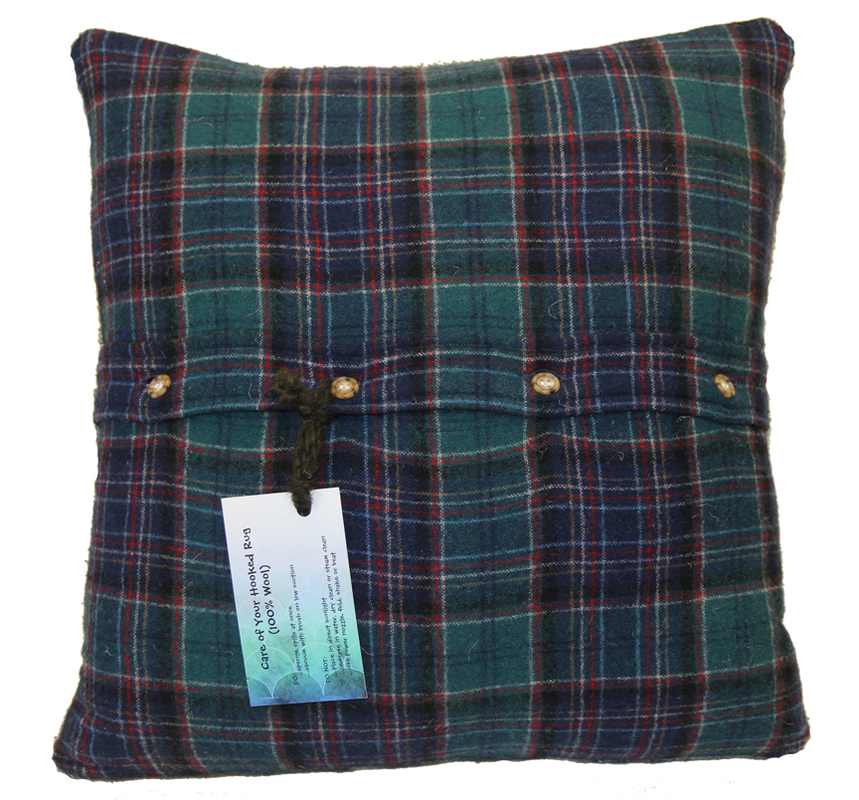
This clever way of finishing a pillow, first came to me by way of Linda Ruth, one of the Main Street Rug Hookers who made beautiful pillows using recycled Pendleton Shirt plackets for the backings. It changed the groan factor to a WOW factor when sewing a back on a pillow, even I could do it! Using a wool shirt placket means there aren’t any buttons to fuss with or button holes to create because they’re already there! It’s ‘sew’ easy and another way to recycle those fabulous wool shirts. And even if you are not concerned about making an opening to be able to remove the form, sewing on a solid backing, this technique works for this as well.
Then the brilliant Sue Cunningham took this great idea to another level with her suggestion of hooking the last outside border row around the pillow in a #8 cut strip. This is the row that you will sew the backing to and it also provides a straight line for a guide.
Easy Steps to create the perfect pillow back
Step 1 - Find a complimentary coloured Pendleton shirt (maybe even use a bit of in the pillow front for a custom blending or if you have a shirt that doesn’t match, throw a little dye on it to blend with the rug). Button the shirt and cut out a square the size needed. If the shirt has a pocket on it you can leave it on or carefully remove it with a seam ripper. Cut out this wool backing the same size as the excess backing edge left around the hooked item. (Assuming you have already steamed and zig-zagged 1” out all around your hooked pillow top to cut it out.)
Step 2 –Place the loop side of the hooking with the right side of the placket and pin together. Usually the placket will run horizontally across the middle of the pillow so make sure it remains straight across but if there is a hole in the shirt or if you tear the material when removing the pocket, cut the front of the shirt so the placket can be positioned higher or lower on the back. Pin the two pieces together well. I pin the excess backing of the rug and the shirt together and then pin an inch away from where I plan to sew on the inside of the pillow. They have to be well secured together so there is no movement of the two pieces when being put through the sewing machine. If you don’t want to use pins you can baste stitch the two pieces together with a different coloured thread so it is easy to see and pull out later after the machine stitching is completed.
Step 3 - Now work from the back of the hooked side of the pillow and run it through the sewing machine staying in the center of that #8 cut row of loops. The rug and backing will be thick to sew through so make sure the tension is set properly so there isn’t any bunching and pulling on the shirt underneath as it goes through the machine. Sewing directly down the center of the loop will insure there is no backing showing along the edge when you turn the pillow right side out. The great thing about using a shirt placket, is that you don’t have to leave a gap in the sewing at the bottom of the pillow to later stuff the pillow form in and then hand stitch up the gap.
Step 4 – After you have sewn around the entire pillow trim each corner point off in a diagonal line, leaving at least 1/2" so you don’t have a lot of bulk when you turn the pillow right side out. Unbutton the placket; turn the pillow right side out, using your finger, a large knitting needle or proddy tool, to push out the corners so they open as much as possible. Steam press the bulkiness out, insert your pillow form and voila you have the easiest pillow imaginable. No sewing the usual gap shut that you struggled to force the pillow form into. How many times have I done this by making that hole too small and then almost tearing it when pushing the form through? No sewing on buttons or making those dreaded button holes or as some do, sewing on Velcro. You have a pillow that opens easily and it is very attractive to view. Your pillow will look professionally put together if you are selling in a boutique or impressing a loved one.
Tip – If backing shows anywhere around the edge use a coloured marker and rub it along the exposed burlap or linen. Markers come in many colours so you can match pretty much any shade. Especially if the border was hooked in dark colours, a bit of burlap or linen peeking through isn’t attractive.
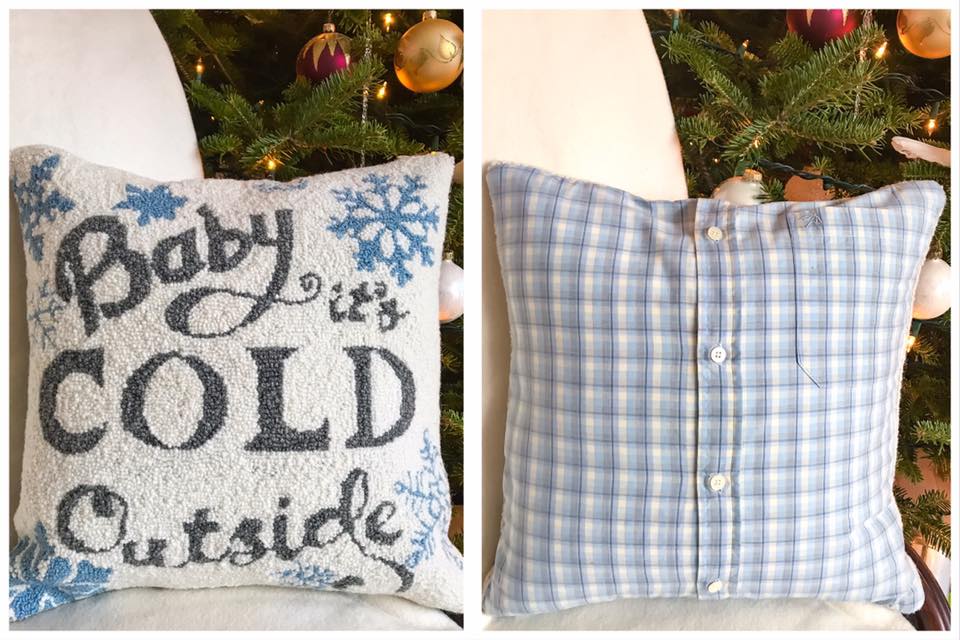
Also, don’t turn your nose up at a linen or cotton shirt to use as a pillow backing. Do like Anne Holmes did by using one of her late father’s shirts to make a pillow for her daughter for Christmas. Not only was it a wonderful match for the hooked top, but a memory. Her daughter said that when she turned the pillow over she instantly started to cry. She remembered this exact shirt he used to wear and the present means the world to her. Any time she misses him she knows that she can snuggle into the pillow with his shirt and it will be like she is hugging him tight. What a beautiful sentiment.
Besides, who doesn’t love a good pillow? It’s an international accessory for the home, beautiful to look at and comfort for the head. Smaller projects also hook quickly, so there’s instant gratification for your toil. And as for gift giving, it’s much easier to give a project away when it worked up quickly as I recently learned over Christmas, than a rug project that spanned over a year or more.
Finishing the pillow can be as easy as hooking it, although I hear it all the time, how the hooking is fun but sewing on the back is a chore. A lot of rug hookers I’ve talked to farm that job out to local seamstresses, (I’m not sure if that name is politically correct anymore but I’m referring to the wonderful thread wizards that sew out of their homes for a living).
This clever way of finishing a pillow, first came to me by way of Linda Ruth, one of the Main Street Rug Hookers who made beautiful pillows using recycled Pendleton Shirt plackets for the backings. It changed the groan factor to a WOW factor when sewing a back on a pillow, even I could do it! Using a wool shirt placket means there aren’t any buttons to fuss with or button holes to create because they’re already there! It’s ‘sew’ easy and another way to recycle those fabulous wool shirts. And even if you are not concerned about making an opening to be able to remove the form, sewing on a solid backing, this technique works for this as well.
Then the brilliant Sue Cunningham took this great idea to another level with her suggestion of hooking the last outside border row around the pillow in a #8 cut strip. This is the row that you will sew the backing to and it also provides a straight line for a guide.
Easy Steps to create the perfect pillow back
Step 1 - Find a complimentary coloured Pendleton shirt (maybe even use a bit of in the pillow front for a custom blending or if you have a shirt that doesn’t match, throw a little dye on it to blend with the rug). Button the shirt and cut out a square the size needed. If the shirt has a pocket on it you can leave it on or carefully remove it with a seam ripper. Cut out this wool backing the same size as the excess backing edge left around the hooked item. (Assuming you have already steamed and zig-zagged 1” out all around your hooked pillow top to cut it out.)
Step 2 –Place the loop side of the hooking with the right side of the placket and pin together. Usually the placket will run horizontally across the middle of the pillow so make sure it remains straight across but if there is a hole in the shirt or if you tear the material when removing the pocket, cut the front of the shirt so the placket can be positioned higher or lower on the back. Pin the two pieces together well. I pin the excess backing of the rug and the shirt together and then pin an inch away from where I plan to sew on the inside of the pillow. They have to be well secured together so there is no movement of the two pieces when being put through the sewing machine. If you don’t want to use pins you can baste stitch the two pieces together with a different coloured thread so it is easy to see and pull out later after the machine stitching is completed.
Step 3 - Now work from the back of the hooked side of the pillow and run it through the sewing machine staying in the center of that #8 cut row of loops. The rug and backing will be thick to sew through so make sure the tension is set properly so there isn’t any bunching and pulling on the shirt underneath as it goes through the machine. Sewing directly down the center of the loop will insure there is no backing showing along the edge when you turn the pillow right side out. The great thing about using a shirt placket, is that you don’t have to leave a gap in the sewing at the bottom of the pillow to later stuff the pillow form in and then hand stitch up the gap.
Step 4 – After you have sewn around the entire pillow trim each corner point off in a diagonal line, leaving at least 1/2" so you don’t have a lot of bulk when you turn the pillow right side out. Unbutton the placket; turn the pillow right side out, using your finger, a large knitting needle or proddy tool, to push out the corners so they open as much as possible. Steam press the bulkiness out, insert your pillow form and voila you have the easiest pillow imaginable. No sewing the usual gap shut that you struggled to force the pillow form into. How many times have I done this by making that hole too small and then almost tearing it when pushing the form through? No sewing on buttons or making those dreaded button holes or as some do, sewing on Velcro. You have a pillow that opens easily and it is very attractive to view. Your pillow will look professionally put together if you are selling in a boutique or impressing a loved one.
Tip – If backing shows anywhere around the edge use a coloured marker and rub it along the exposed burlap or linen. Markers come in many colours so you can match pretty much any shade. Especially if the border was hooked in dark colours, a bit of burlap or linen peeking through isn’t attractive.
Also, don’t turn your nose up at a linen or cotton shirt to use as a pillow backing. Do like Anne Holmes did by using one of her late father’s shirts to make a pillow for her daughter for Christmas. Not only was it a wonderful match for the hooked top, but a memory. Her daughter said that when she turned the pillow over she instantly started to cry. She remembered this exact shirt he used to wear and the present means the world to her. Any time she misses him she knows that she can snuggle into the pillow with his shirt and it will be like she is hugging him tight. What a beautiful sentiment.


 RSS Feed