Encompassing Designs
  • Home
  • Shop
    • Kits
    • Patterns >
      • Christine Little >
        • Signature Designs
        • New Designs
        • Seasonal Designs
      • Deborah Sweet
      • Susan Leslie
      • Patricia Perry
      • William Morris
    • Supplies >
      • Backings
      • Frames
      • Hooks
      • Books
      • Extra
    • Wool >
      • Abrashed
      • Antique JQ Colors
      • Custom Dyeing
      • Dyed Bundles
      • Dyed Spots
      • Dyed Values
      • Dyed Yarn
      • Natural & Colours
      • Plaids & Textures
      • Dye Books & Swatches
  • Ordering
  • Blog
  • Workshops
  • Our Story
  • Contact Us

Anne's rug

7/13/2013

1 Comment

 
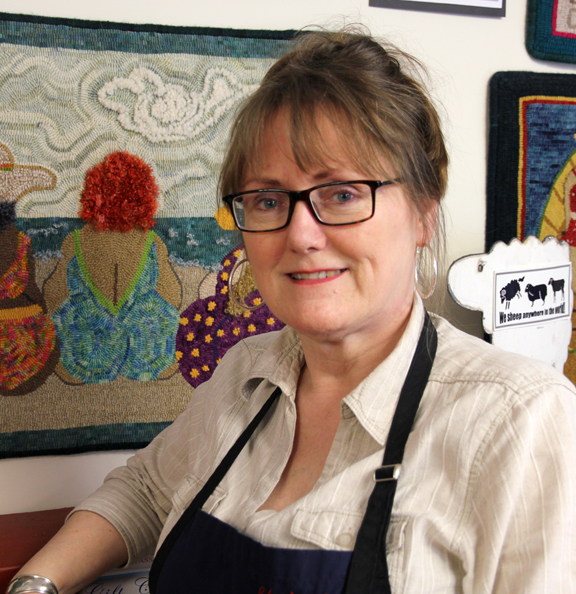
By Guest Blogger Anne Holmes
Picture
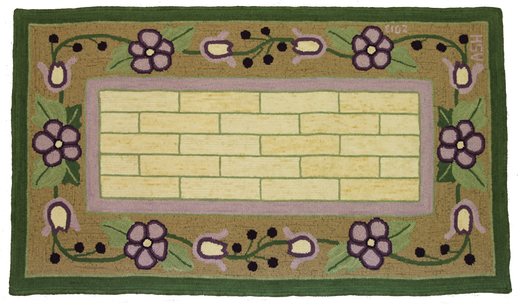
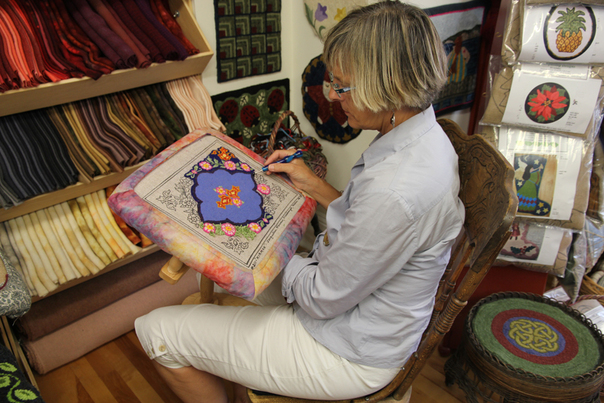
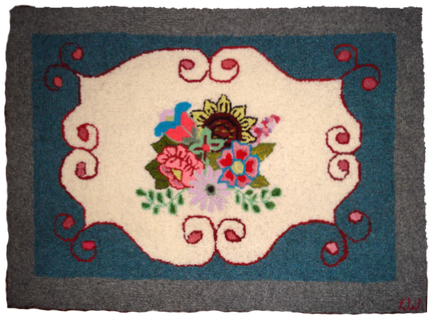
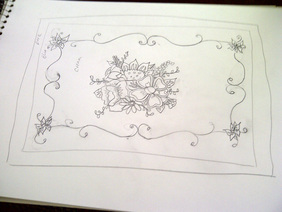
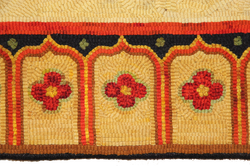
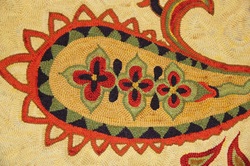
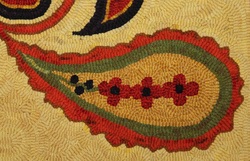
I designed this traditional looking rug for a client to fit a specific location. Called Donna's Primitive, she wanted a mix of floral and geometric so I did a brick style center and a garland of flowers and berries around the perimeter.   I've had a few updates on the pattern but I think a health problem has slowed down the completion.   I hope Donna is feeling better and back to hooking soon.    In the meantime Anne Holmes, one of our Main Street Hookers took a shining to the pattern and decided to do it as well.    In Anne's words:

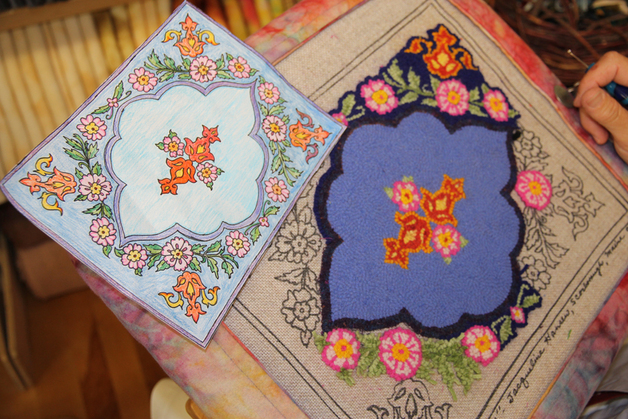
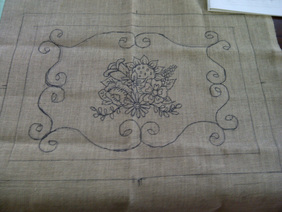
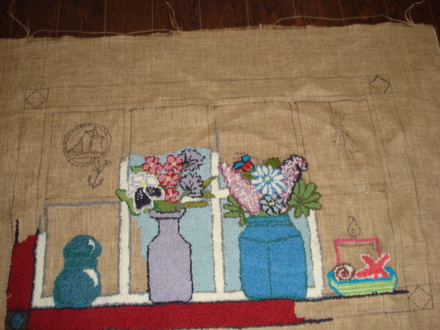
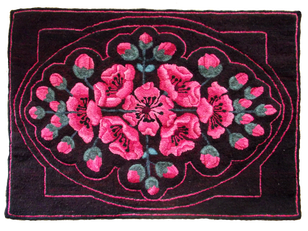
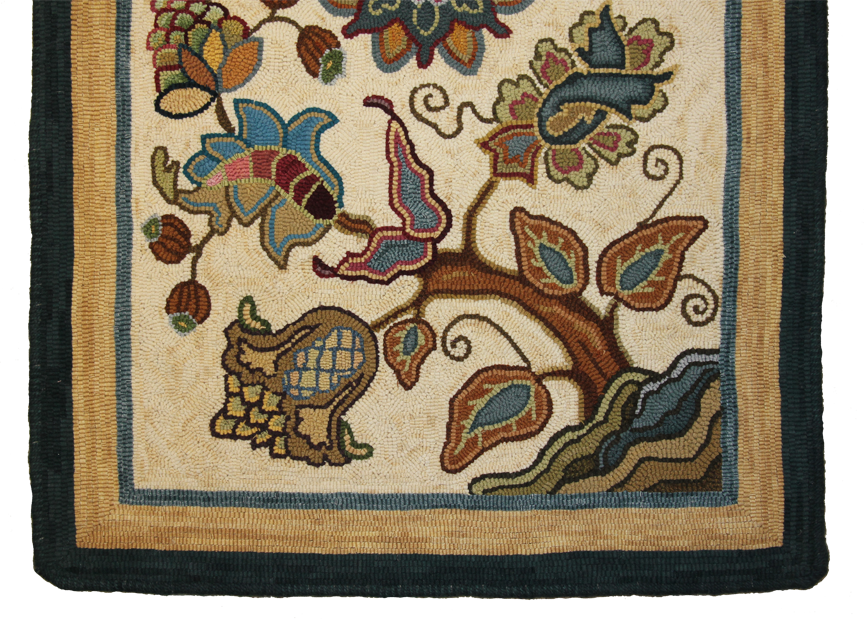
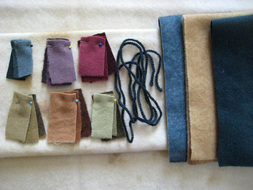
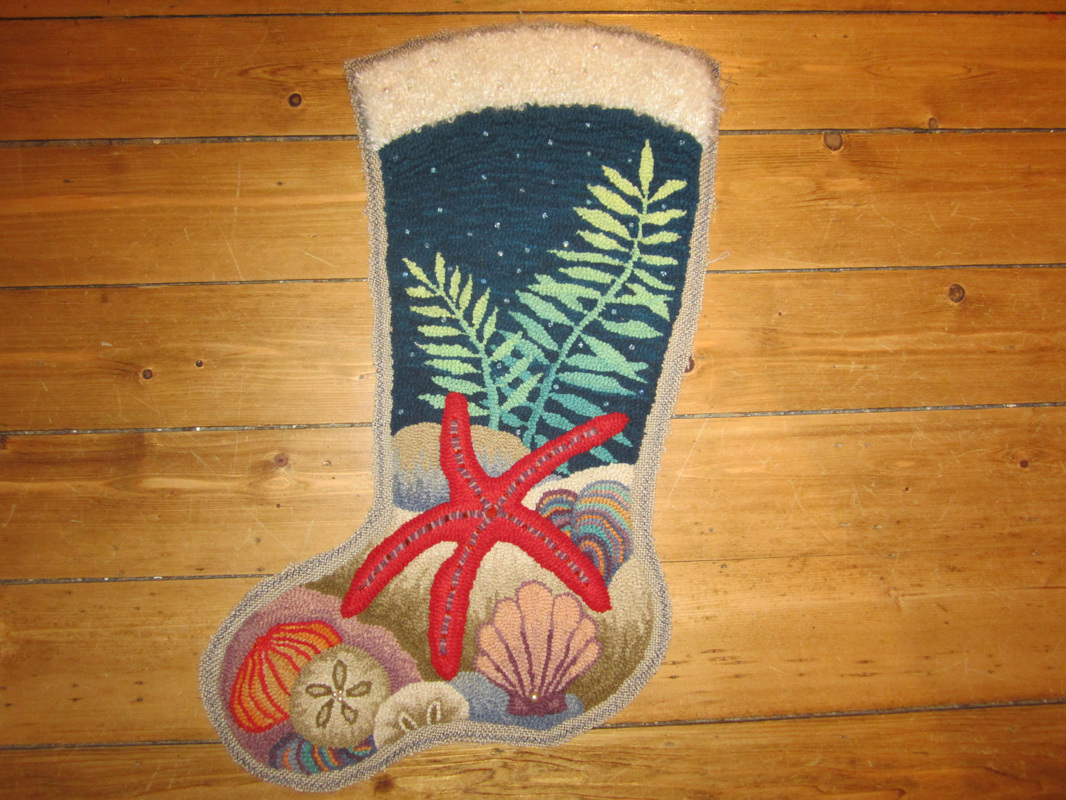
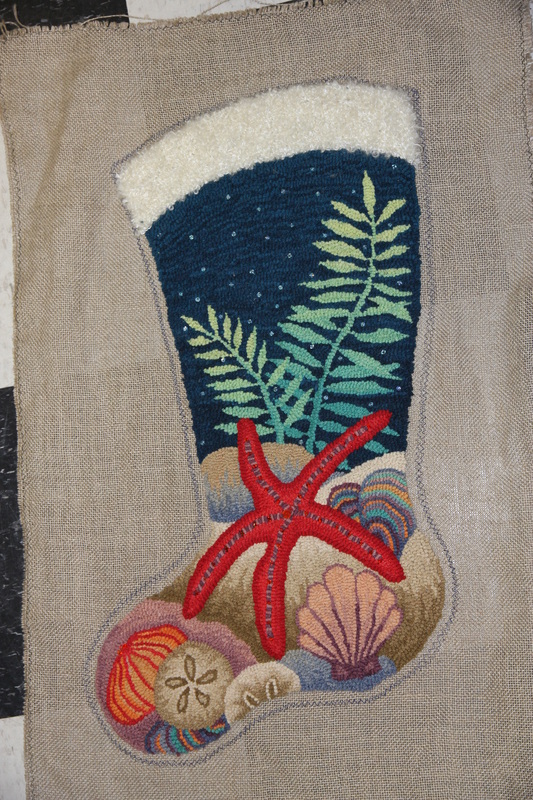
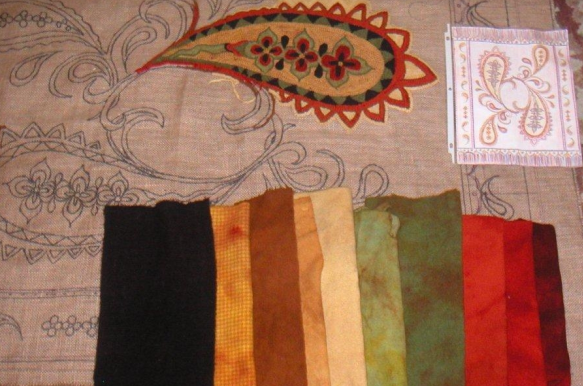
I used the Ecru from Christine's shop for the bricks and a light taupe plaid for the background of the floral garland.  The rug is hooked in 
#6 cut and the colours were the ecru, Amethyst and Shamrock from Christine's dye books which I died myself. 

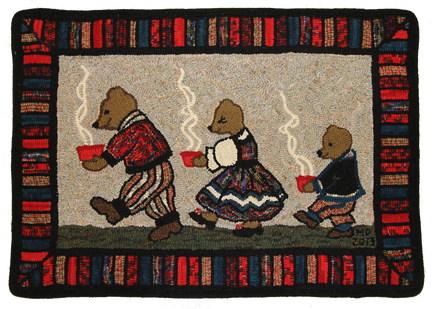
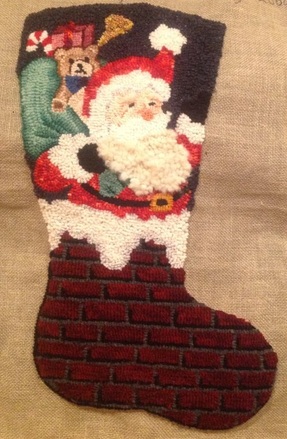
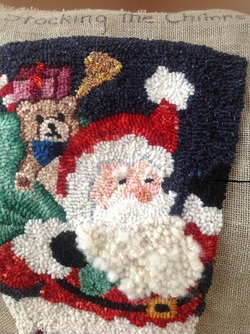
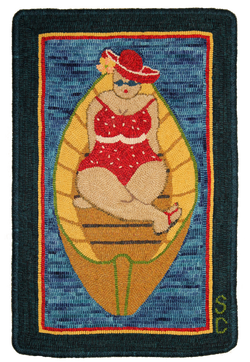
The pattern was given to me by my stepson and his wife for a Christmas present.  I chose these colours to correspond with the duvet, pillows and wall colour in my daughter's bedroom.    The mat that was on the floor of her bedroom was made when I first started hooking in 1992.  The pattern was drawn on burlap for me by Muriel Peveril and it had a teddy bear with five blocks in front of the bear and I put ANGELA in the blocks. My daughter is now 31 and  I think the mat has had its day and we needed a more grown up version to take its place for when she comes home. 

Anne Holmes

Picture
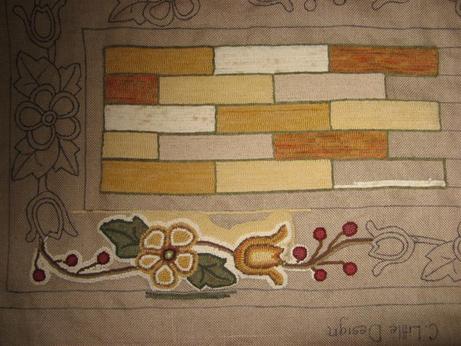
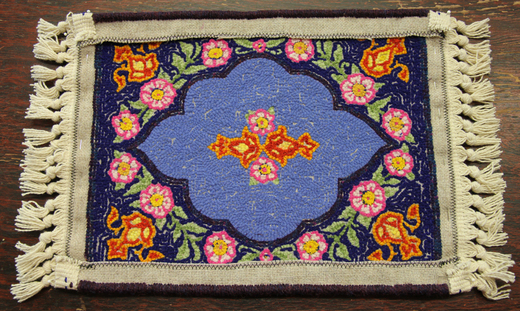
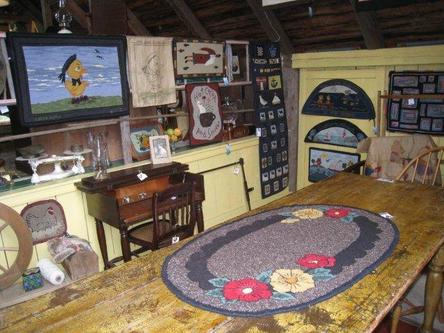
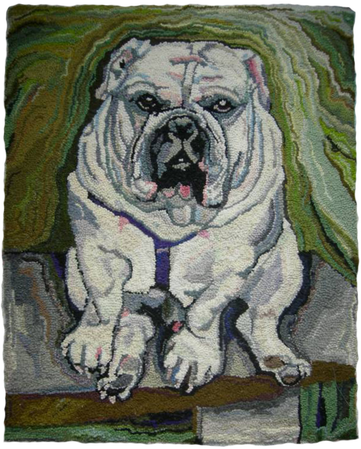
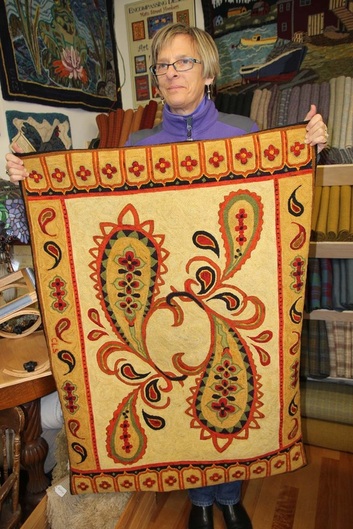
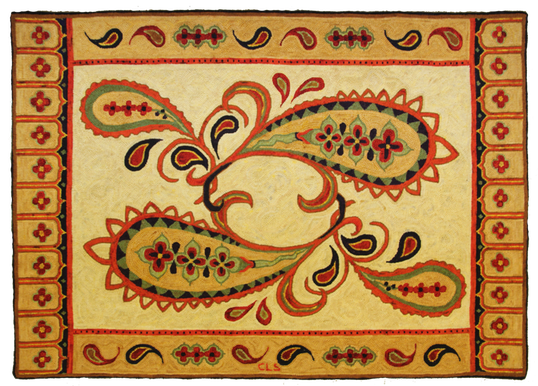
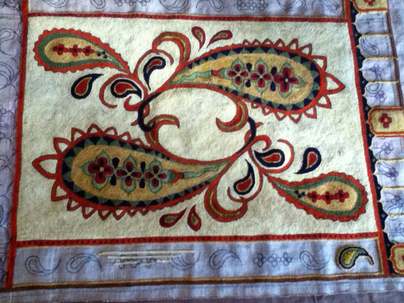
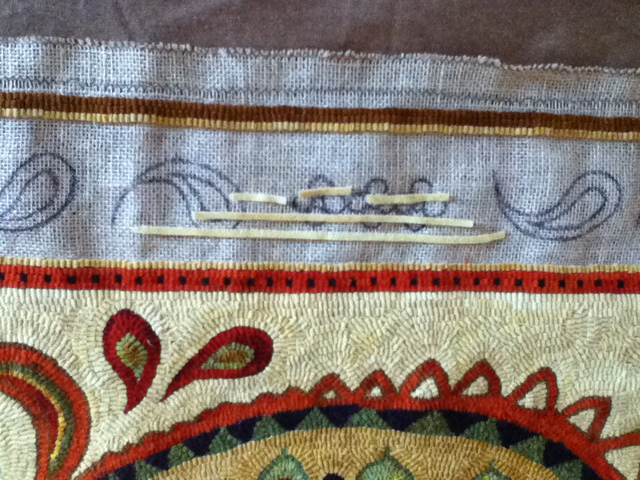
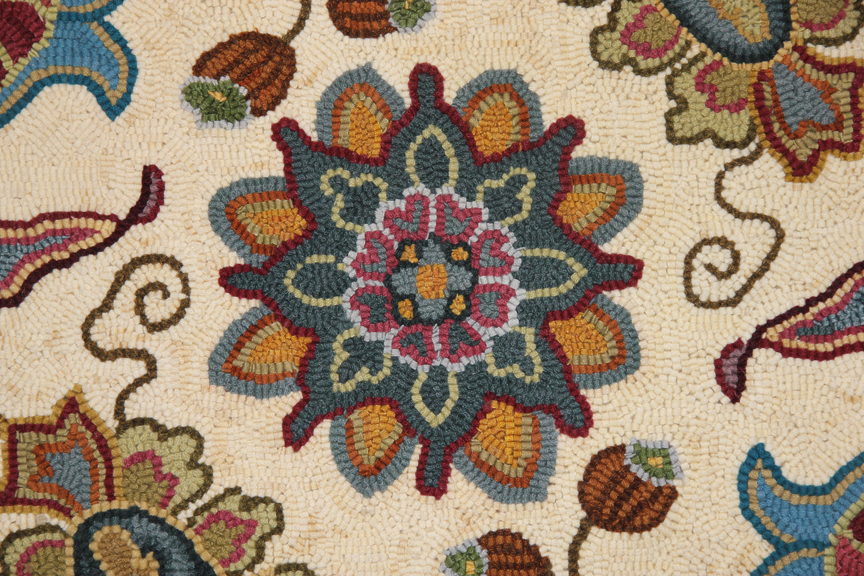
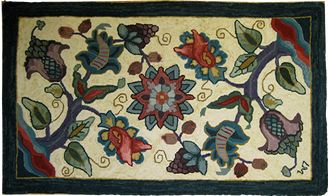
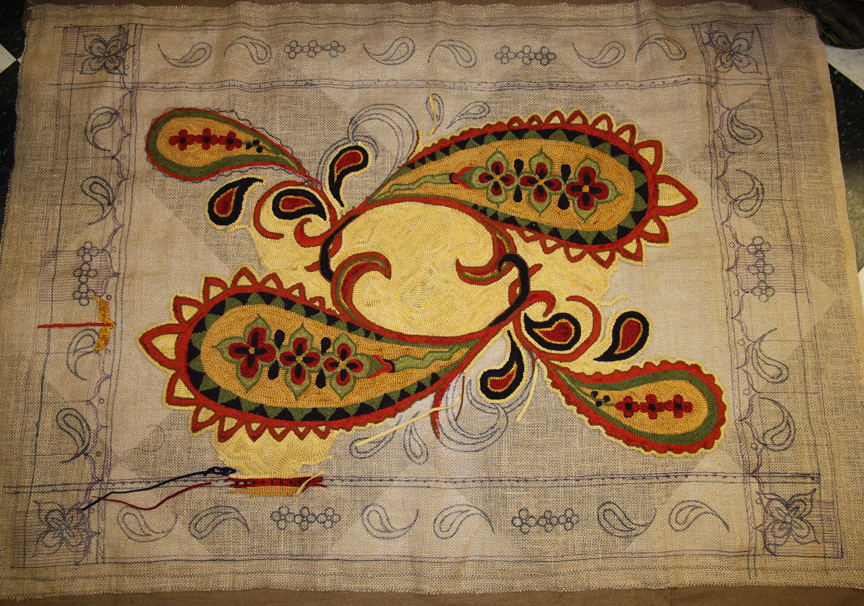
Donna's version of the pattern. Beautiful creamy tones with hits of gold, green and red.

"Donna's Primitive" pattern:  http://www.encompassingdesigns.com/new-designs.html
1 Comment

The World's Smallest Rug......

7/11/2013

2 Comments

 
By guest blogger Charlene Scott
Picture
I am calling this little Persian beauty the World's Smallest Rug as it is pretty cute and tiny compared to anything else I've done.  Too big to be a coaster and too small to walk on, perhaps this little gem is perfect for a doll house or a table topper.  I won this rug at the silent auction at the Nova Scotia Guild Rug School this past May.   I bid $15 and later saw the back of the tag and found it had been originally purchased for $10. There are no dates with it so I have no idea what its age might be.  I bid on a whim and got it.  

Written on the pattern was #211-"KIRMAN"- Jacqueline Hansen, Scarborough, Maine CR-25  It is stamped on verel which I have never hooked on so  it was interesting to have the experience but I'm not inclined to use it again.   Also because it was stamped it did not run neatly along the grain.  This meant when I did the outer edge, I had to keep jumping  rows to keep the line straight.  


I hooked it with #3 cut wool all compliments of my stash. I outlined the yellow flower centers with a single strand pulled from a length of dark blue wool yarn, sort of like separating the strands from embroidery thread.   Although cute as a button on its own, I  felt it needed a little something to frame it and Christine sells factory made decorative rug fringe that  fit the bill.  The tassels were too long for the size of this rug and needed to be trimmed so I taped it to the edge of a table and then cut the tassels to uniform length.  

I felt the fringe  showed  too much white for the proportion of the rug so to break it up I threaded one ply of the wool I used for the whipped edge and a piece of the wool I used to outline the yellow flower centers through the cotton fringe band using my whipping needle.   I then put binding tape on the back and finished it off per the usual.    I really enjoyed hooking this little beauty and I'm thinking I might like to do something like this again.  I would like to try it with a different backing as the verel or divider cloth as it is sometimes called, was not to my liking.
   Without the fringe the rug is 12 1/2" x 10 1/2" and with the fringe 17 x 10 1/2".

Picture
Picture
When I colour plan, I am most comfortable if I can have a black and white  photocopy of the pattern so that I can colour it with inks and coloured  pencils.  I took a photo of the pattern, and with a simple Photoshop App on my  iPad I was able to turn it into a black and white picture to print off and play with colour until I was happy with the results.   I then used the  coloured print as a guide.  (However as I was using wool from my stash the colours are not identical.)
Picture
Charlene pulling a few loops at the shop during Saturday's hook-in. It is nice that the rug fit the floor frame so she could see the entire piece as she worked.
Picture
Charlene's coloured picture of how the colours would be used.
Picture
Basically Charlene used the length of the fringe with an overlap of an inch and hand sewed it to the rug.  Then when she applied the rug binding it covered all of the exposed verel edges and the overlay of the fringe on each side. 
Picture
Picture
We sell premade Cotton Rug Fringe in four different colours and styles.  Back in the day when our entire group was working on Oriental projects I was given a lesson in crocheting but try as I might, I was all thumbs.  So I thought maybe there were a few more folks like me who would appreciate edging already done so I promptly ordered some.   Charlene choose the second from the top and although the finished rug picture at the top appears to have a cream coloured fringe, that is my lack of photographing savvy.  Charlene cut considerable length off the fringe to meet the proportions of the rug.  Taping it along the table edge was a clever way to insure a clean cut.  
2 Comments

Linda Ruth & Friends Hooked Rug Loft

7/3/2013

2 Comments

 
By Guest Blogger Sue Cunningham
Picture
Designed and hooked by Sue Cunningham for the Hooked Rug Loft at Come by Chance Antiques. The background of this rug is our Razzle Dazzle spot dyed formula that Sue likes to incorporate in her Women of Abundance bathing suits. What a fantastic spot if I do say so myself!
Picture
My friend, Linda Ruth Beck is a long-standing and very talented member of our Main Street Hookers Group. She is also the proud owner of Come by Chance Antiques something of an institution here in the Chester area on the south shore of Nova Scotia.

Linda Ruth's shop is a veritable cornucopia of wonderful treasures just waiting to be discovered in every nook and cranny. Everything from rope to rocking horses to baskets to buoys, tables to teapots, cabinets to carriage clocks.

In a world where genuine antique shops are becoming rarer and rarer, Linda Ruth has stuck with it and works hard to gather the best and most interesting items from the past. This year she celebrates her 34th year in the antiques business. Many of her customers are regular visitors who stop by every year during their vacations to Nova Scotia. 

This season Linda Ruth decided to shake things up a bit. She has turned a wonderful loft area at the top of her antiques barn into a hooked rug loft from which she and her hooker friends offer for sale their beautiful hooked rugs. The area already had high peaked ceilings, great natural lighting and large windows. But after a coat of cheerful yellow paint, freshly cut flowers and the addition of carpet tack strips strategically placed to hang rugs of all shapes and sizes, the area has been transformed into a warm and welcoming space for showcasing the hooking talents of the Main Street Hookers.

So, if you happen to find yourself in the Chester area it would be well worth your time to stop by for a visit to Come by Chance Antiques located at 4751 Highway #3.

And if antique markets are your thing, Linda Ruth also organizes and hosts an annual antiques market in the field behind her barn. Approximately 40 vendors are planning to take part this August 4th from 9 a.m. to 4 p.m. Live music and good eats as well.  Call 902-275-3146 to book a space to sell or drop by and peruse a field full of antiques and collectibles.  Everyone  is welcome!


Picture
Picture
Picture
Picture
Picture
Picture
Picture
Picture
Linda Ruth Beck working in the loft.
Picture
A plug for my son Shane who designed this flyer and the above business card for Linda Ruth.
2 Comments

91 and still hooking!

6/27/2013

3 Comments

 
My mom, Anna May Austin, by Guest blogger Mary Schlech
PictureAnna May gave this Blue Rocks rug to Mary's younger sister.
Here's a picture of my proud Mom who is 91 years old and still a hooker! I just got back from the states where we celebrated Mom's birthday!

My dear mom began hooking in her late 40's with her best friend in Darien, Connecticut. Her friend never completed the first piece, Mom never stopped. She is an avid sports fan and hooks while watching her favorite Met's baseball team. It is a joy to sit and hook with her. She lives in Florida and when I visit I bring my rug and my wool. She has Alzheimer's now and I sometimes have to push her to work on her project but she is always happy when she picks up her frame and gets to work.    
Mary Schlech

The rug being held by a smiling Anna May is Blue Rocks.  (Can be viewed at http://www.encompassingdesigns.com/signature-designs.html )  This is one of the most popular designs with tourists who come through the door and fall in love with the scenic beauty of this small fishing village just a short hop down the coast of Lunenburg.   The scene depicts a summer's day and a boat waiting to be launched on the skid.  Maybe it will be pushed into the water for a day of fishing or just motoring along the coast to enjoy the salt air.  If you go to Blue Rocks you can stand and look at this view, maybe the boat won't be there but the building is and the houses across the water dot the hillside.  When you look at this rug, you can almost hear the waves lapping on the shore and feel the ocean breeze brush by your face.   

I've drawn this pattern and made a kit many times over the years  and a finished version of the rug graces the wall of the shop.  It was originally hooked by Blaine Allaby and when he expressed an interest in selling the finished piece I jumped on it to represent the pattern.   Mary's mom did a fantastic job hooking her version and I'm sure it is a treasured gift of a mother's artistic talent, an heirloom to be treasured for decades to come.   If I did the math correctly, Anna May has been hooking for over 63 years, longer than some of us have been alive.  Sorry to hear that she is now struggling  with the terrible disease of Alzheimer's but knowing, she is surrounded by love and encouragement is heartfelt. 

Mary has been coming into the shop for many years.  The acorn didn't fall far from this family tree in that she is very talented designer and rug hooker.  Some of her pieces are regional to places she's visited or lived and she enjoys a challenge, taking on projects that evoke much thought and careful colour decisions.  I wish I had some picture to post of some of the projects it has been a pleasure to see but alas there are none.  She just called me with an emergency for a piece of wool she though maybe her husband used as a rag and when I delivered the bad news that it was no longer available she pleasantly said she would make it work with a bit of altering to the design, a clever solution to what could be a challenging block.  Personally I'd pull my hair out and on go on a chocolate bender!   I always look forward to a visit from Mary to see what she has been laying her hand to....I'm always filled with wonderment and awe at the creativity of her vision.   

3 Comments

How to hook Gnome Santa!

6/13/2013

45 Comments

 
By Guest Blogger Charlene Scott
Picture
I have not had a Christmas stocking since I left my fathers home, many years ago.  As children, we all used one of my dads big socks.    I have not thought much about them till I took up rug hooking and saw the ones made by my fellow hookers.   Christine has a wonderful line of stockings, and Mary Doig is just amazing with the ones she has hooked for her family. 

So, no one was more surprised than me when I was seized with the intense need to draw one, right around Christmas.  I had been wrapping presents for hubby and a small figure on one of the seasonal papers caught my eye.   I stopped wrapping, picked up a pencil and immediately drew the initial sketch to cement it in my mind and then went back to the presents.

Later I drew the pattern in a 8"x11" sketch and coloured it.   With that done I passed it by my hooking friends and they all agreed it would make a great stocking.   The pattern was drawn up, put on burlap and then set aside as I had a rather large paisley rug to finish.

I waited till I went took the dye course at the Rug Hooking Guild of Nova Scotia May school and on the last teaching day we were encouraged to dye something for a personal project.   I had a picture in my mind of an orange red with some yellow highlights for the suit.  I am very pleased with the results.   It was a casserole dye using pure red and pure yellow.   It came out perfectly. 
 

Picture
The flesh was another puzzle but our instructor Sarah Ladd had the perfect solution.   Pro chem #504, French Vanilla.   1/16th tsp using the crush method with 1/8 yard.   My wool was in 3" strips that had been torn for another project.   I took one strip out just before I put in the citric acid and placed it in a bottle with a few drops of red, the water was barely pink, just enough to change the colour for the cheeks.  

For those who aren't familiar with the crush method, Sarah gave us all a large tin can of restaurant size.   You put in the least amount of water needed. Put in the dye and the citric acid/vinegar.  Put the material in loosely crushed.  The colour gets sucked in at different strengths on the crumple.  You can give it a little poke but not much.  Then let it go till the colour is set.  

The white was Dorr natural wool and the deep blue was a leftover from Pendleton woman's suit that had been over dyed for a previous rug.  The yellow came from my paisley project.   The hat band was natural curly mohair.  

The wonderful grey line was an interesting small ball of wool I found in a second hand store in Florida in February.   I saw it and instantly knew it was going in my Santa piece but just not sure where.   It is a two piece yarn.  A silver grey thread runs continuously throughout with some small bits of straight mohair attached.
  
I had fun hooking the pattern.   It was a welcome change after my last two projects, one big rug and then a small piece  I completed for the Art Hits the Wall kaleidoscope theme.  


My next small piece that I like to call the world's smallest rug is a cute little design I won at the silent auction at the RHGNS school.   A story for another day.


Thursday's Name The Number Contest

I've been working like a demon trying to get a new pattern ready for today's contest but the shop is so busy it looks like it might not happen until late this afternoon!  So I am going to offer this delightful Gnome Santa pattern as the prize today.  It is new to the shop as Charlene just brought in the pattern yesterday and it will come with a picture of the finished stocking so how great is that!   So add your pick from 1 - 50 to the comment section of this blog and try to hit the number in my head.    Lots of time to hook it for Christmas!

I'll offer the pattern I'm working on now for tomorrow's contest! 
45 Comments

Dances With Wool

5/30/2013

1 Comment

 
By Guest Blogger Carole St. Amand
Picture
I am so thankful to have found enjoyment in rug hooking and it continues to occupy my mind on my way to a long recovery.  My friend Odette is the one that introduced me to it.

I used carded natural wool fleece (for the sheep) and wool yarn, wool strips and dyed fleece for the grass at the bottom.  For the rest of the rug I used wool off the bolt or dyed (all new).  I would like to say I used number 8 cuts but without a cutter or access to one, I had to cut all the wool by hand - either with a rotary cutter (not very successfully) or just hand-cut with scissors (trying to cut 1/4" strips but sometimes wider).  Most of the wool fabric had to be ordered on-line as I was not very mobile at the time.  I would say it took me about 4 or 5 days at most to hook it entirely.

As I think I told you before, my friend bought me the pattern as a get well gift.  She knew I love sheep because we have a sheep herding dog (a Schapendoes).  I guess she thought it would be something to help get my mind off things.  Her idea was that we would work on it together and select wool and she would show me how.  But I was impatient and started doing research on the internet.  I ordered a beginner's kit and a video and  was able  to go to a local studio for a beginner's workshop just so I could learn how to complete this pattern. 

I have been recovering since October 27th (the date of the accident) and am now walking with a cane.  It has been a very emotional journey for both my husband and I as we were both struck by a vehicle as pedestrians.  Before rug hooking, I felt a little depressed and my life as I knew it before did not exist - no hiking, or walking and running with my dog, no cross-country skiing, no shopping in malls etc.... This new found love of wool has re-energized me and I have been sketching my own designs non-stop and just can't stop buying wool to make more rugs!!!!!

Carole


*************************************************************************************************************************

I call stories such as these "Sweet & Sour".  The sour is how some people suffer in life, from things beyond their control, but then I am inspired how they come out the other side of this trying tunnel through hard work and fortitude.  Accidents and all manner of mishaps happen and can change  life as we know it but it doesn't have to be in a bad way.  Some things may go but other things are waiting to fill the void.  Joy can be found in many places, you only have to look to find it. This is the sweet. 

So to hear that rug hooking moved in and  helped the healing process, taking her mind temporarily away from her troubles to fill her life with beauty and renewed hope made me smile.  Carole's story is a tradegty but in this time of struggle emerged a Phoenix out of the dust for a new lease on life and obviously the start of something fantastically wonderful. 

This sweet little pattern called "Dances With Wool" was designed for a teacher who wanted to incorporate flowers with a sheep.  I designed two of them.  One critter was kicking up water in a mud puddle wearing rubber boots, and the other was sporting high heels such as the sweet little lamb above.  I've seen this pattern hooked many times and each time it makes me chuckle.  This is one of those designs that's pure fun...maybe for Carole it represented one day soon, being able to kick up her heels once again.  I love everything about this piece, she did a great job with colour planning and I am so excited to see what she'll come up with next.  


1 Comment

Look at Kristy go.....!

5/14/2013

1 Comment

 
By Guest Blogger Kristy Wagner
PictureA gift for Mother's Day.
I took my first and only rug hooking class in Feb 2013 at Encompassing Designs in Mahone Bay, NS with Christine Little as our Instructor. What a great thing to do on a Sunday afternoon, especially in the winter.

Why Rug Hooking? I like things that are "pretty and useful" and I'd just come off a "dishcloth" knitting marathon and needed a new project. I like to see progress, that was something I thought I'd like about rug hooking. I knew it may be a challenge to complete a rug, they take time to complete, but the fact that I could see it coming together along the way, forgive the pun, that's what "hooked" me. I needed to see what it would look like when it was finished, like a surprise! I also needed to find something I could do at home.

It was a relatively affordable hobby too, about $150 to get everything to start up, then it all depends on your equipment and material - there are ways to keep the cost low. I used a mixture of  real wool and yarn wool. The yarn mde it tight like carpet. It's an extremely forgiving hobby, easy to fix mistakes, change colors. If you wanted to take your favorite sweater, pull it apart and hook it into a rug, you could do that.

The day of my class, everyone had their seat cover patterns, I turn up with a giant rug pattern that I designed myself. I figured, just in case this is the only one I ever do, at least I will have designed it. You need a straight edge, pencil, burlap, sharpie and creativity. I looked at images online and  I drew out ideas, then put them to burlap.

I got my first one done within two months, just plugging away here and there. Of course I see imperfections, but that's what gives it character. My first rug will be a gift to my mother this Sunday for Mother's Day.    I'm really enjoying the hookin'!  haha!
  I've already started on my next one. :)

Thanks again Christine for teaching me how to hook!

Picture
The drawing stage, figuring out the design and playing with the details.
Picture
The final cut now transferred to the backing.
Picture
My current project. Having a lot of fun!
It is always so great to hear from a student after they've gone off on their own.  Sometimes you wonder if they're still rug hooking or if they finished their project.  A lot of the time they come back to get a critique or finishing instructions but for the ones I never hear from again I often wonder what they are up too, if the passion took hold or if they moved on to other things.  Kristy was a prime example.  Her enthusiasm and big project made her stand out.  I saw me in her.  I didn't want to mess around with the small stuff either as I never planned to do it again....look at both of us now!  
1 Comment

Bull Dozer and Zoe

5/9/2013

3 Comments

 
By Guest Blogger Laura Hendryx
Picture
Bull Dozer is 26 1/2" x 20 1/2"
These are my dogs, my third and fourth rug hooking forays.  The big, white and black male is Bull Dozer and he is 5 years old and the little brown and white one is his mother Zoe who is 8 years old.  

I started hooking rugs because the woman who taught me, Wilma Hill, is a published hooker and moved back to our home town about the same time I did. She is featured in a book called "Hooked Rug of the South". She has a group that meets at her house over the non-Summer months to hook and share in Fort Smith, Arkansas, USA. She is single-handedly bringing back this art form to our area of the world.

I was born in Fort Smith, but my father was in the military and then after college I joined the Navy and traveled a lot. I started quilting in 1999 and cannot seem to stop and now I am doing wearable art and I started hooking in September 2011.  

My first project was from a pattern, a sheep’s head. Then I made a Watermelon rug, three foot round and then I made Wooly Bullie, or my portrait of my beloved dog Bull Dozer and then I made his Mom, Zoe. I cannot decide whether to make these into pillows or whether to frame them.

I can draw free hand but I took digital photos and had them enlarged by the copy center. I transferred the pattern and then dug up a large varied palette of wool colours to do the “painting” or adding of the colour. It can turn out to be as detailed or as folk art as one wants and is a great way to do portraiture. Juxtaposition of  darks and lights and warm and cools brings the form out and carves out the space in the piece, but flat would work just as well. I have a degree in Drawing/Painting/Ceramics from Indiana University in Bloomington, IN, and although classical art school training is helpful it isn't totally necessary. I had a lot of fun and they look like my little beasts. 

Picture
Zoe is 11" x 16 1/2""
3 Comments

A completed Passion for Paisley

4/24/2013

7 Comments

 
By Guest Blogger Charlene Scott
Resembling a twisted teardrop, the kidney-shaped paisley is of Iranian and Indian origin, but its western name derives from the town of Paisley, in central Scotland, a center for textiles where paisley designs were produced. Paisley is a term in England for a design using the boteh, a droplet-shaped vegetable motif of Persian or Indian origin.  Such designs became very popular in the West in the 18th and 18th centuries, especially in the form of Kashmir shawls.  The pattern is sometimes called "Persian pickles" by American traditionalists, especially quilt-makers, or "Welsh pears" in Welsh textiles as far back as 1888. 
Picture
At the 2012 Rug School I took a course with Donna Gass on creating and using Paisley. So I spent a few days coming up with a design, drew it on the backing and went to school with the goal of colour planning the rug. By the end of the week I had a colour plan in mind and had redesigned the two end panels

In November, Mary Doig offered to help me further colour plan and dye for the project.  Mary was a guest blogger a few months ago and talked about the process we went through to dye for this project.

I started hooking the first week of November and finished the whipping the third week of April. It has been a long, slow road and I have learned a lot in the process.  I've discovered that you can have a plan firmly planted in your head at the start but that might not be the colours you end up wanting and using.

I have also learned that when hooking mirror images it is best to do them bit by bit at the same time. I did the first large Paisley completely and by the time I got to the second one, I found I had to rip  it out several times until it more closely reflected the first.

Woman's prerogative and all, I learned that it is never too late to change your mind. The end panel design was changed a third time as the second change did not work for me.  I learned that when using recycled wool you need to be aware of the consistency of how thick or thin it may be and of course, make sure you have enough. I was left with the equivalent of one strip of yellow for the background, which is why you don't see it used in the outside border.  Talk about sweating bullets, that was too close for comfort.

Using these lessons, when I came to the end panels I hooked all the flowers before filling in the background so they would all be fairly uniform. It isn't noticable in the pictures but if you look closely at the rug, the dark colour which started out as eggplant on new wool, became more of a blue purple.  As I ran out of the eggplant early, I used some dark purple I had on hand overdyed with eggplant. The shortage occurred as the colour placement evolved and I used much more of it than first envisioned.

And lastly, I learned to listen to friends and fellow rug hookers for advice. I had it in my head that I was going to whip the rug with a brown, a little darker than my outside rows. Everyone that I spoke to said no and I was told,  "You don't have that colour in your rug so why introduce a new colour". Then it was unanimous that the whipping be in the eggplant colour. So once again I visited my friend Mary and she helped me dye a skein of yarn so I could complete the rug.

I am enrolled in the dye course at the Nova Scotia Guild Rug School in May for a greater understanding of the process and gain a bit of independence in the colour department.  Thanks to Mary for the use of her dyes and time to make this rug the heirloom I hoped it would be.   

Picture
The final dimensions of the rug are 47" x 34". It was hooked in every cut from 3 to 7.
Picture
Picture
Wood hand stamp for block-printing traditional "paisley" designs, Isfahan, Iran
Picture
Picture
Picture
7 Comments

Poppy Spray by Margaret Tupper

4/20/2013

1 Comment

 
By Guest Blogger Margaret Tupper
Picture
Poppy Spray 33" x 25"
Once again I was delighted to open an email and find one of my designs in full hooked splendour!  Pink, and any variation thereof, is tops with me.  Throughout my life and during my brief obsession with beads I always veered toward anything pink.  I once read if you wish to portray the ultimate in femininity, frame your face with pink, either with clothing or jewellery.  

The hooking in this piece is definitely note worthy.  The curl ups on the petals were done to perfection.  Margaret really has an artist eye in that she understands the way light and shadows work to achieve a high degree of realism.   This drawing was simple and unassuming in it's line state to which Margaret added the colour in a highly effective way.  You would walk around this rug on the floor as not to crush the petals!    She has another one of my patterns and  I can't wait to see how she will breathe life into it.   All I can say is, "Margaret Tupper...you can hook my patterns anytime!"
 
Margaret 's message to me:

I hook with the Nicholsville  Rug  Rats,  You made mentioned on  your website that you would like to see completed pieces of your designs.  Here is a picture of your Poppy Spray pattern completed, I hooked the poppies with Cushing dyed wools; a combination  off Cherry, Garnet, and  Scarlet. The background was  one of your formulas,  Aubergine from the SkyBluePink With A Green Smell dye book.....a perfect background shade.  I used a number4 cut. A great  piece to work on.  I enjoyed it very much.  Hope I did it justice.  I also have your Tina's Roses pattern but have not started as yet.  Hope to see you soon. 

Your fellow rug hooker,

Margaret                                                       
   

1 Comment

A Nova Scotia icon revisited

4/11/2013

2 Comments

 
By Guest Blogger Lorraine Burch
Picture
In preparation to hook this wonderful old Garrett pattern, I went to watch the Bluenose documentary at the Fisheries Museum  so I could have a better appreciation of  this  ship and all it has meant to Nova Scotia. 

My Dad grew up in New Glasgow  and went to school with Cammie Garrett; I remember him taking me to Garrett’s when I was very small.  My parents have a velvet
settee made by Cammie Garrett's grandfather.          
 
I took my Mom back to Garrett’s this fall when they announced that Garrett’s by the Bridge was closing for good….what a trip down memory lane!  It was still full of beautiful antiques, but the building was literally falling down around the furniture; there must have been a dozen buckets upstairs. I am sure they had to keep moving the valuable antiques to stay out of the drips. I bought a little  glass  doll sized sugar bowl as a memento. 

I began hooking this rug August 22 of last year and finished April 10th in between making two mats for new granddaughters.  This rug represent my first commission from a very dear friend who loves everything Bluenose and is in fact,  quite a Bluenose historian.

The pattern was purchased at an auction and not being sure of its age, I retraced it on linen.  The pattern was number 2024.   I loved hooking it and as I pulled each loop, I often thought of the brave souls who go  down to the sea to make their living. 
      
I used a combination of new and recycled wools.  The sail are tea dyed in three shades.  Ocean is Deep Ocean spot dye.  The sky is made up of three parts of a blue blanket  over-dyed with #13 in Past & Present (minus the black).  The spars and tiny border  are shades of  Antique gold.  The Heart Red below the waterline I picked out of Christine's scrap basket; it really sets the ship off.  Of course the hull and border are the traditional black.  Even though some believe the name 'bluenose' infers the hull is blue, it is actually a term coined for the early settlers and seafarers of Nova Scotia.     

I loved hooking the people  and the gulls  and find it amazing how just a wee bit of wool can be made to look like a person  or a bird. 
I think the proportion of the ship to the rest of the mat gives it a majestic impression. 
      
I am a proud Nova Scotian  and was so pleased to hook this provincial marine heritage icon


2 Comments

The Happy Fishermen by Pam Haughn

4/4/2013

2 Comments


This is one of Susan Leslie's most popular patterns and one can easily see why.  The whimsy and folk art feel to this piece is just what the doctor ordered.  If you can't look at this rug and smile, you need a prescription!   

So many times I hear rug hookers tell me that this was the most fun piece they've ever worked on, sometimes landing itself as a favorite in their portfolio.  This rug also inspires a palette of happy colours to match the jovial name.  Pam delighted us with a show and tell at last night's hook-in and got plenty of oohs and aahs from the crowd. 
Picture
Guest blogger Pam Haughn

I rediscovered the pattern at our "Art Under Foot" gallery show that our group,  The Main Street Hookers, hosted last March.  I loved Sue Cunningham's version of it and just had to have the pattern.  

I hooked minimally last year due to renovating and my daughter, Heather's wedding but got it back out and put a push on in January to finish it. 

The rug is mostly a #6 cut with new and recycled wools. 


The fishermen's jackets are hooked in Travis Gold (or variation of it) dyed by myself. 

The sky is a combination of purchased abrashed wool from Encompassing Design called Overcast Blue Sky, and wool bits left over from other projects. 


The water is a mixture of recycled and left over wools from other projects as well.

"It's a happy rug that makes you smile."
This pattern can be viewed for purchase by clicking the link  
http://www.encompassingdesigns.com/susan-leslie.html
2 Comments

The Three Bears

3/1/2013

6 Comments

 
By Guest Blogger Mary Doig
Picture
 
Linda MacDonald, owner of Rags to Rugs Hooking Studio in Pictou NS, graciously gave me permission to make a smaller version of her famed heritage pattern, for my own use. Linda has purchased, and is painstakingly rescuing and restoring the Garrett’s Bluenose
patterns, preserving this important part of Nova Scotian rug hooking history.  Here’s her web page:
http://www.ragstorugs.com


As a child, I remember the Three Bears rug well in the homes of friends and relatives.   I suspect that it is the most loved, and most well known of all the Garrett’s Bluenose patterns.
 
Years before Linda bought the Garrett’s Bluenose designs, I drew a design of the Three Bears from a booklet that had been compiled of them, changing the dimensions to be smaller, but keeping the body of the design true to the original.  I made this rug for a number of babies in our circle of family and friends.
 
After Linda started producing the Bluenose patterns, I bought them from her.  The original Three Bears Bluenose pattern is larger than I wanted for my next project, because I wanted to add a large border to it.  I contacted Linda for permission to use my old drawing.  She gave me her permission, and accepted the copy fee that I insisted on sending her.  Linda has done so much work to restore these patterns, that I would not feel right about making the rug without her permission, and without giving compensation for her investment of money and time in rescuing this design. Please do this if you are considering amending (or copying) someone else’s design, and contact them to arrange a situation that is acceptable to each of you.  It is important for our rug hooking community to respect copyright law, and equally importantly, you can take pride in your finished work.
 
Now let’s talk about hooking the rug!
 
With the impending arrival of our youngest niece’s first baby, I wanted to make a special gift.  Some reconnaissance from my sister-in-law informed me that the nursery walls were grey, so I thought I’d do a Three Bears with a mottled grey sky.  I mixed some as-is grey texture with leftover soft greys that I had dyed for previous projects.   Then I thought I would do the rest in plaids.  I had just finished a project that had some rich red and blue abrashes, so it seemed reasonable to match my plaids to these colours, and so it wouldn’t be too crazy busy with too much plaid, use some of the abrashed material with them. 
  
The best thing about working with plaids is that you have an automatic colour plan.  Just match your colours to the plaid and it all goes together like magic. You can also strip different areas of the plaid to get more of one colour, or darker and lighter shades. It’s fun to play with plaids.
 
The Three Bears practically hooked themselves, this mat was so much fun to do.  It’s all ready to give to little Paisley Rae, who arrived safely on February 26, 2013.
 
If you want to read more about the Garrett’s Bluenose patterns, here is a link:

http://www.civilization.ca/cmc/exhibitions/cpm/catalog/cat2102e.shtml


6 Comments

Cutting it close!

2/25/2013

2 Comments

 
Update by Guest Blogger Charlene Scott
Picture

I just wanted to show you all that I finished the yellow background last night. I was a little panicky getting to the end. I have included a photo of the amount of yellow left. My mind was wildly roaming my piece trying to figure out where I could rob some pieces and re fill with colour. That was cutting it close. Now I feel I am on the last stretch.

Mary I think of you every day when I pick up my hook to get underway. I have bought four nice old pots to bring home for my dyeing class.  I think the panic
came  because the yellow background was a thinner wool than all the rest. There seems to be more than enough of everything else.

Cheers
Charlene

Picture
2 Comments

Rug Hooking With T-Shirts

2/22/2013

4 Comments

 
Guest Blogging Sisters - Charlene Scott and Ernestine
Picture
The old saying, done it, got the T-Shirt is a literal translation for  Ernestine.  She's done it alright, with T-shirts!  I must say I really like the moon and plan to add that to my design.  I must admit I never thought of the pattern with any particular time of day but since two people have now hooked it with a nighttime background I think the message is clear and makes perfect sense.  The Halloween time of year definitely has an after dark flavour and the upper corner did scream for a little something extra.  Thank-you to Ernestine for the clever idea.  

From Charlene:  I have been hooking with the Main Street Hookers for approximately 6 years and am currently working towards completing Passion For Paisley Featured earlier in a blog by Mary Doig and lately in one by Christine. When completed I hope to do a short blog on the finished piece. In the meantime my sister Ernestine who lives in St. John's, NL has completed a project that I thought was interesting. My sister hand cuts her material and works in T-shirts exclusively. I have seen the featured rug done in wool but also am very impressed with her rendering in T-shirts.

From Ernestine:
When I first saw "The Pumpkin Grinners" at Encompassing Designs I wanted to hook it for myself. I purchased the pattern and kept it for over 2 years while I finished a large cross stitch project. I prefer to use T-shirts (100%cotton only) as my medium. When learning to hook my instructor told me that T-shirt material was used in Newfoundland and Labrador more than wool so that is what I am used to. I used the photo that accompanied the pattern as a starting point for choosing my colours. I tried to hook the pumpkins in similar colours, then branched out on my own. I decided to add the moon in the upper right corner. I did not do any dyeing but did bleach out half of the most vibrant orange to do one of the pumpkins. All other material was used as is.

I have completed two other mats and finished a third. The bird rug was started by our Aunt Joan. She took hooking lessons at the age of 80. She was an artist her whole life primarily working with oil paints. it certainly shows in her rug. She completed the rug except for the binding just before her 86th birthday and passed away shortly thereafter. I did the whipping and binding to finish it off. It measures 21"x15". The stained glass/broken glass was my first rug. It measures 20"x15". The Rose Blanche Lighthouse was designed by me and was my second rug. It measures 16"x13". For my next project I have designed a rug suggested to me when I saw a photo of an old carpet bag. It will be very vibrant with a black background.


Picture
Rose Blanche Lighthouse 16" x 13"
Picture
Stained/Broken Glass 20" x 15"
Picture
Birds 21" x 15"
4 Comments

My Friend Jane

2/15/2013

2 Comments

 
"a room without art is like a body without a soul"
Picture


One of my favourite people to spend time with is my talented friend, Jane Rowberry. Jane is an artist specializing in acrylics and oils. She and three other women are the proprietors of a special gallery in Lunenburg aptly called Quartet. It is a wonderful, warm, bright and welcoming space...not a stiff, formal place that some galleries tend towards. I love to visit the gallery often to see their latest creations.

Although she has participated in a number of workshops over the years, Jane is mostly self-taught. While incredibly gifted with artistic talent, she shies away from thinking of herself as a true artist. I think she believes she can 'paint' fairly well but stops short of describing herself as an artist.

It has become a tradition over the past few years that we exchange Christmas gifts. She creates a painting for me and I hook a rug for her. This past Christmas I created a piece for her that would reinforce my belief in her artistry.

I had the idea of placing her among some of my other favourite artists. Say, Monet, Degas, Hopper, Lautrec, etc. I'd call it 'Artists of Distinction'. So I Googled, printed and enlarged their signatures, transferred them to red dot, then on to linen. I placed Jane's signature dead center, surrounded by
her more famous counterparts. And voila, my idea started to come to life!

Next, as background I wanted a wool that was very colourful and varied to represent the various hues of an artist's palette. So, I asked Shane and Christine to dye up a yard of 'Razzle Dazzle', which is one of my 'go to' wools. I try always to have a supply in my stash. I love colour and this is
simply yummy! I chose an antique red (really a deep rich burgundy) for the lettering which pops nicely. The background palette is hooked in a 6-cut and the lettering is a combination of 4, 5 and 6-cut.

I think Jane was very pleased with her gift. And more importantly for me, I think she finally got the message!

You can visit Quartet Gallery at www.quartetgallery.com.


By Guest Blogger Sue Cunningham


2 Comments

"If At First....." 

1/30/2013

2 Comments


The Story of a Jacobean Crewel Mat by Heather Gordon

Picture
If at first you don’t succeed, it is worth trying again.  The project I just finished (January, 2013), was begun in September, 2009.  This is my third attempt.  I love it and enjoyed every hooking minute but it wasn’t always this way.  For a couple of years it sat in a corner in a Rubbermaid container, where it was dropped when I got home from rug school.  I was frustrated and disappointed and never wanted to see it again. 

I had completed two previous Crewel projects – a bell pull and a lovely mat that Christine designed for me and named “Heather”.  The mat is quite striking with beautiful floral colours on a black background.  This time, my friend, Lesley Marshall, encouraged me to join her at another course and asked Christine to design a mat for her which was named “Lesley”.   Lesley finished hers right away, and you can see a photo on the Encompassing Designs web site and attached to the pattern.  Mine sat in a box.

Why did I abandon this lovely design?  Well, it had nothing to do with the design, which I loved – especially the centre medallion.  I think we have all had the experience of a project that just doesn’t come together.  I started with a vision.  This was going to be a traditional Crewel.  I could see it in my mind with the colours of those gorgeous embroidered panels in the Victoria and Albert Museum.  It would have an off-white or parchment background with gold, rust, olive, bronze, brown and teal motifs.  Instead of red, I would use variations of dusty rose or raspberry shades since strong reds don’t work in my house.   It just did not turn out that way.

My second attempt was a slight improvement on the areas that I had hooked.  I changed the colours in the central medallion and adjusted one of the floral motifs.  So much for that.  Back it went into the box.

I knew that I had some of the colours right.  Along the line, I had picked up some of Christine’s 3-value swatches.  Anjou Pear, Cranberry and Ganache worked well together but I still did not have the right teal and my rusts and browns were too strong.  I started to think about some of the colours that I had seen in the shop and for my gift to myself at Christmas 2011, I bought more 3-value swatches, adding Teal, Coppertone and the new Magic Mix that Shane had just invented.  Then I got out a variety of swatch remnants (some Jacobean blues, dusty rose, golds, plum colours and more greens) and got inspired.

Each year, I go on a 4 day retreat to White Point, a traditional lodge/resort on the South Shore of Nova Scotia.  There are 12-15 of us and we tend to either take a special new project or a project that challenges us.  I spent most of the time (aside from the eating and drinking part) colour planning and experimenting with crewel colour combinations.  It was great.  Colour planning is my favourite part.  By the time I left, the project was well on its way.

This was my main project last spring.  It was set aside in June so that I could design and hook 3 pieces for summer shows.  I did some hooking on it in the fall, alternating with more interesting pieces because by then, I was just working on background and borders.   Then, in January, I felt the need to finish it and here it is.


Picture
Picture
Colour Palette for Lesley, hooked by Heather Gordon

Main Swatches:  Anjou Pear, Cranberry, Teal, Coppertone and Max Brown

Additional Colours: Leftovers from previous projects including bronze, Jacobean dusty rose, some bluish teals, transitional gold/tans and a variety of greens and purples for the grapes. 

Background:  The first off-white I tried was too bright.  The second was too yellow.  The third was too drab and the fourth was JUST RIGHT.  It is a light solution of Max Brown, abrashed with a slightly stronger solution of the same colour.

Outer Border:  I used the same mid-value teal formula from Christine’s Sky Blue Pink dye book that I also used in the main field.  The next gold band is a mid-value of Max Brown, from the same book and this was also used in some of the motifs.  The outer band is a stronger value of the Teal.

Finishing:  Whipped with cording and natural Briggs & Little yarn dyed in the same dye bath as the outer border Teal.

Cuts:  Design motifs were hooked in #4 cut with #3 for the finer details. Most of the leftover swatches that I used are #3 because they came from my early hooking days when that was the standard for shaded pieces.  The background is hooked in #4.  I tried #5, but it looked too heavy for the design.  I did go to #5 for the first two sections of the outer border and I used #6 for the darker outer teal because it grounded the mat well.
Picture
Colours vary slightly from the above pictures from being taken with a different camera. The colours above are a truer depiction of the actual rug.
Picture
Another hooked version by Lesley Marshall, thehooker the rug was designed for.
Story by Guest Blogger Heather Gordon
2 Comments

Finishing Mary's Seashell Stocking

1/11/2013

1 Comment

 
By Guest Blogger Mary Doig

How to Make a Christmas Stocking
 
Of note:

If your stocking pattern is not already on red dot transfer material, see instruction number 5 below and make a template of it before you start hooking.

A warning – I am NOT a seamstress, so there may be easier or better ways to assemble a stocking. However, this system works for me, and I hope it works for you!

1.  Pattern and swatches are ready to go.  Linen is zigzagged twice approx 0.5” from the pattern lines.  To prevent raveling of the pattern, raw edges are zigzagged once.  Swatches are labeled with the dye formula, which makes it easier to dye more if the material runs out. 

2.  Hooking is in progress.  I am generally happy with how the colours are working out, although I think the strong purple line in the center of the starfish is too much.  Eventually it is changed to a beaded line of medium and light purple.

3.  Hooking is finished and has been pressed.

4.  Beading is finished.  New glass beads and pearls from a broken strand add some bling.

5.  Make a template for the stocking backing, by copying from the red dot pattern to newspaper, tracing around the stocking outline with sharpie marker to transfer the outline.  If you have not made your own pattern, I would advise copying its outline to red dot before you start hooking, using a china marker so as not to mar the pattern, and then use the red dot to complete this step.

6.  Cut out the newspaper template, adding ½” for seam allowance.

7.  Place the template on the material you are using for your stocking backing.  I use a piece of wool that has been dyed the main colour of my stocking.  Pin it in place and cut around the template.

8.  The stocking backing is ready for assembly.

9.  Cut the lining from a piece of cotton, doubled over.  Place template on cotton and pin in place.  Cut around template.

10.  Two pieces of stocking lining are ready for assembly.

11.  Tear one 10” x 2.5”  piece of material for tab.  I tear the material because it automatically finds the straight of grain.   I use the cotton lining fabric for the tab.  You may prefer to use wool.

12.  Cut excess linen away from the stocking front.  I cut about ¼” beyond the zigzagging around the stocking.  Make nicks through the zigzagging at the curviest parts, which will help in the next step when you press the linen to the wrong side.

13.  Press excess linen to the wrong side of stocking front.

14.  Stitch excess linen using a running stitch, to hold it in place.  Use a neutral colour thread and don’t poke the needle all the way through the hooking.  Stitching should not be visible on the right side of the stocking front.  On the way around the stocking, while stitching, reinforce the places that you have nicked through the zigzagging, to ensure that they won’t fray.

15.  Press ½” to the wrong side of stocking backing.

16.  Pin the stocking front and backing together, with wrong sides together.

17.  By hand, slip stitch the front to the back, stitching as close to the hooking as possible.

18.  Lining and tab:  Press ½” to the wrong side at the top of each lining piece.  With right sides together, stitch ½” seam allowance on sewing machine,  from the right hand top around to the left hand top of the lining, leaving the top open.  For tab, fold right sides together and stitch ½” across top and down the side, leaving bottom open.  Turn right side out (a chopstick is helpful for this) and press.

19.  Insert lining into the stocking, with wrong sides together.  Double the tab over to form a loop and slip it in between lining and backing.  Slipstitch together by hand, around the top of the stocking and through the tab, so the tab is secure.

20.   Tack at the heel, instep and toe by stitching a couple of stitches through the backing, lining and front.  This should be invisible.  It helps to hold the lining down inside the stocking.

21.  Stocking is finished!

Picture
1. Pattern and swatches are ready to go. Linen is zigzagged twice approx 0.5” from the pattern lines. To prevent raveling of the pattern, raw edges are zigzagged once. Swatches are labeled with the dye formula, which makes it easier to dye more if the material runs out.
Picture
2. Hooking is in progress. I am generally happy with how the colours are working out, although I think the strong purple line in the center of the starfish is too much. Eventually it is changed to a beaded line of medium and light purple.
Picture
3. Hooking is finished and has been pressed.
Picture
4. Beading is finished. New glass beads and pearls from a broken strand add some bling.
Picture
5. Make a template for the stocking backing, by copying from the red dot pattern to newspaper, tracing around the stocking outline with sharpie marker to transfer the outline. If you have not made your own pattern, I would advise copying its outline to red dot before you start hooking, using a china marker so as not to mar the pattern, and then use the red dot to complete this step.
Picture
6. Cut out the newspaper template, adding ½” for seam allowance.
Picture
7. Place the template on the material you are using for your stocking backing. I use a piece of wool that has been dyed the main colour of my stocking. Pin it in place and cut around the template.
Picture
8. The stocking backing is ready for assembly.
Picture
9. Cut the lining from a piece of cotton, doubled over. Place template on cotton and pin in place. Cut around template.
Picture
10. Two pieces of stocking lining are ready for assembly.
Picture
11. Tear one 10” x 2.5” piece of material for tab. I tear the material because it automatically finds the straight of grain. I use the cotton lining fabric for the tab. You may prefer to use wool.
Picture
12. Cut excess linen away from the stocking front. I cut about ¼” beyond the zigzagging around the stocking. Make nicks through the zigzagging at the curviest parts, which will help in the next step when you press the linen to the wrong side.
Picture
13. Press excess linen to the wrong side of stocking front.
Picture
14. Stitch excess linen using a running stitch, to hold it in place. Use a neutral colour thread and don’t poke the needle all the way through the hooking. Stitching should not be visible on the right side of the stocking front. On the way around the stocking, while stitching, reinforce the places that you have nicked through the zigzagging, to ensure that they won’t fray.
Picture
15. Press ½” to the wrong side of stocking backing.
Picture
16. Pin the stocking front and backing together, with wrong sides together.
Picture
17. By hand, slip stitch the front to the back, stitching as close to the hooking as possible.
Picture
18. Lining and tab: Press ½” to the wrong side at the top of each lining piece. With right sides together, stitch ½” seam allowance on sewing machine, from the right hand top around to the left hand top of the lining, leaving the top open. For tab, fold right sides together and stitch ½” across top and down the side, leaving bottom open. Turn right side out (a chopstick is helpful for this) and press.
Picture
19. Insert lining into the stocking, with wrong sides together. Double the tab over to form a loop and slip it in between lining and backing. Slip stitch together by hand, around the top of the stocking and through the tab, so the tab is secure.
Picture
20. Tack at the heel, instep and toe by stitching a couple of stitches through the backing, lining and front. This should be invisible. It helps to hold the lining down inside the stocking.
Picture
21. Stocking is finished!
1 Comment

Seashell Christmas Stocking

1/11/2013

3 Comments

 
by Guest Blogger Mary Doig
Picture
This design was inspired by Dr. Krista Ritchie, the wonderful bonus daughter that fate brought to me (the term stepdaughter always sounded too wicked stepmother-ish).
 
I am working on a multi-year plan to make each member of my family their own Christmas stocking, of their own design/vision. Krista wanted a seabed still life – including a skinny starfish, sea grass, sand dollars and urchins.  She envisioned a dark blue background with little dots of plankton that would also resemble stars.  And although she was very clear with her directions and even provided me with sketched templates, I struggled with the actual design. Christine came to my rescue – it was like magic seeing her draw exactly what I (and hopefully Krista!) wanted.
 
Colour planning was fun.  The starfish was red, for a Christmas feel.  Other than 3 value swatches in red and blue for the starfish and background respectively, 6 value swatches were used.   Blue green to yellow transitional for the sea grass, purple to orange transitional for the  scallop shell, light brown for the sand dollar, blue to orange reverse transitional for the mussel shells, although colours from the other swatches were used in the mussels to mimic iridescence.  To add another bit of red, because the red was all alone in the starfish, the spines of the urchin were made red, and some of the orange to purple transitional was used for the urchin shell.   Originally I thought I’d use recycled greys and browns from my stash for the rocks, but since there were so many unused swatches with the dyeing I had done, it seemed a good opportunity to have neutral colours that matched the rest of the colours by using the mid values of these swatches.
 
I bought some dark blue yarn with a silver sparkle to make the stars/plankton with, but wasn’t happy.  It was too fat.  When I told Christine of my plan to add hooked beading to the central lines in the starfish, she thought ****sparkle**** (you know she’s a huge fan of sparkly things)…and had the idea of real beading for accents.  Not only is Christine a hooker, she is an accomplished jewelry maker, so she had a huge selection of beads to choose from.
 
Then that gave me the idea to place a pearl in the scallop shell, using a loose pearl from a broken string of my mother’s. My mom loved Krista very much and was also a big fan of sparkle, so I thought it would be extra special to add this as a little gift from her that Krista would have every
Christmas.   Christine suggested 4 mm Aurora Borealis Swarovski Crystals for the plankton.  All the beading embellishments were added after the hooking was completed and pressed.
 
Hooking was done in a three cut.  Fine shading in a three isn’t my first love, but I thought that it would help show off the shells better than a primitive cut would.  I followed a lesson learned from Jane Halliwell Green via her pictorial class (and books) – anchor objects by starting dark at the bottom and moving to light at the top.  This technique also helps to define objects against one another as your eye moves up the piece.
 
The top of the stocking was hooked with natural soft curly mohair, doubled up, from the Fleece Artist.   Years ago I purchased a skein from Christine, and it has lasted forever!
 
Finishing:  Stay tuned for tomorrow's blog by Mary Doig

Picture
The design!
Picture
Transferring the design to red dot at the hook-in.
Picture
Colour planning with swatches.
Picture
Beginnings!
Picture
Ruby says,"I think I would like this stocking for me so Santa can bring some treats. I've been an awfully good girl this year!"
This pattern is available on Mary Doig's page of this website. 

Picture
A picture after the bling was sewn on. Crystals for the plankton, a pearl for the shell, and red/orange crystals down the center ridge of each the starfish leg.
3 Comments

'Stocking The Chimney' by Della

1/10/2013

7 Comments

 
Picture
I loved hooking this Christmas Stocking called "Stocking The Chimney".  Your website is wonderful, lots of pictures and you've been posting pictures on Facebook and I saw the partially hooked Stocking The Chimney you were working on and knew right away I NEEDED to do that rug.  lol

I love geometric designs and when I saw your brick work I thought oh my, that is beautiful, I'm  going to pay close attention to try to figure out what Christine did so I can do  the same! I was very pleased with my resulting brick work.  I had some overdyed  burgundy that I thought would look  great as the bricks, it was an old skirt from  Frenchys' and the grey was also recyled wool from Frenchys' probably a skirt as  well.

You've commented about Santa's jacket on Facebook, I struggled getting the  'right' shade of red for his jacket.  I've recently been learning to dye wool  using the Wooly Mason Jar method but knew the shades for that weren't going to  be a deep enough red.  I tried some Pro Chem and Majic Carpet two different  shades of red and didn't find it was going to be 'right'.  So back to my stash I  went and found
what I thought would work best for the jacket, it was something I  purchased at some point, looks to be spot dyed.

I've been hooking since  2007 and I don't think I've ever done a human face so I did what I thought  looked right but the nose bothered me.  I tried bright red, then pinkish then a  light brown.  I
haven't sent you a pic of the nose changed back to the original  red I had started out with.

I've decided that I will probably try to do  one Christmas sock each year for my family members but this one will be for  me!  Thanks for the pattern and it helps seeing the patterns hooked, it  inspires one to do it! Keep up the good work.     Della

By Guest Blogger Della Ackles

Picture
A closeup of the items in Santa's goodie bag.
Picture
Ribbon I used for the Christmas present in Santa's sack.
7 Comments

A Passion for Paisley

1/8/2013

10 Comments

 
An Adventure in colour planning, colour matching and dyeing with swatches.
By Guest Blogger Mary Doig
Picture
Isn't this rug spectacular?! Stay tuned for more pictures as Charlene heads for the finish line!
A few weeks back, my friend Charlene asked me to help her with some dyeing for a new project. 
She had designed a lovely paisley rug, and was looking for some input on colour.
 
Charlene had some initial ideas for a colour plan – she wanted to try something different from the usual clear, bright colours that she works in, and use more muted yellows and orange/reds and green. She also wanted a bit of “poison”, as had been discussed in her rug school class on
paisleys.  As part of her rug class experience in paisley design, she had coloured in a copy of her original pattern sketch.
 
Here’s what we did:
 
We met the night before our dye session to make the action plan.   I brought swatches; since I started dyeing years ago, I have been saving approx 2”x 5” samples of every dye formula.  The name and formula is attached to each swatch with a safety pin, so it’s quick and easy to refer to
when dyeing.  
  
We put all the swatches out on the table, and Charlene picked the colours she had thought about for the rug.  We stowed away the rest so we wouldn’t get confused.   Of the colours on the table, she then discarded the colours that weren’t pleasing to her eye.  What she was left with was colours that she liked, and interestingly, they all coordinated well.  Then we determined the values she wanted of each colour – light, medium or dark.  
  
Charlene intended to use primarily recycled wool, so from her stash, we picked what would be best to overdye for each colour. We used recycled white for the lightest value, which was to be a soft mottled gold for background.  Because she wanted darker versions of the gold for borders and outlines, we chose a soft yellow to overdye for medium gold and a darker tan for the darkest gold, which would be the outline value.  Recycled light orange was chosen for an orange abrash, and recycled lime green for a mossy green abrash, spotted with hints of rust.   We used the same recycled orange to overdye two values of red abrash.  Some new cream and white textures were used for a sunny yellow and for a rich eggplant.  The eggplant was to be the poison.   At the same time we were choosing the wools to overdye, we were also measuring (by covering the hooking area four times over with wool, because she hooks her loops quite low) to ensure she won’t run out.  After that, along with two glasses of a delightful Pinot Grigio, we were
done for the night.
 
Charlene was super organized – she soaked her wools overnight in water and dish soap, in separate bowls, and beside each she laid the swatch for the colour that the wool was to be dyed.  The next morning we used the open pan method to dye each one in sequence.  We kept notes, because occasionally we had to amend a formula slightly, to account for the colour we were
overdyeing.   Overall, it went like clockwork – as one dye lot was setting, we were preparing the next one.  Charlene has served in the military, and the phrase for that type of action is “working concurrently.”  We were lean, mean, dyeing machines (well, Charlene is lean, me not so much, but I make up for it in mean).  It was a beautiful fall day here in Nova Scotia, perfect for outdoor drying, so Charlene was hanging our handiwork up on the clothesline as I worked concurrently in the dyepot.
 
We needed two further dyeing sessions after the initial one….the lightest gold value, to be used for the background, turned out to be too bright.  As the late Dorothy Haight, oriental rug hooking guru, would say – it “jumped,” meaning that it didn’t blend well with the other colours.   So we took it back to the dyepot and overdyed it with a dilute brown/black combo – what I call my “toning down wash.”  I always have a jar on hand, for just this kind of occasion.
 
And then Charlene decided since she liked the eggplant so much, she wanted to use more.   She had a couple of different recycled purples (one was more blue than the other) that she wanted to overdye.  Since the colour we were trying to match was already very dark, we knew there was room to darken the recycled purple more while we tried to get it to the right eggplant colour.   We threw the recycled purple wool into the dye pot, and by eye, added red brown.  It was still too purple-y, so we had a look at the colour wheel, and decided to add yellow as the complement to “brown it down” and that worked well.   When all her eggplant is line-dried, she’ll mix it together and it will be spectacular! 

Here’s a picture of Charlene’s colours, her pattern with a bit of the hooking done, as well as her initial sketch and colour plan of her pattern.  The eggplant looks black in the picture, but it is really a delicious dark red/brown/purple shade.
Picture
Looking forward to seeing the finished rug!    by Guest Blogger Mary Doig

A Passion For Paisley - Designed and hooking by Charlene Scott
Pattern is available

10 Comments

Women of Abundance

1/3/2013

3 Comments

 
As 2012 fades and the potential of twelve new hooking months stretch before me, I already find myself busy colour planning the first of what I hope will be many lovely hooked rugs in 2013. This past year was a busy hooking year for me with 39 projects completed.... mermaids, sock monkeys, roosters, clipper ships, compass roses, and of course......abundant women. Some have been commissions, others presented as gifts by me to special friends and family members while a number have been purchased off the frame as they are completed. Understandably, several are close to my heart and will remain in my private collection never to leave home.

Before closing the door on last year's projects Christine asked that I share the last two rugs of 2012 from my Women of Abundance series. I love working on these gals. They make me smile. They seem to take on lives of their own as I take hook to wool and backing. Each has her own distinct personality. Without a doubt 2013 holds the promise that more of these wonderful gals will find their way to my frame. Enjoy!

And Happy Hooking New Year!

By guest blogger Sue
Cunningham
Picture
Chunky Dory...I love this one so much I bought it! Everything about it is bang on. The design, the colours, the friend who hooked it, the smile on my face every time I see it. The water behind the boat has a lot of movement even though it was hooked straight across, not easy to do and very effective.
Picture
Very Cheeky...Wow, look at all those beach bums! What fun! This time Sue added a bit of texture with mohair boucle for the hair, cloud in the sky and white caps on the water. I love the colourful bathing suits, they have a life of their own. You can almost feel the summer breeze and the sun on your face. There's something magical about these gals that make you smile every time! I so love the sky with its stylized cloud and waves slapping the shore.
3 Comments

Sewing the back on a Christmas Stocking by Bonnie Duncan

12/17/2012

1 Comment

 
Picture

Let me first say that I would rather hold a rug hook anyday
to a sewing needle!

Steps:

    1. Hook the stocking


    2. Leave 1 ¼” edging for finishing

    3. Insert cording and whip the stocking with a 2 ply yarn

    4. Choose a suitable backing, wool preferably, and cut all around the shape of the stocking ½” larger than the stocking itself, except for the top you can leave 2”.  You need to cut out two pieces if you want the stocking to be lined.  I use a wool skirt for my backings because I recycle the waist band to use as the hanging tab.  Remember I don’t like sewing!

5. Put the two cut pieces of wool together and fold the edge over by ½”.  Nestle it tightly up against the whipped edging from the back of the stocking and push your needle through until it comes out the crevice between the last row of hooking and the whipped edge on the top part of the stocking.   Your stitches, embedded in the crevice, will be nicely hidden on the front side of the stocking.  

6. Fold the extra amount you left for finishing the top down and inside on the front and back side of your stocking.  The front can be sewn into up against the back side of the whipping just like the sides, in the crevice. 

7. Attach a tab for hanging on the top left side. 

I like to leave a 2” opening at the top left side of my stockings between the front lining and the backing.  This is to allow for extra opening space to put in those larger presents.  I then attach my shirt waist band to the back of this opening and the other end to the front. 

Voila a finished stocking my way – Bonnie Duncan


1 Comment

Ruby by Mary Doig

11/26/2012

1 Comment

 
Picture
Ruby the Welsh Terrier
Christmas Stocking
 
We adopted Ruby as an adult dog three years ago and she is a delight!   If only she liked other dogs, she would be perfect. 
 
I decided that I would make a Christmas stocking for each member of our family, of something that was special to them. So Ruby is on my
Dad’s.   He often tells her what a special little person she is. And she knows it.

I took a class in animals with Elizabeth Black at the Rug Hooking Guild of Nova Scotia’s Truro school.  She is an excellent teacher.  She helped me simplify my pattern (removed the pattern on Ruby’s leash – too busy for a small work, and removed the NS tartan kerchief that Ruby was wearing – also too busy).  She suggested the abrashed turquoise background that turned out to be perfect for it.  I can’t even remember now what colour I initially had planned, but it was no match for the turquoise.   Before rug school, I played around in the dye pot a lot to find the right colours for Ruby.  I finally decided on a black to reddish brown reverse transitional swatch – 10 values. It’s amazing how close it is to her coat.
 
My dad really likes his Christmas stocking, and I think Ruby is quite pleased with it, too.

By Guest Blogger Mary Doig


1 Comment

Mona Lisa Christmas Stocking by Mary Doig

11/7/2012

2 Comments

 
Picture
The Mona Lisa on a Christmas stocking??

That’s what they said at Rug School.  But I did it anyway.

In my quest to make a stocking for each of my family members, I gave everyone a paper cutout of the life size stocking and told them to draw what they wanted on it.  And then nobody got back to me.  So I decided to make my own stocking.  I’ve always loved the Mona Lisa, and have visited her twice at the Louvre.  She is much smaller than you would think, so it is not such a great leap that she would fit nicely on my stocking.  I like to think that Leonardo would be okay with it.

I found Mona’s picture on the internet and had our local print shop blow it up several sizes on regular paper so I could find the one that fit my stocking outline the best.  I drew around the main contours on the paper with Sharpie marker and when I flipped the paper over, there was my pattern, in reverse.  I copied it with red dot, reversed it and copied it to the stocking template.    Voila.  A pattern.  With Mona facing the right way.  I had a bit of an empty space at the toe, where I put in our shared initial M, in a Renaissance font.

The next challenge was the dyeing.  This is my favourite part of hooking.  I did six to eight value swatches of my own variations on  antique bronze, blue green, sandy yellow, and antique red.  I overdyed recycled grey with the bronze and red, and the rest was new Dorr wool.  I wanted to make the closest match I could to the rich tones in the original artwork.

I was fortunate enough to be accepted into Michele Micarelli’s Portraits class at Nova Scotia Rug Hooking Guild’s Truro rug school.  She is a very entertaining and informative teacher and I hope I get a chance to take her class again.  She helped tremendously with Mona’s face – the tip that I will remember if I do another portrait, is that you can shade the face with darker values of other colours in the rug, rather than a darker shade of flesh tone.  It worked really well for Mona, to have her lighter facial tones in cream and light olive, and then the shadows in medium bronze.  I never would have thought of that without Michele.  I was also flummoxed about the background – thinking that the scenery behind her might be too much detail for a stocking, so thought I would take it out altogether and make the background all dark red.  When I asked Michele’s opinion, she said “don’t you think she’d be happier in her home?”  She was right. 

We had a wonderful class.  On our show and tell night, one of the other students brought in a giant cardboard poster of Mona, with her eyes and hands cut out.  So we took turns sitting behind it, watching through the eyeholes and with hands crossed on our laps through the handholes, startling onlookers as they walked by.  Too much fun!


Guest Blogger Mary Doig


2 Comments
<<Previous
Forward>>
    Picture
    Picture
    Picture
    Christine Little has been ranked #5​ out of the 60 top rug hooking bloggers by Rug Hooking Magazine!

    Picture
    Picture
    Max Anderson, Australia, recipient of my Nova Scotia Treasures rug.  An award of excellence for promoting Canada through his writing.  
    Picture
    Picture

    RSS Feed

    Archives

    May 2025
    March 2025
    February 2025
    August 2024
    January 2024
    May 2023
    April 2023
    March 2023
    February 2023
    January 2023
    July 2022
    March 2022
    February 2022
    January 2022
    November 2021
    October 2021
    July 2021
    March 2021
    February 2021
    January 2021
    December 2020
    November 2020
    September 2020
    August 2020
    June 2020
    May 2020
    April 2020
    March 2020
    February 2020
    December 2019
    November 2019
    October 2019
    September 2019
    August 2019
    July 2019
    May 2019
    April 2019
    March 2019
    February 2019
    January 2019
    December 2018
    November 2018
    October 2018
    September 2018
    August 2018
    July 2018
    June 2018
    May 2018
    April 2018
    March 2018
    February 2018
    January 2018
    December 2017
    November 2017
    October 2017
    August 2017
    July 2017
    June 2017
    May 2017
    April 2017
    March 2017
    February 2017
    January 2017
    December 2016
    November 2016
    October 2016
    September 2016
    August 2016
    July 2016
    June 2016
    May 2016
    April 2016
    March 2016
    February 2016
    January 2016
    December 2015
    November 2015
    October 2015
    September 2015
    August 2015
    July 2015
    June 2015
    May 2015
    April 2015
    March 2015
    February 2015
    January 2015
    December 2014
    November 2014
    October 2014
    September 2014
    August 2014
    July 2014
    June 2014
    May 2014
    April 2014
    March 2014
    February 2014
    January 2014
    December 2013
    November 2013
    October 2013
    September 2013
    August 2013
    July 2013
    June 2013
    May 2013
    April 2013
    March 2013
    February 2013
    January 2013
    December 2012
    November 2012
    October 2012

    Picture
    Picture
    Gift Certificates are available for that special rug hooker in your life!  Any denomination, no expiry date! 

    Categories
    (Click on the categories for past blogs)

    All
    Announcements
    Beginner Class
    Christmas
    Colour Planning
    Contests
    Copyright
    Coupon
    Customer Rugs
    Cutter Servicing
    Dyeing
    Equipment
    Featured Hooker
    Giveaway Draw
    Guest Blogger
    Guest Blogger
    Health & Fitness
    Home & Heart
    Hooked Rugs
    Hooking Groups
    Hook In Talk
    Initially Yours
    Jibber Jabber
    Just A Bit Of Fun!
    Life's Experiences
    Life's Experiences
    New Design
    New Ideas
    Pattern Of The Week
    Patterns Hooked
    Pets
    Rants
    Recipes
    Rememberingfbe7326ff7
    Rug Schools
    Show & Tell
    Show-tell
    The Rant
    Tips Technique
    Tips Techniquef0cd117ab4
    Visitors
    Workshops

    Picture
    Picture
    Picture


    Picture
    We have a pot to "Fiz" in!

Shop Hours:
Monday - Friday 10:00 AM - 5:00 PM 
Saturdays 12:00 PM - 4:00 PM
We are closed during ice and snow storms
​so please call ahead.  If school is cancelled we probably are closed as well.  

Toll Free: 1-855-624-0370
Local:  902-624-0370​
[email protected]

498 Main Street
P.O. Box 437
Mahone Bay, N.S.
Canada B0J 2E0

​Follow us and keep up to date
on our specials, new products
​and events!
Picture
Picture
Picture


Home
Shop
Ordering
Blog
Our Story
Workshops

Contact Us


​​​© Copyright 2023 Encompassing Designs. Website by SKYSAIL